

Home of K-fab

|
|
|
|
The Mini-Raptor
I want to acknowledge a group of friends that have helped me with the design, development and building of the Mini-Raptor.
I've known them for quite a few years now via the Minibuggy.net forum.
We're all a bunch of desert rats, racers, engineers and damned good friends. (well... Bullnerd lives in Joyzee and Gareth in Ballarat, Australia so they're not quite desert...)
Justin - JD66 on the forum. Excellent Mechanical Engineer and quick on a bike in the desert.
Jesse - Flyerrider on the forum. Flyer is an Action Hero (always has the clothing for the occasion), smart as shit and slightly twisted - which is why he's my friend. He's not allowed to ride dirt bikes with me anymore. He seems to crash when we go out in the dirt.
The Wizard - bdkw1 on the forum. Pretty much one of the smartest people I know across an incredible array of topics. He's also an instigator of epic proportion "You should build it 'this way'" as he gives you this smirk... And he does the perfect "I'm a turtle" when you ride dirt bikes with him.
Mike - Bullnerd on the forum. You've been eyes, critic, comic and crashed your dirt bike in your front yard on the maiden voyage. (I was NO WHERE NEAR HIM when he went down!). Bull got smart and switched to a 350 after that too.
Lastly I can't leave out Gareth - TALON on the forum. Owner and Second Chief Honcho (First Chief Honcho at B&B is his wife, Wendy) of B&B Off Road Engineering. Look around Yellow Dog Racing and you'll find my appreciation of TALON here on my web pages. TALON falls over in deep, flowing creeks on dirt bikes and finds cholla cactus at night.
And so begins a project that I had no clue how long was going to take.
How much fun and frustration it was going to be and give me.
How much pride it's instilled and how much it's taught me and continues to do so.
2016 build
2017 build
2018 build
2019 build
2020 build
2021 build
2022 build
2023 build
I came across a thread on the Minibuggy.net site a little over two years ago. It showed a mini pre-runner body based on a full sized pre-runner Ford Raptor. Ben from Knine Racing was doing this project. It was designed to fit the Polaris XP900. I was hooked the moment I saw it.
Quoting Ben
"I scaled/detailed it the best I could to the Ford Raptor body and really used the luxury pre-runner 'Raptors' built by Stewart's Raceworks to get the 'trophy truck' style."

The Real Raptor Pre-Runner |

Ben's Concept Vehicle |
Feb 5, 2015
So back in February of 2014, I started planning. I should have been diligent about chronicling my progress here on my site but alas, I was lazy and did it on the Minibuggy forum (since I run the forum) and was in the process of moving from Ohio to Arizona.
The project has taken a while to get moving and a massive amount has changed since the beginning. Now it's full steam ahead and the build begins.
I've linked to the beginning of the build, but the first 560 or so posts in the thread are original concepts, conversations with members of the forum and such. The present stuff starts around post 580. Go read if you want, if not, stay here and watch it proceed without all the filler.
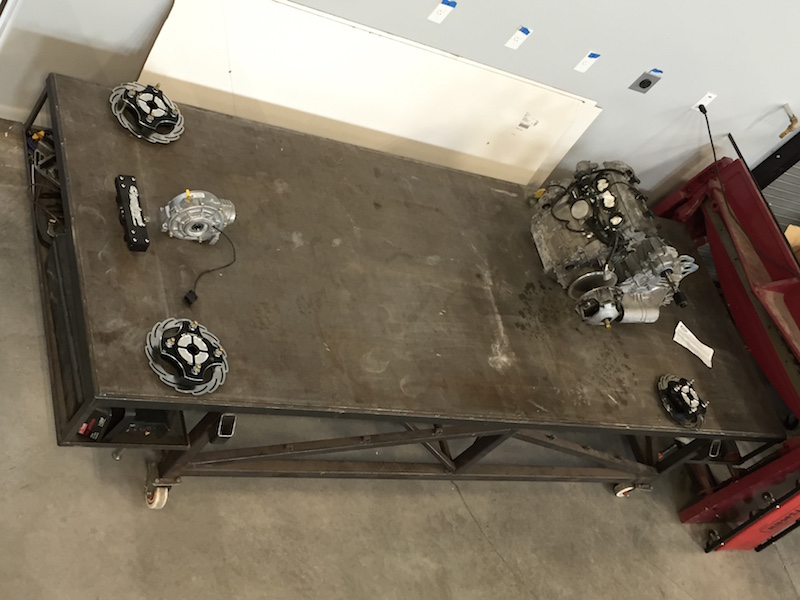
The Components:
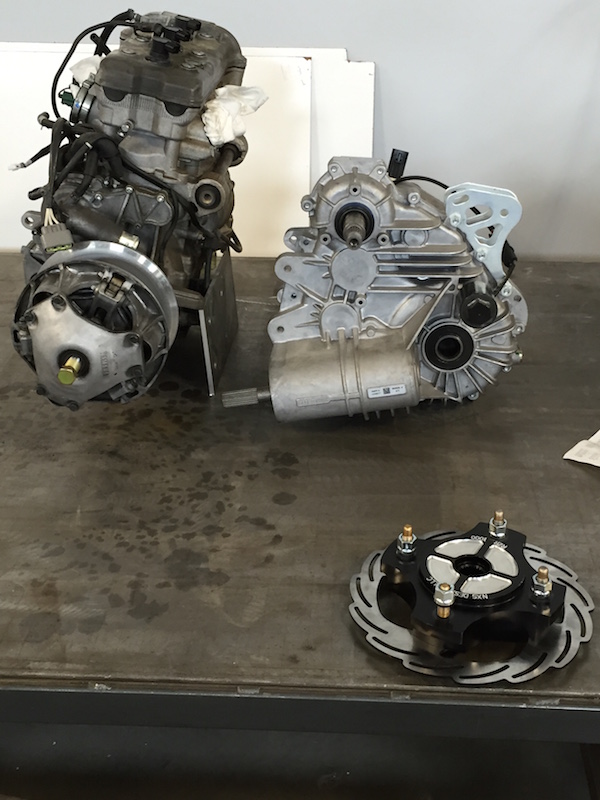
Powerplant: - Yamaha Nytro Sled engine with MPI Supercharger. 1053cc, triple. Stock they make about 135 hp with a wide and flat torque curve. Supercharged they're capable of over 200 hp without much work, 300 hp with minor mods.
Transmission: - Polaris XP1000 drive train. This includes a CVT drive train with a transmission that has park, high, low and reverse. The transmission is out of the international XP, so it also has a locking rear differential. Open the diff for street, lock it for the dirt. Up front it has an open diff that's activated with the flick of a switch for four wheel drive. Originally I'd planned on using the tried and true RPM gear box and having this be a two wheel drive vehicle, but a weekend running around in Quartzite, AZ in my XP900 and one particular hill made me go "Hmmm… two wheel drive will NOT make it up this rocky, nasty trail." It was during that ride that I realized the Mini-Raptor needed a different drive train and the four wheel drive concept was put in place. The XP1000 drive train has proven very reliable and the ability to purchase off the shelf parts made it a no brainer.
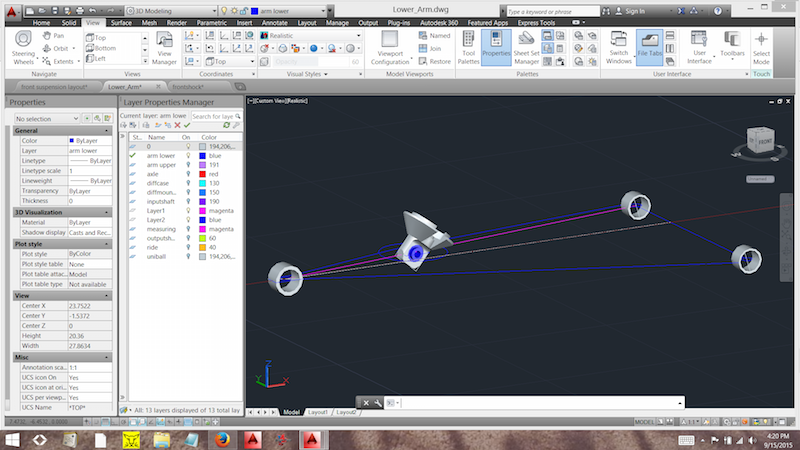
Axles:
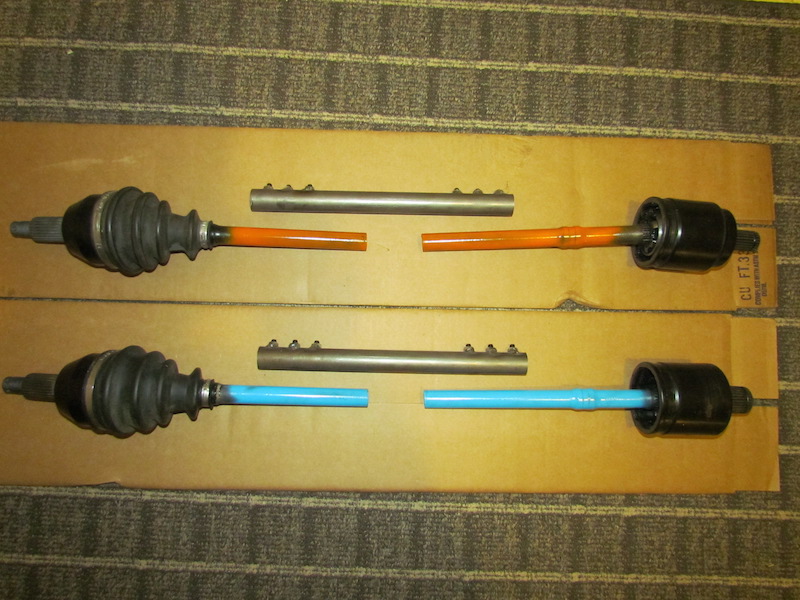
Knine Racing custom XP1000 axles and cv joints.
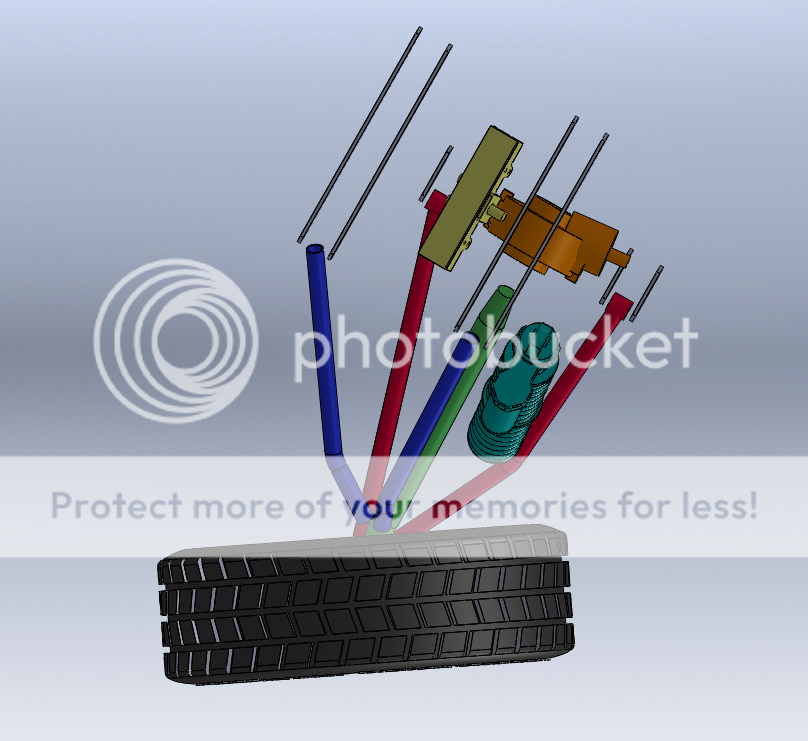
Shocks:
Revolution Racing 2.5" Evo's up front - 12" stroke, 3.0" Evo's in back - 14" stroke.
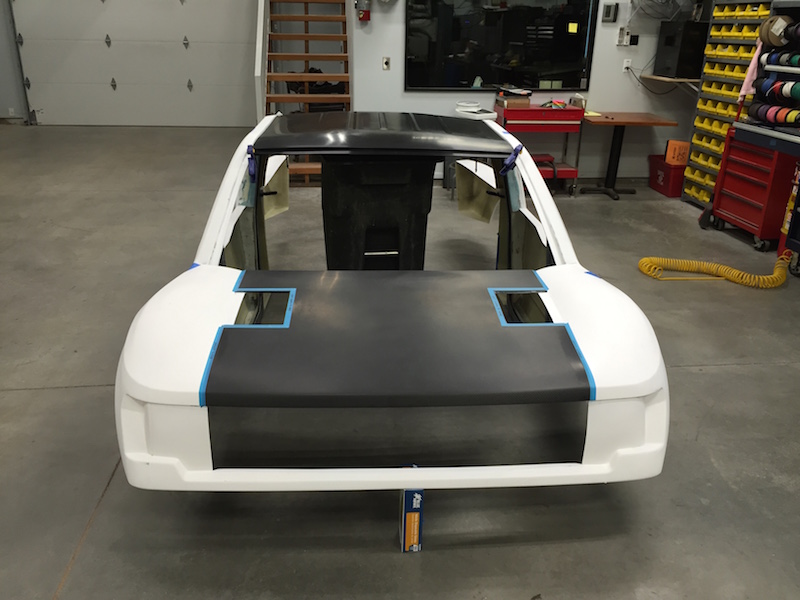
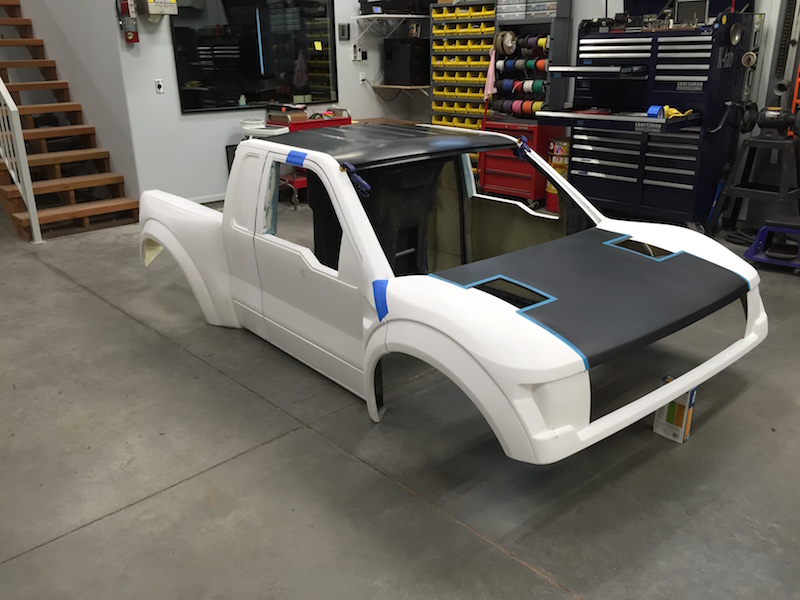
Bodywork:
Knine Racing Mini-Raptor special. Custom widened just for this project. Thank you Ben!
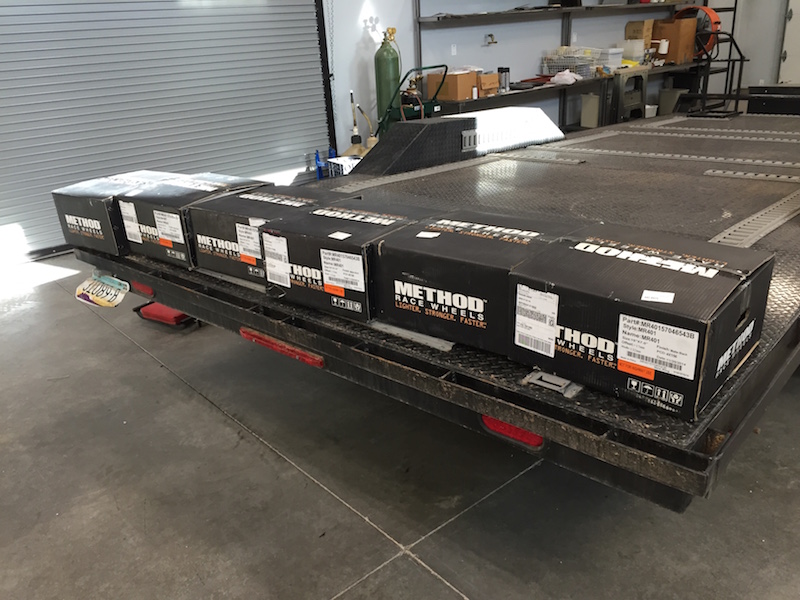
Wheels:
Method Racing Black 401 UTV Beadlocks 15x7, 4 on 156 bolt pattern
Tires:
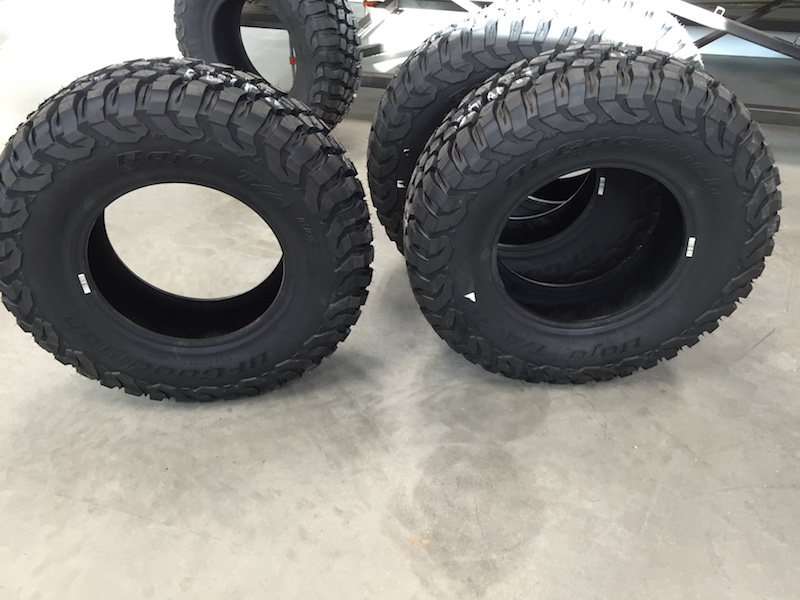
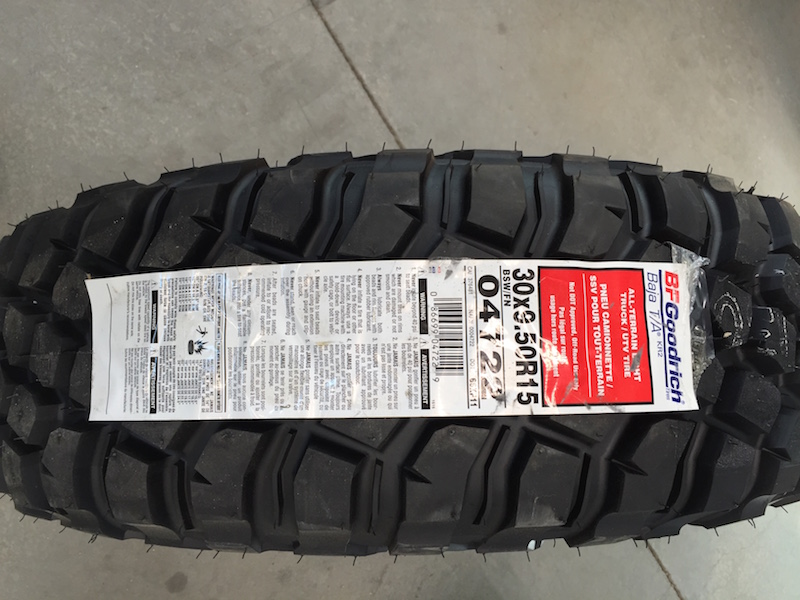
BF Goodrich KR2 UTV tires in 30x9.50r15.
The Specs:
Dimensions:
92.5" wheel base
74" overall width
Not sure of overall body length or height yet.
Suspension:
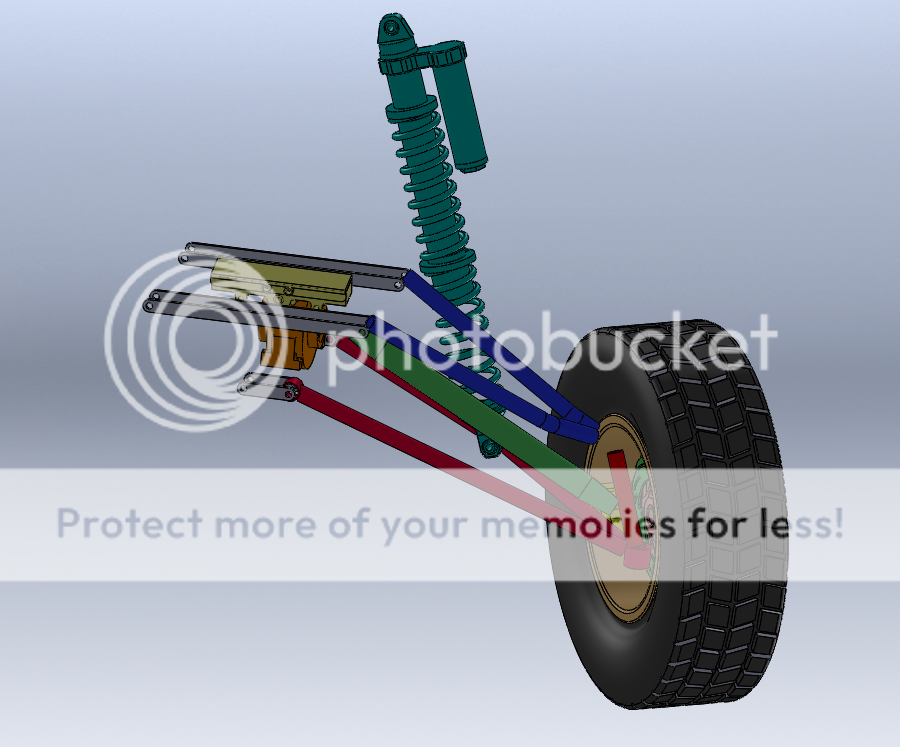
Front - Unequal length a-arms, Boxed lower, possibly billet upper. 19.75" travel.
Rear - Four link trailing arm system. Boxed arms. Somewhere in the 20" travel range - it's not designed yet.
Weight:
Hopefully between 1500 and 1700 lbs.
The Build:
This is going to take awhile to get all put together. I'm having to wade through 2,646 posts from the build thread in Minibuggy.net's Mini-Raptor Build Thread
May 29, 2015
Got a phone call from Benihana a couple of days ago.
Axles are on the way - now I can start designing the suspension. I already have a bunch of crap laid out on the table sort of in place, other than being on the narrow side. Once I get the axles, I'll be able to lay out the stuff in actual place.
Flyer asked how big the engine is:
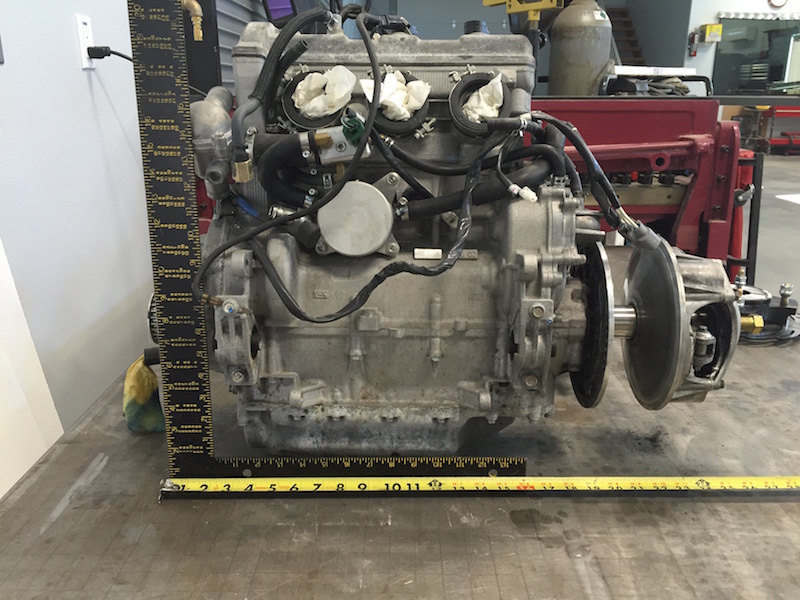
Bodywork is still at least three weeks out. Ben asked if I minded if they pulled a couple of plugs off of the doors. I said go for it.
June 20, 2015
From Benihana
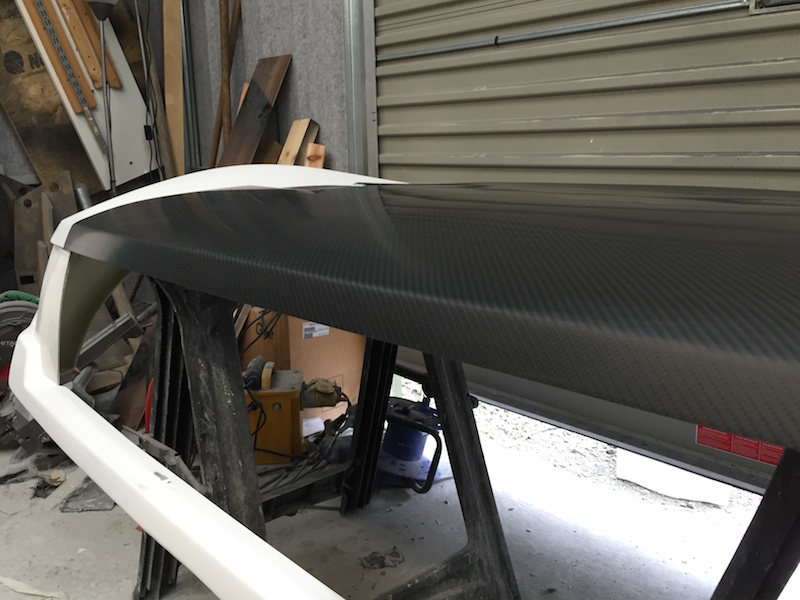
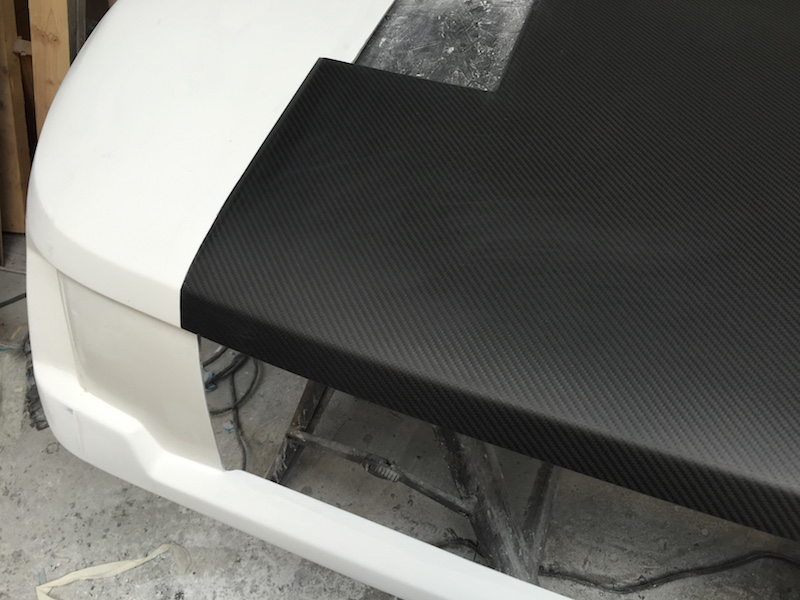
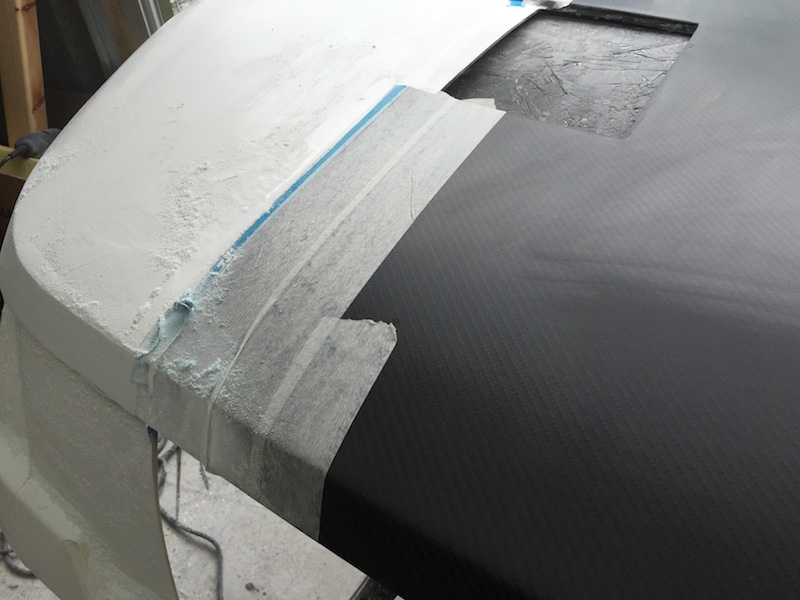
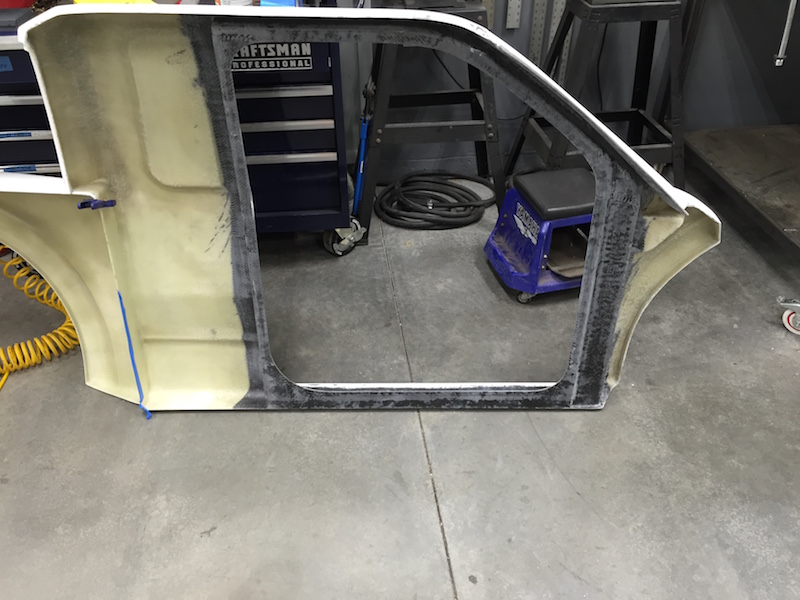
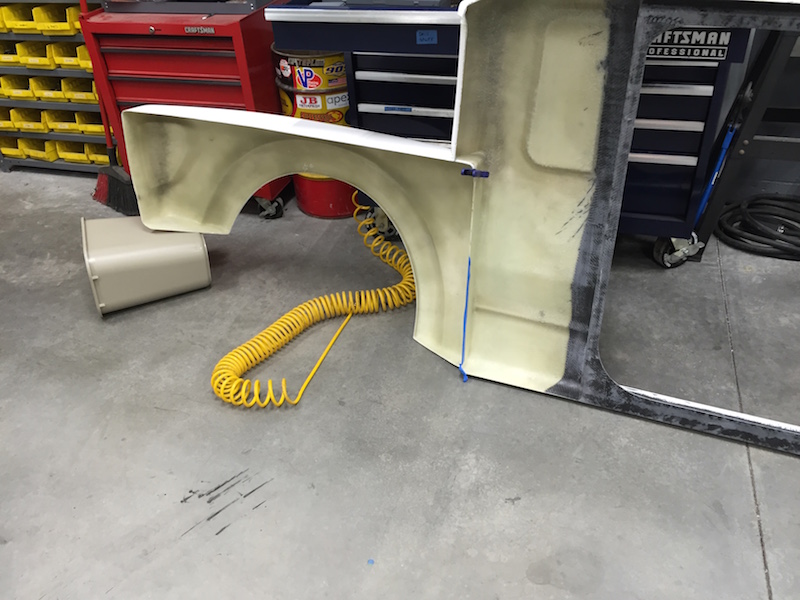
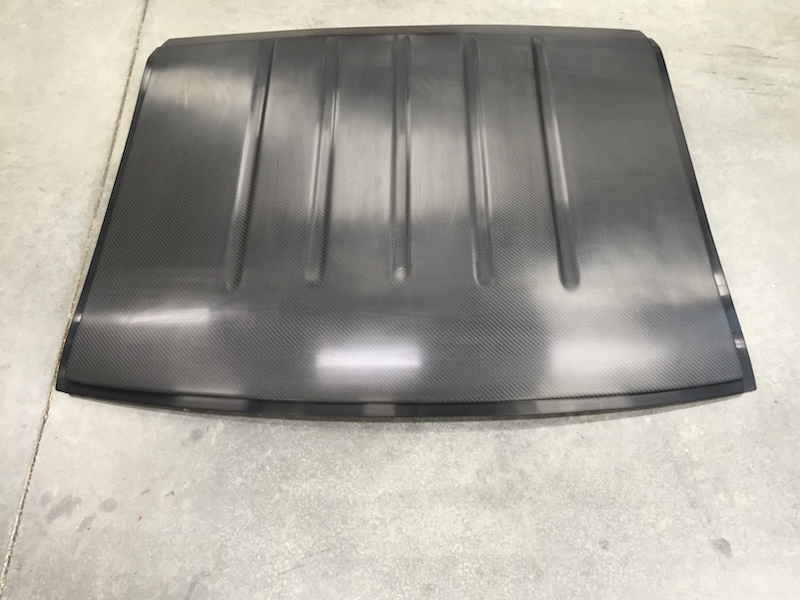
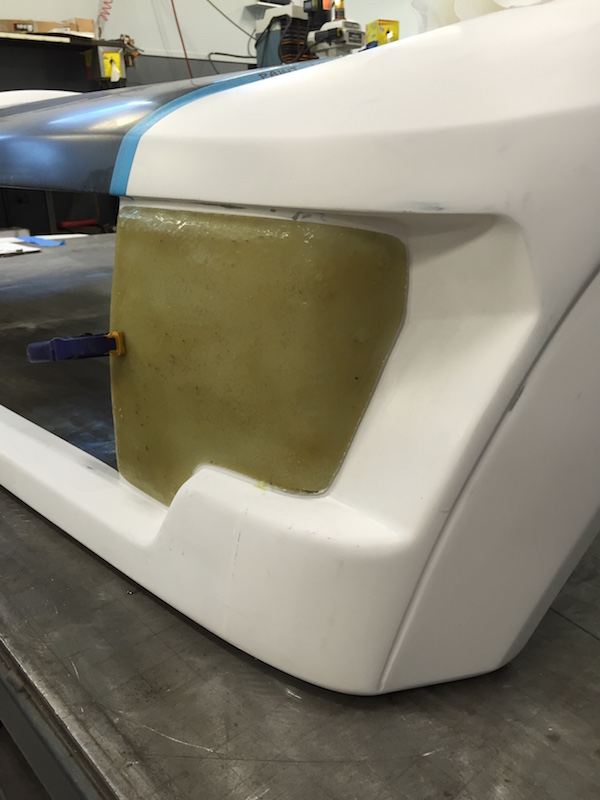
Good God your shop looks nice. End is in sight for the body works! Was hoping to finish this weekend, but still have a lot of little things that will add up...goal is to have it crated by Friday. Won't clog your thread with a bunch of composite talk, but here's a little of my favorite piece. Front clip has a bit of everything in it. The carbon hood section with matching roof are killer. My molds are only made for a ~65" track and K-Fab needed ~75" so we had to section the front end & roof exactly 10". Did the roof first as it was easier, but learned a lot there, so the front clip went pretty well.
I molded the fenders normal process, full layers of glass, but only did 1 light layer of glass on the hood section, just enough to hold the shape. Then cut it in half

Used the mold to make the 10" center section and pieced it together. Then flipped it over and used 1 more light layer of glass to hold it all together.
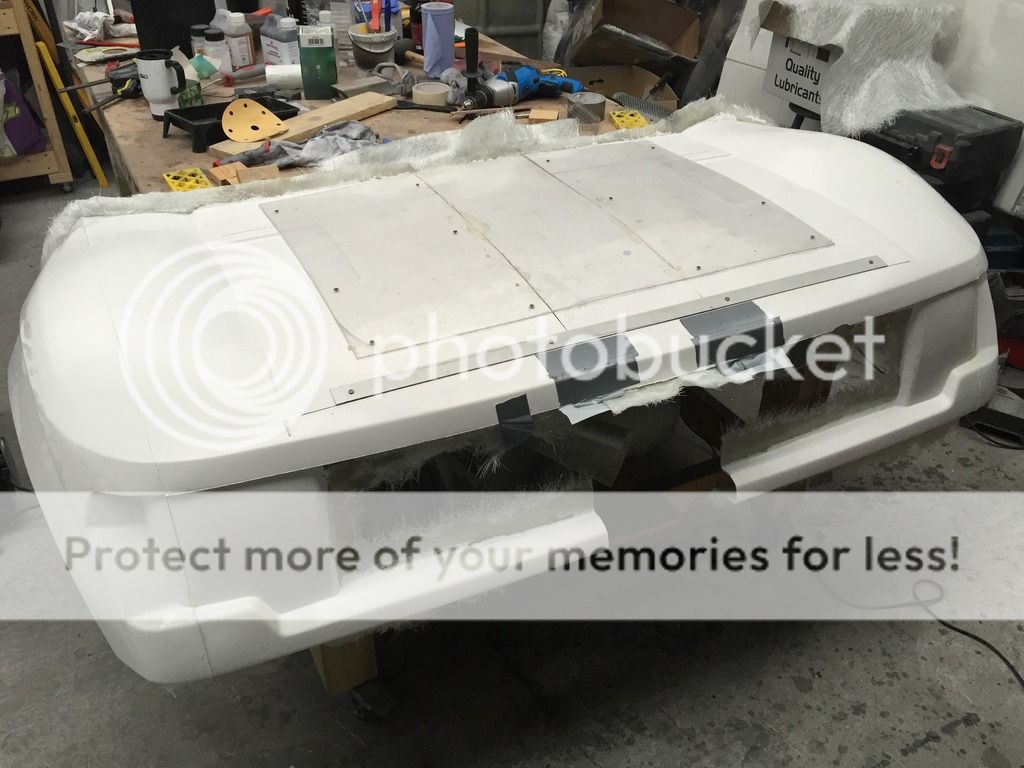
Same with the bottom 'bumper' portion. Here we used Kevlar to make this portion very impact resistant. If you hit something it will likely be here. Then a couple layers of CF for some stiffness.
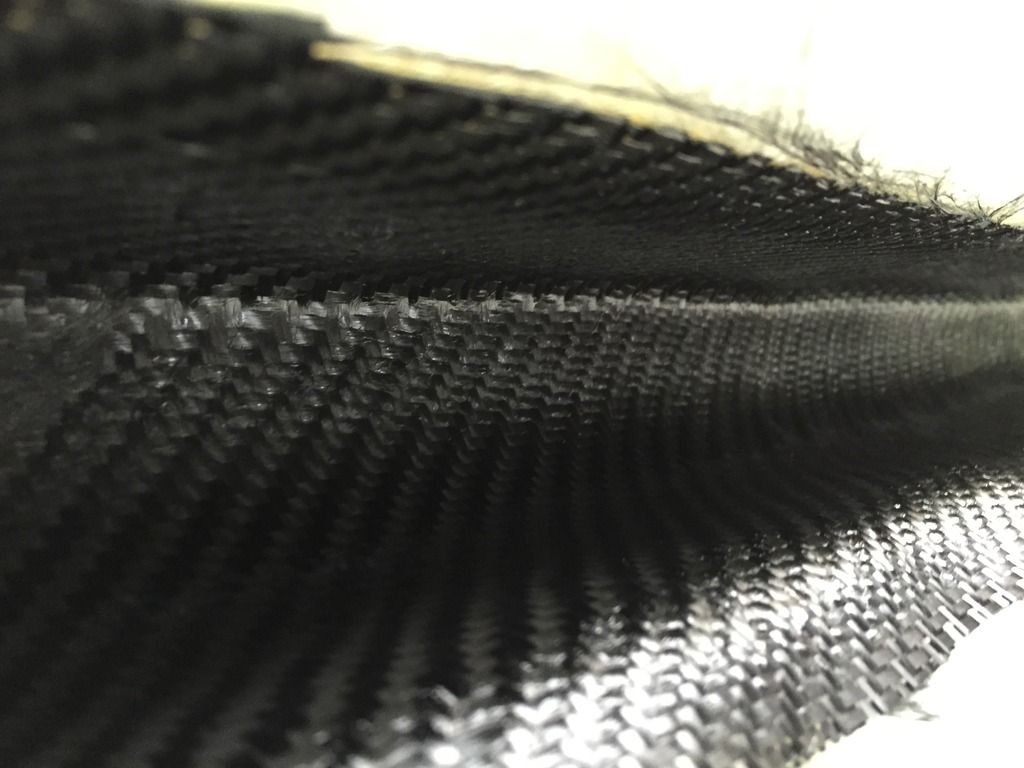
Then flipped back over and a rough fill/flat sand. The panel is still not super rigid, as we only have a couple layers of CF on the back at this stage, but enough to get it relatively close.
Then we switch to epoxy, with this base-coat, which is really just higher viscosity dyed resin. Not needed, but really etches to the fiberglass/fillers, and eliminates any tiny pinholes that may have been there giving a perfect surface for the CF. Then 2 more layers of carbon.


The part is now structurally finished and the hood section is very rigid, so you can finally flat sand it to perfection. We finished it off with a final 'cosmetic' layer of 2x2 twill weave carbon.
June 27, 2015
Talked to Ben a couple of days ago and he informed me that the last batch of axles didn't quite work out - tolerances weren't held. So instead of designing around axles, I'll wait until the body shows up and work from there. He's getting it boxed up this week and getting me a shipping quote in the next few days.
He's also going to send me a set of setup axles that telescope. I'll fit them into the drivetrain as I move along and once the correct length is figured out he'll make me a custom set.
I need to find some actual specs on the 30" BFGs so I can start redesigning the suspension.
I've decided I'm going to do a modified five link (actually four links) on the rear. Three traverse bars - 2 in the rear like a XP, then one in the front of the carrier to the chassis. Instead of two drag links from the chassis back to the carrier I'm going to do a triangular boxed arm that the shock attaches to. It'll mount to two uniballs in the front of the carrier, straddling the front traverse link.
July 8, 2015
Got a note from Benihana today - the body is being boxed up and shipped in the next few days!
Hopefully by the end of next week, I'll see it. I'm waiting on a phone call to get everything finalized.
I get to pick it up at the airport, as it's coming in from Ireland.
July 16, 2015
From Benihana
My shop is so clean again. That will last about a week. Can't wait to see it again, on your end.
The cab/seat pedal distance does look small on that chassis, but the mini raptor only has 54" from back of cab to wheel arch, and there's still plenty of room in there, at least for me (5'11")...but I'd think you could easily be 6'2"+ and not be cramped at all. That 54" is not including how far you can go forward with the firewall, between the tires either, and with the added width of K-fab's, I'm sure there will be a lot available. Thing is WIDE. Windshield is from a Chevy Colorado, and I still had to widen the A-pillars, so I think the cab is ~3" wider than the Colorado. I actually did a final test fit of the cab at the weekend, and set a couple seats in there for fun, it's roomy. I just had it set up on the floor, so it was hard to tell how easy it will be to get in/out of, but the door opening is bigger than my mid-size BMW so I'm sure it will be pretty nice. It's like 37" high 32" wide. My car is only 35"H x 31"W. Doors open as much as any car does too.
July 16, 2015
Pix that showed up today:
Got drive train parts - all XP 1000. This off the shelf stuff is kinda nice - at least for the basic stuff. Shocks are hiding in the background and, oh, what's this? B&B Offroad radiator guards? My, they are nice!

Thank you Gareth - they're works of art. Wish I'd had them last week...
July 29, 2015
Still waiting on the bodywork - been getting cc'd e-mails from benihana to the shippers and he's trying to get it all arranged.
I've modeled the new hubs and bearings - need to get some axle measurements so I know where the pivot point of the cvs is and then I can start working on the front end design.
I'm so ready to have this stuff in hand so I can get to making parts.
Aug 27, 2015
Talked to Ben for an hour this morning and the bodywork will be here Monday, Sept. 7th!
Axles are on the way. Front end designing starts as soon as they show.
I'm so ready to get the started!
Aug 28, 2015
WOO HOO!!!
The BFG KR2's are available and I have five of them on the way. It's odd that I had to fill out an application and sign a waiver for them, but it was worth jumping though the hoops.
30x9.5R15 size. They're gonna be PERFECT for this machine. Can't wait to get them - they're coming out of SoCal, so I should see them early next week.
Looks like this project is finally starting to get rolling.
Sept 2, 2015
A little more teasing!
Got five of the BFG KR2's today. I've had six Method rims sitting on a shelf for a while now (one is a spare for my XP). Spent the better part of three hours assembling six bead locks. 24 bolts x 6 rims, each bolt is hit probably 6 times - yea, I've done enough screwing for the day. Everything's torqued to spec, though.
Six little rims sitting on a trailer:
Mini-Trophy Truck tires - they look just like the big ones you see on the TT and Class 1 cars.
 /P>
/P>
Sidewall close up

Tread pattern - check the little ridges between the lugs on the edges.

Steeeeeeker
Five mounted tires with the hubs and rotors installed in four.
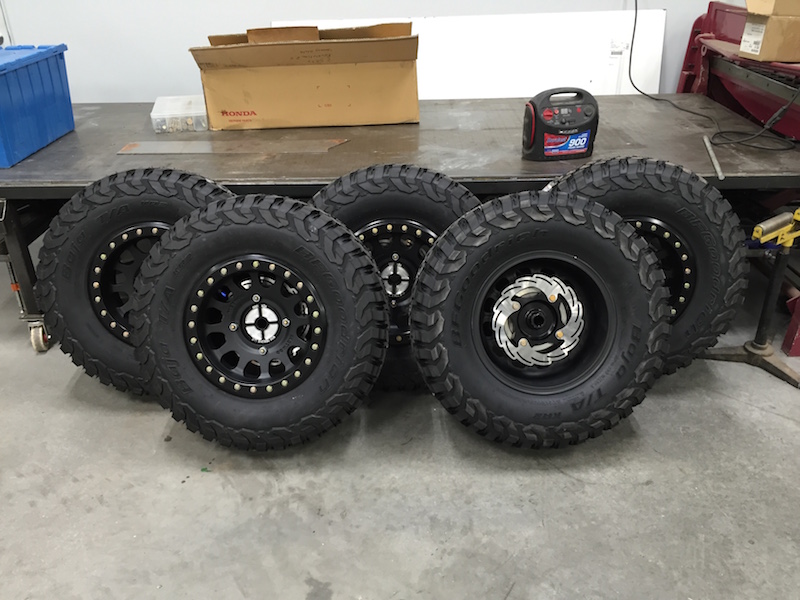
Installed, the tires are 29.5" in diameter and 9.75" wide with 30 psi in them.
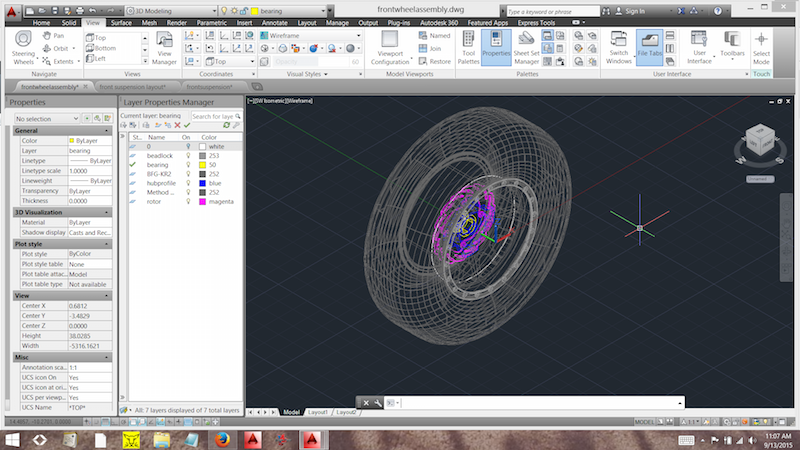
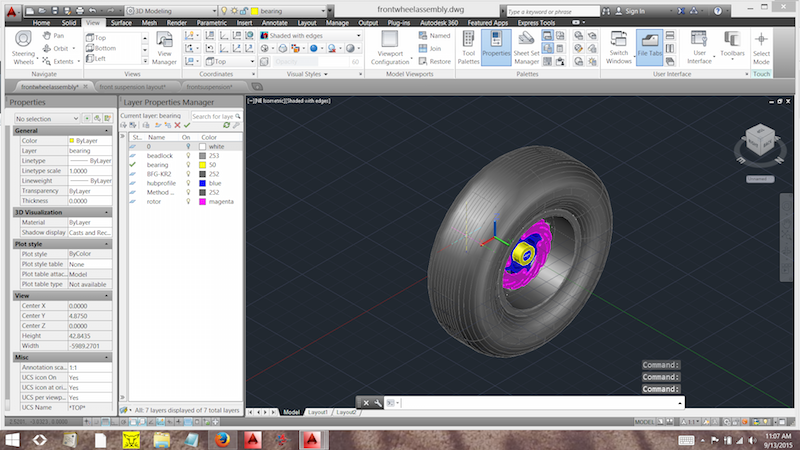
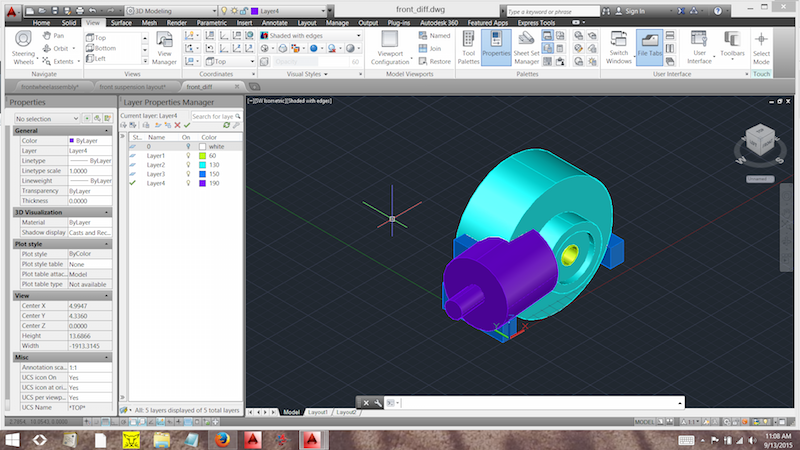
I have the dimensions and need to model a tire now. Gonna model the front diff too.
Setup axles are supposed to be on the way and the body's supposed to arrive either Monday or Tuesday.
I'm going to have to set everything that I have up on the floor just to see what it all looks like once the body gets here.
Sept 3, 2015
Setup axles from Ben - somewhere in the land of shipping...
These will let me figure out the perfect axle length to work with the suspension. I plan on having no axle plunge in either the front or rear end.
They DO exist!
Sept 8, 2015
I'll get wheel weight later today - old bathroom scale is set by the door to remind me to take it to the shop.
Supposed to be picking up the body from the shipping broker today. I'm stoked!
Getting a package via UPS tomorrow, I hope it's the axles.
Looks like this project is finally moving forth! WOO HOO!!!
The wheels weigh right at 55 lbs.
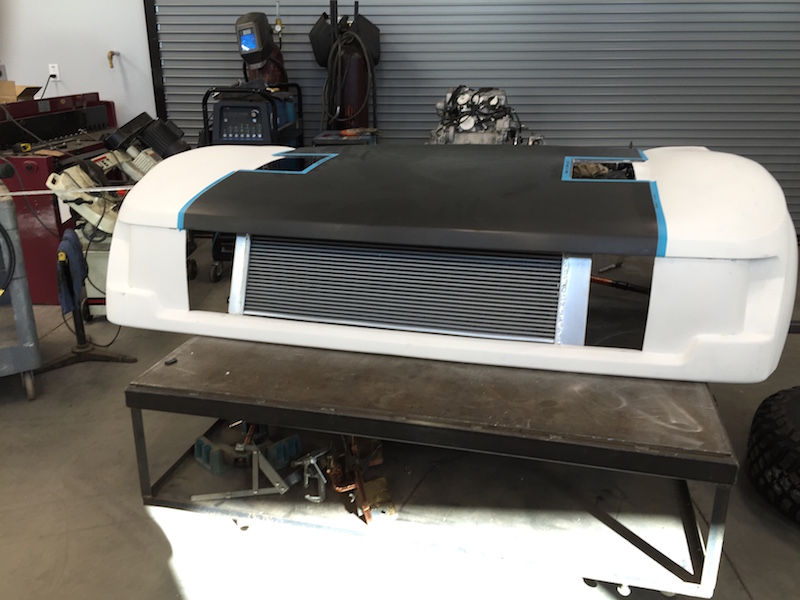
Body to arrive tomorrow. It landed in L.A. today and is being trucked to the broker. Customs has made this a pain - it's moved along easily enough, it's just another step we have to deal with. Benihana's done all that legwork, though and I can't thank him enough.
Sept 9, 2015
Axles arrived today. They're still in the box and at my house - I was a tad sidetracked with something else... Shipping broker called - I had a box for pickup. And what a box! One BIG ASS BOX!
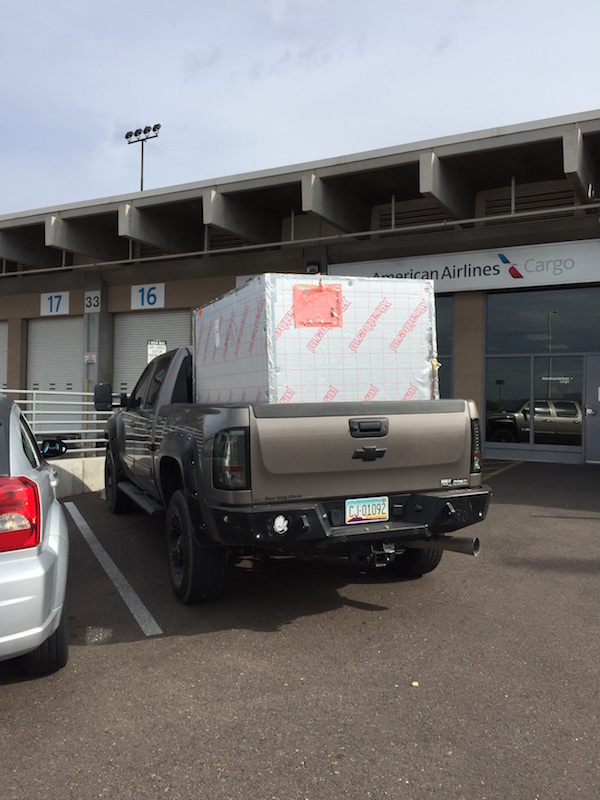
Had to get creative unloading a 285 lb. BAB.
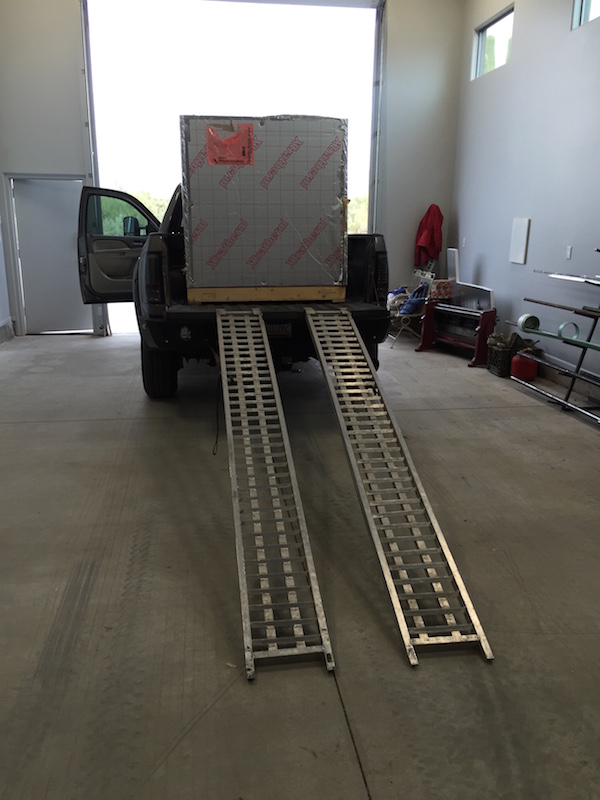
With a some grunting, tugging and then letting gravity help instead of being it's usual biatch, the BAB came out.
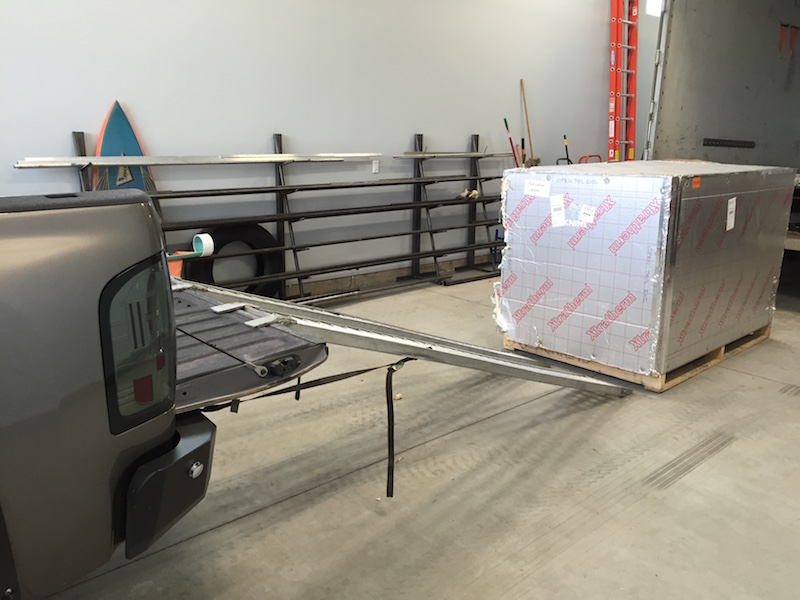
Packaging was perfect - not a scratch, nick or dent.
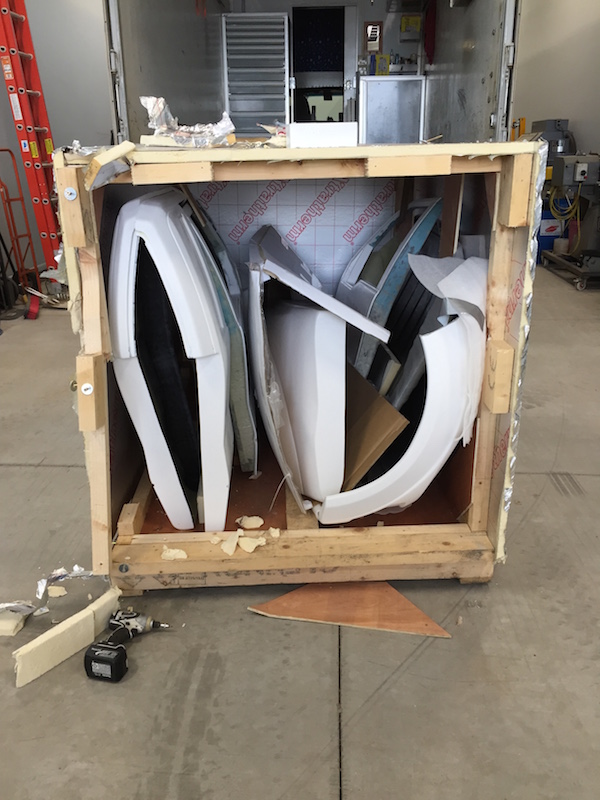
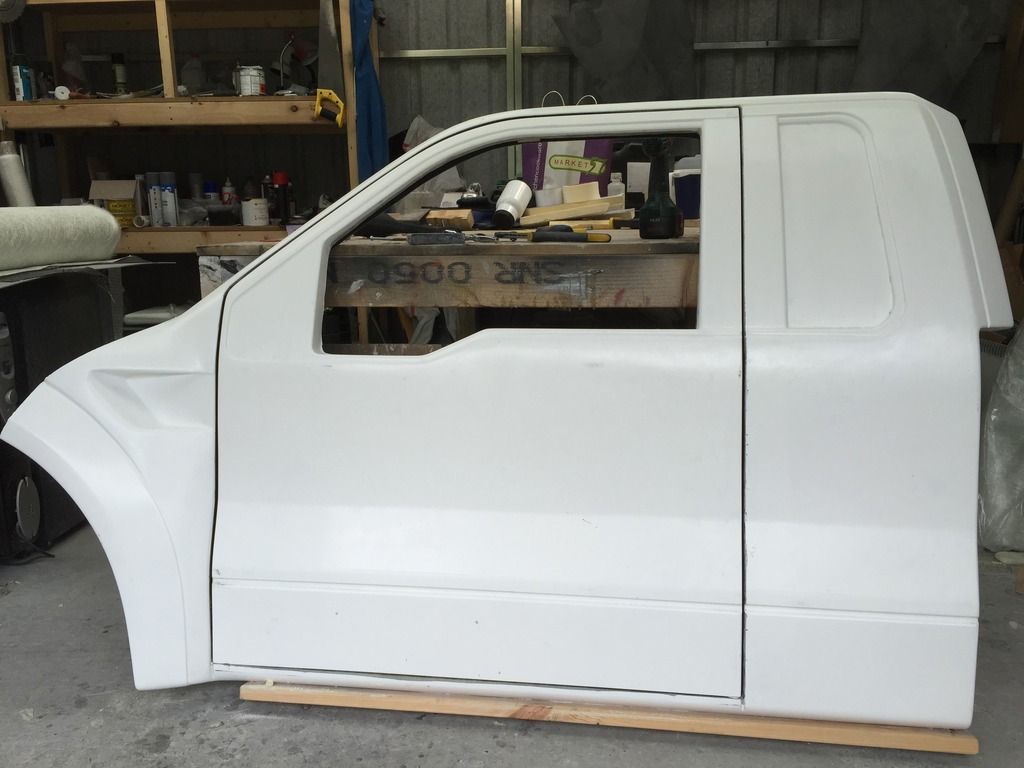
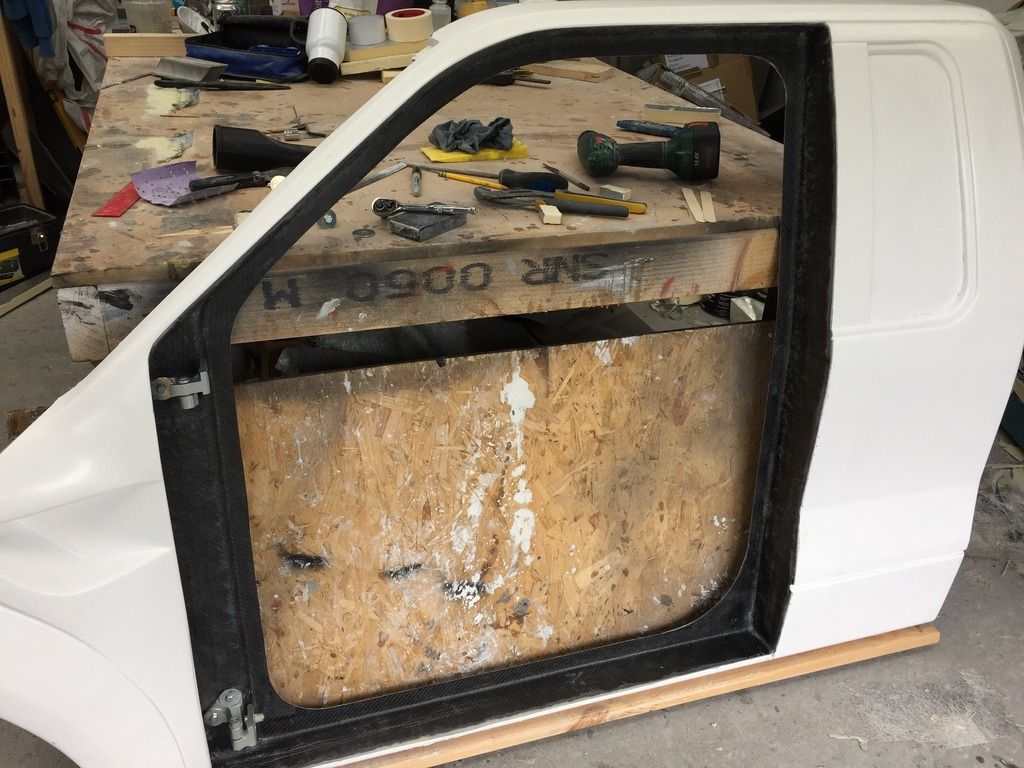
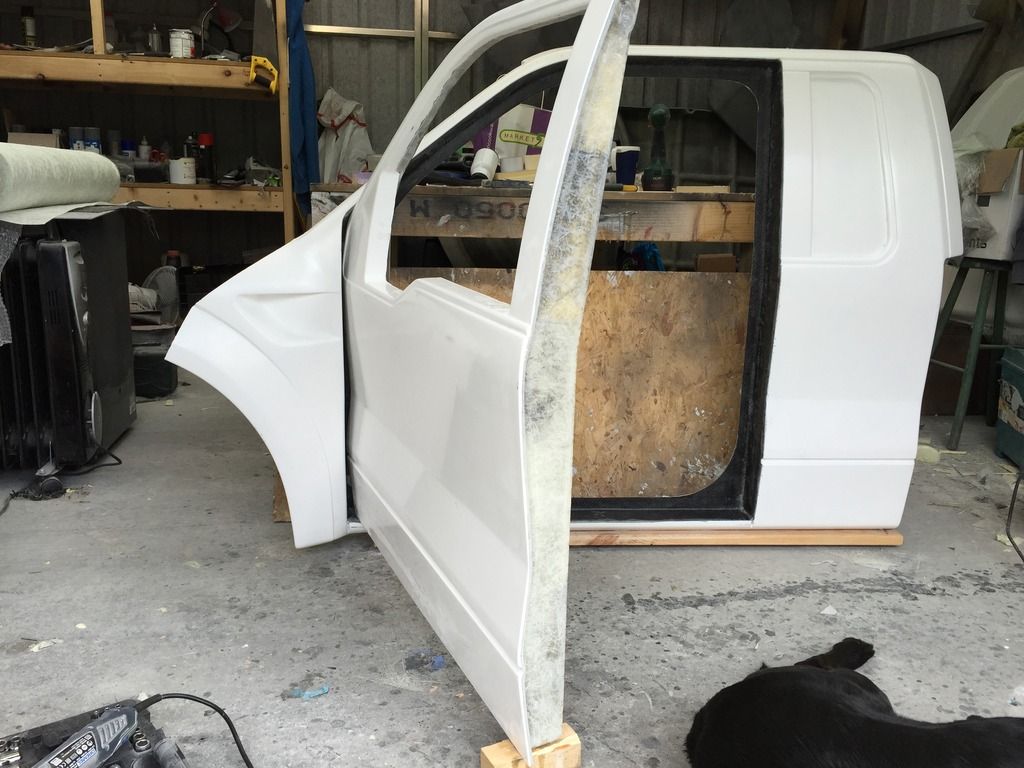
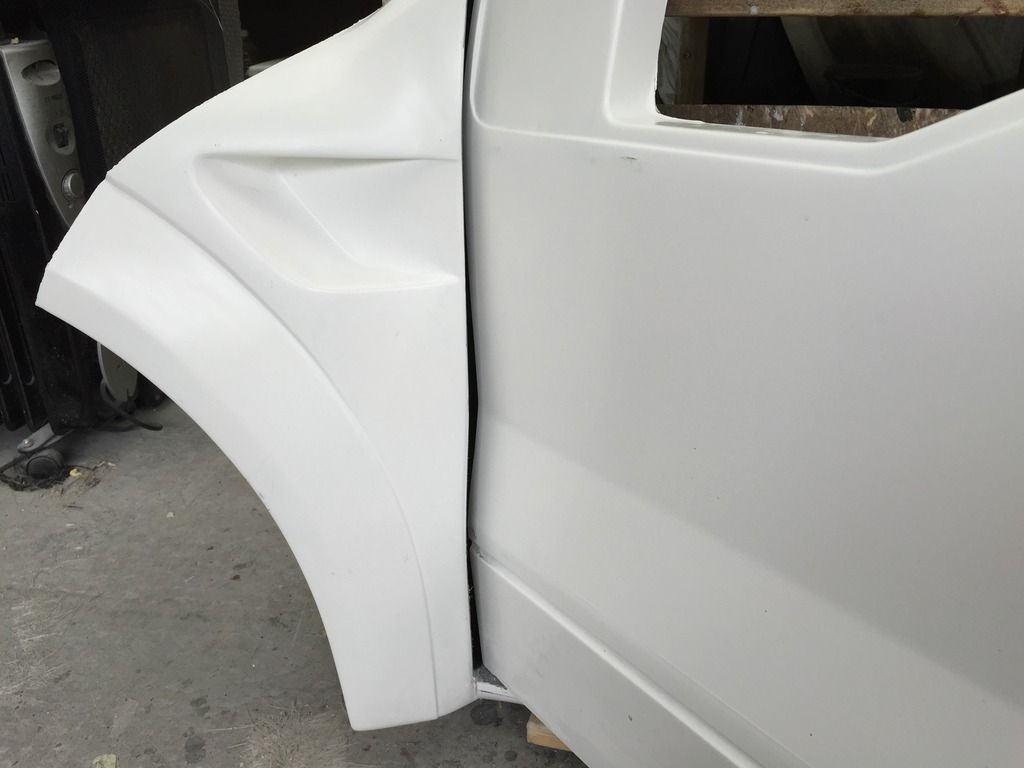
Ben's attention to detail is incredible. Everything fits perfectly, everything is just amazing!

Audi hinges.
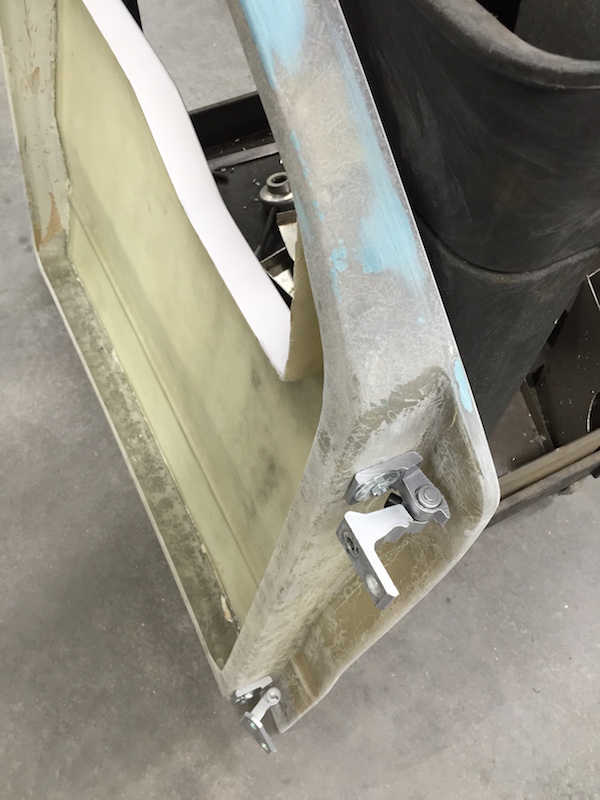
Carbon reinforced door sills.
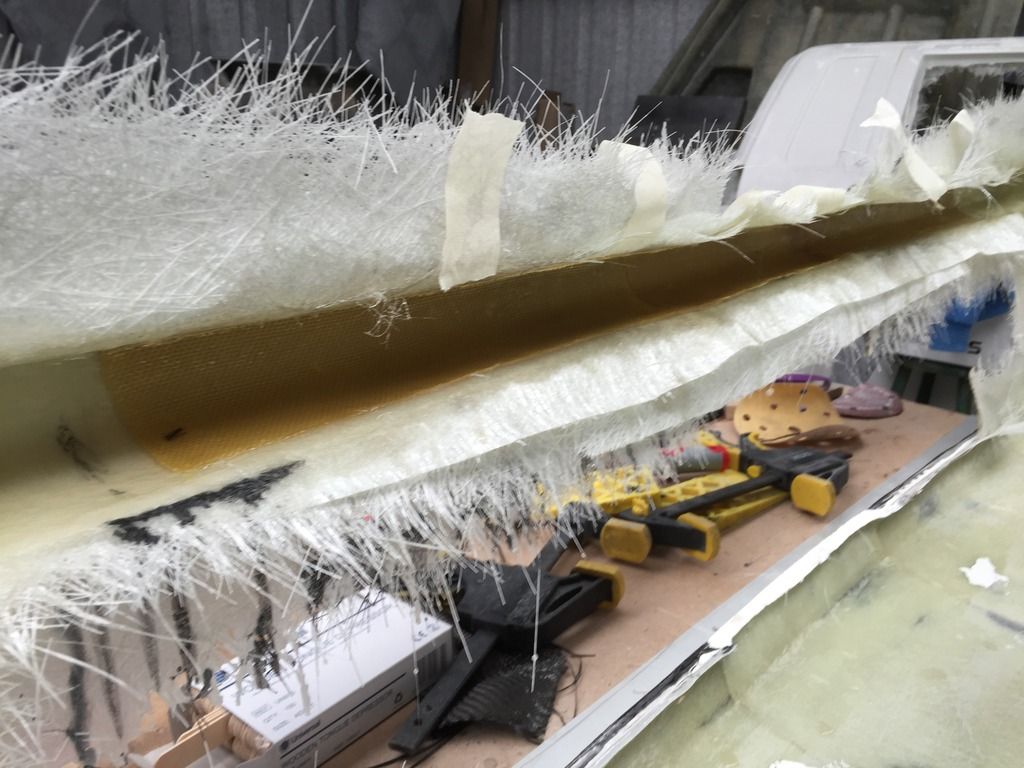
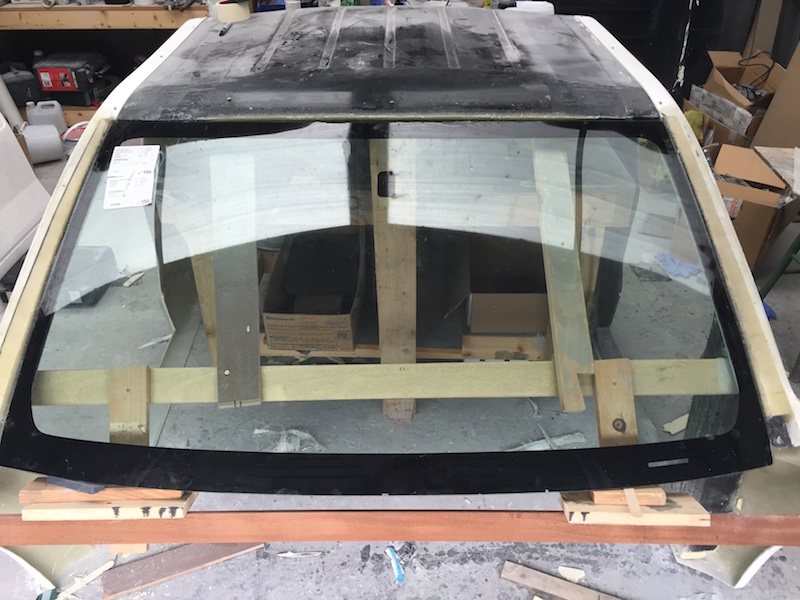
And the roof is off the chart. This thing is stiff, thick, heavy and perfect!
Of course I had to assemble it - first with wheels sort of in place - it's 90% bump here
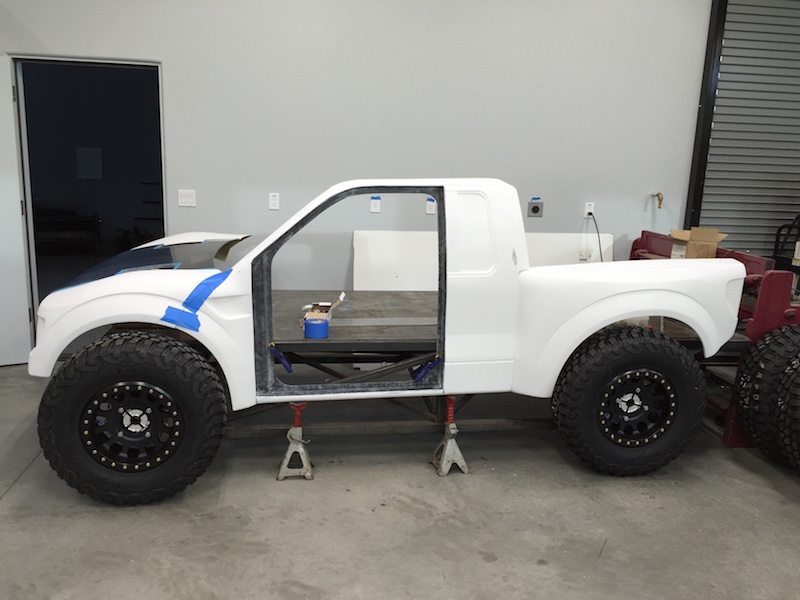


Then it was floor assemble the whole enchilada.
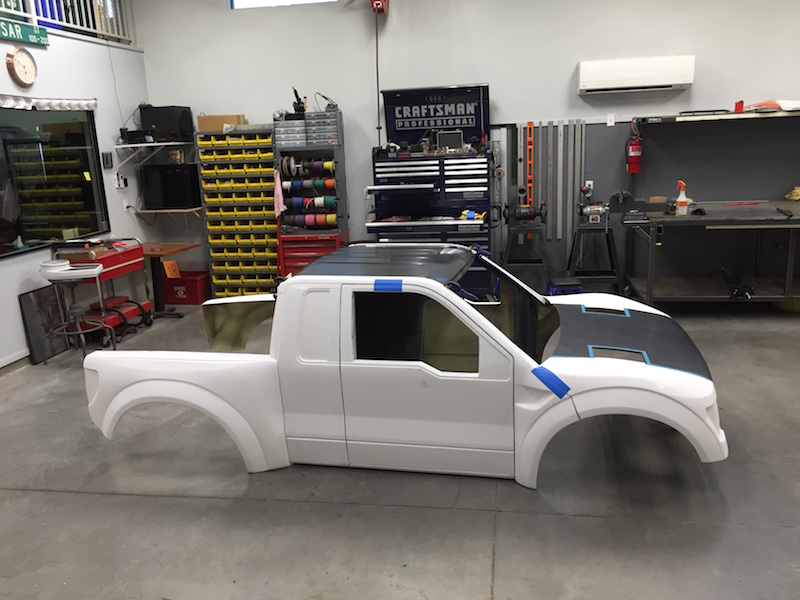
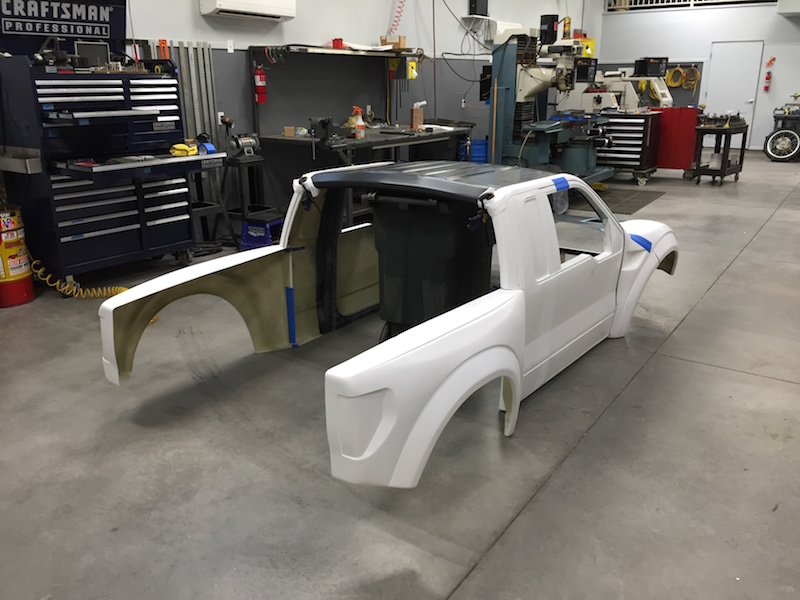
So this project finally, truly gets off the ground and is in process.
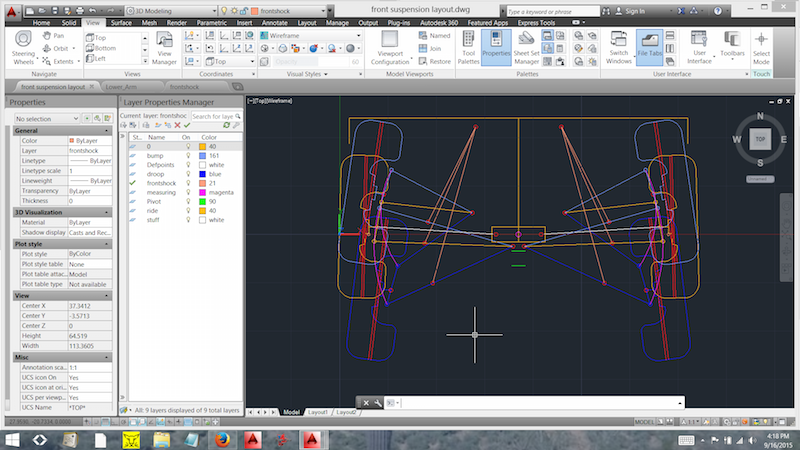
I modeled the diff yesterday, now I have axles, so I can start designing the front suspension. At full bump I have 71.25" between the fenders on the hood. So, there's my number to start with. Wheels cambered in, 70.25" of clearance to work with.
ACAD time ahead - lots of ACAD time ahead. WOO HOO!!!
Sept 10, 2015
Installed, the tires are 29.5" in diameter and 9.75" wide with 30 psi in them.
I have the dimensions and need to model a tire now. Gonna model the front diff too.
Starting to lay things out to get and idea of what I have - this is gonna be so cool!

I have the rack in a front steer position, as I'd prefer that, but I get the feeling it's gonna be rear steer.

I'll get some pix of the CV joints - the outer front has a ridiculous angle ability.
Artsy fartsy angle...
Sept 11, 2015
Doing inventory, gathering, cleaning, trying to get a plan set up.
Screwed around with engine/trans placement. I'm surprised with the amount of offset.
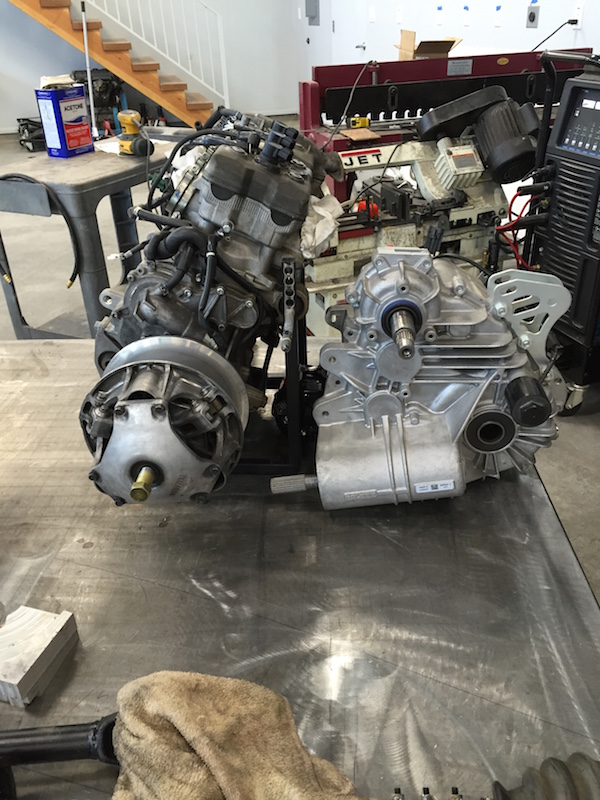
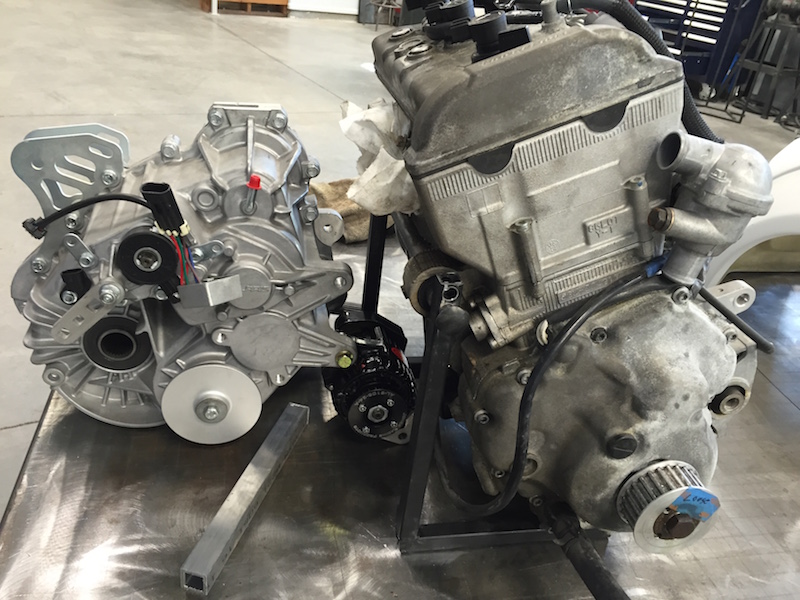
I hope I can tuck the alternator here between the trans and engine. Not sure of the pulley ratio that will be needed, as I've not looked into the ratio of this little parking brake to the input shaft, but it's a start.
Decided to weigh stuff as I moved it around too:
609 lbs in parts thus far. Yea, this is gonna end up being a 1500-1700 lb ride when done.
I need to set up a spread sheet to keep track of the parts and weights.
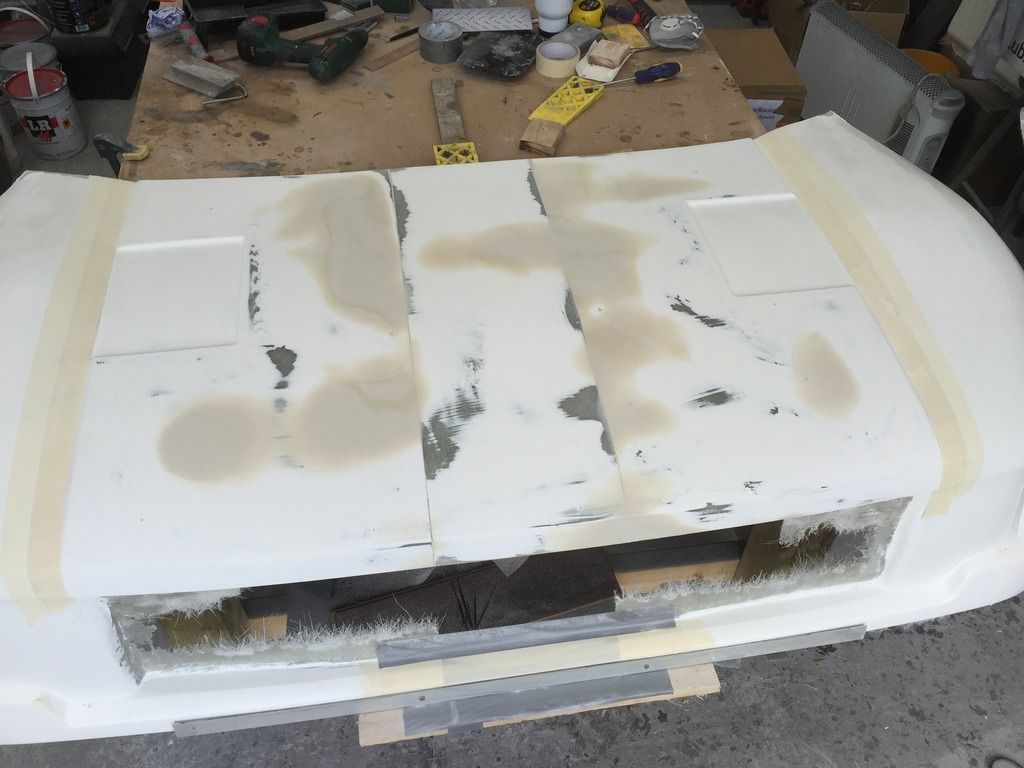
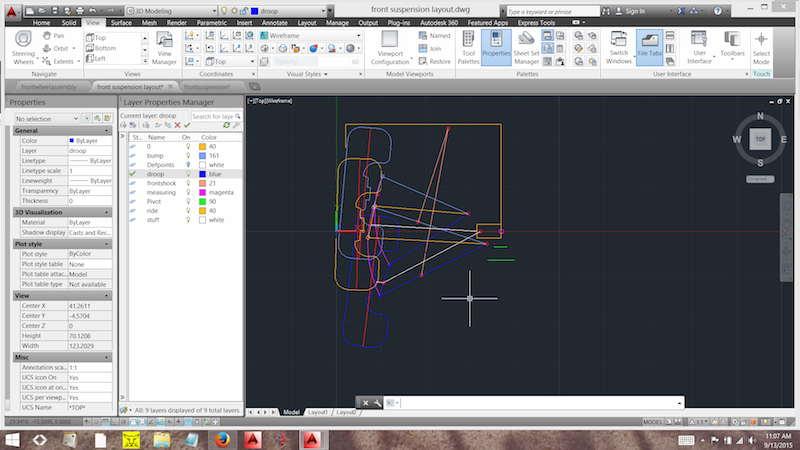
Tomorrow I hope to start on front suspension design. Got the hood laid up on my build table and have taken a bunch of measurements.
I'll post some screen shots in a bit - I have major issues trying to manipulate, upload and work with them from my Windblows powered machine - it's only good for ACAD!
Sept 13, 2015 This one was a challenge - lots of parameters to work with, but doable. I was blowing bubbles by the end of yesterday. Had to walk away and reset (with a nice 40 mile rip through the desert in the XP). Fresh perspective this morning and stuff started working correctly again.
Front end specs thus far:
OAW at ride height 74" - tires stick out about 1.25" from the widest point on the fendersThis is all in a single axis on ACAD. Now I get to go in and start playing with rake, anti-dive, caster changes and such.
Gonna have to make room for the shocks - they'll be ahead of the front axles, steering box is going to end up being behind the diff, so as much as I'd rather not have it, rear steer is what it's gonna be.
The progress continues:
Done for the day - there's a recorded F1 qualifier and race from last weekend to watch, since all that's on TV today is football.
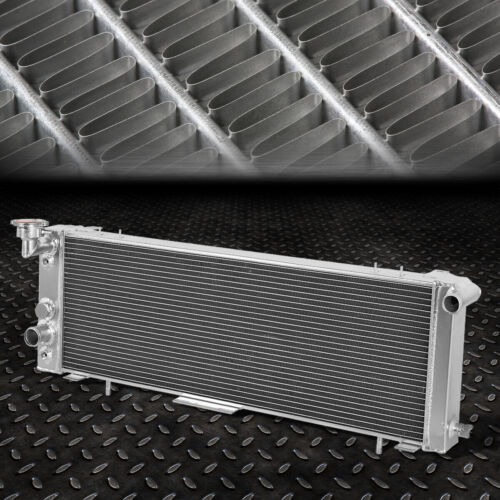
Radiator ordered:
Gonna have to find fans for it now.
More camber at full bump - gives me another half inch of clearance in the fender well.
It moved the upper shock mounts in and down slightly too - more clearance for the hood.
Lower a-arm starting to come around. Shock mount rotated to full droop
Front outer CV has crazy articulation!
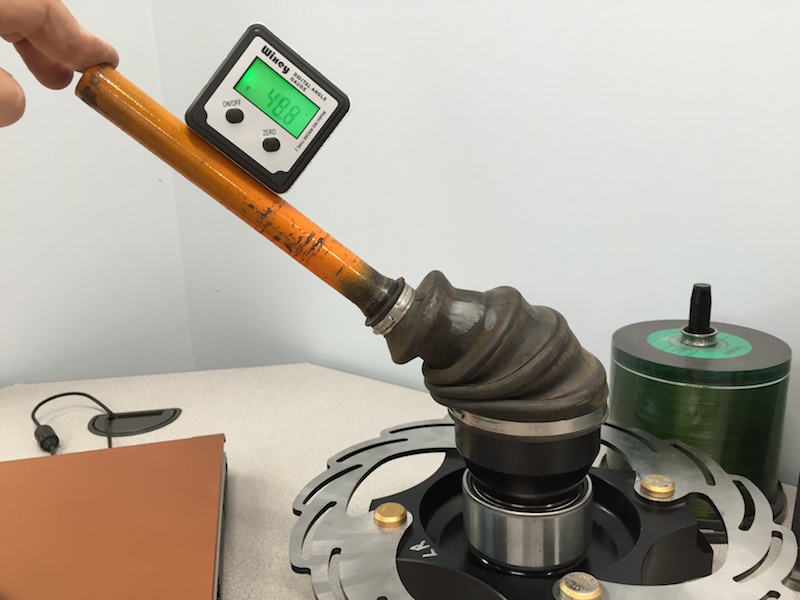
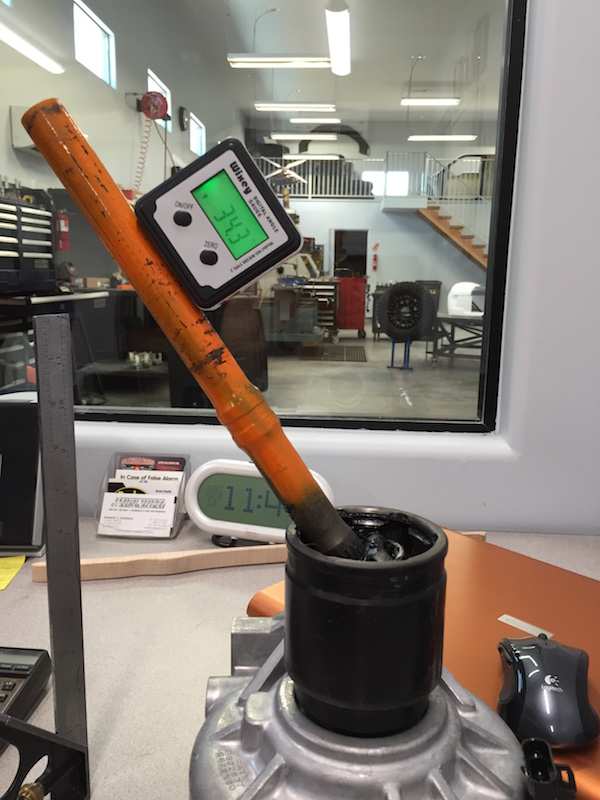
Front inner CV has a bunch too - and I did the suspension with this one at 32 degrees. Even at the angle in the picture, it's a smooth rotation.
Radiator in place.
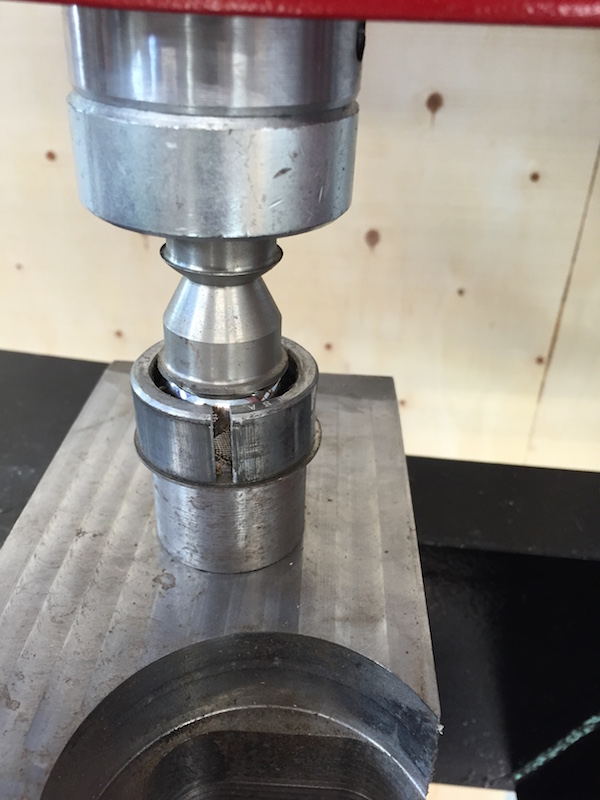
Broke down and purchased a real press. I had a 12 (15?) ton Harbor Freight job and it would flex so badly it was scary.
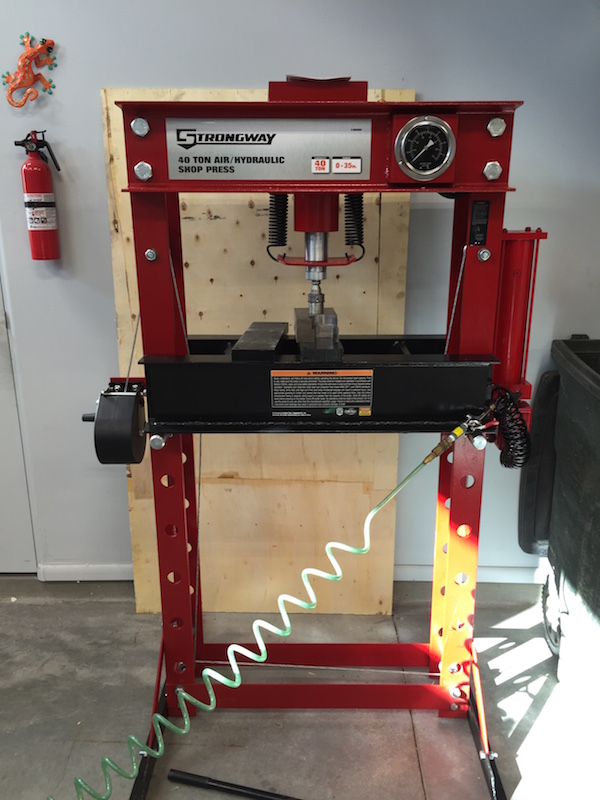
This thing is a beast. Air over hydraulic works so nicely. Makes old tired uniballs into a broken race and nice shiny ball.
Sep 17, 2015
I changed to .5" scrub - it's where I originally designed, then I reverted to zero, in the four wheel drive thinking, then went back to .5". That's where it's going to stay.
Not sure how I'd do a kingpin adjustability - that's designed and built into the steering knuckle. No need anyhow. At .5" of scrub I'm not going to have noticeable torque steer feedback and I'll be running power steering, so that eliminates it even more.
I hope to get more design work done today. Have a meeting this morning, have to redo the casters on my build table (bigger, badder, leveling ability) and make a couple of roller tables for my shear/break (I'm tired of it being on the ground - it hasn't found a home yet, will today) and the 36 x 24 granite block that's showing up today. 700 lbs of press yesterday and 400 lbs of granite today. Ah, nothing like having an engine hoist...
Okay, so now I see how to address my center steer rack and make it the correct spread, along with supporting the change:
I'm going to borrow JGS's design:
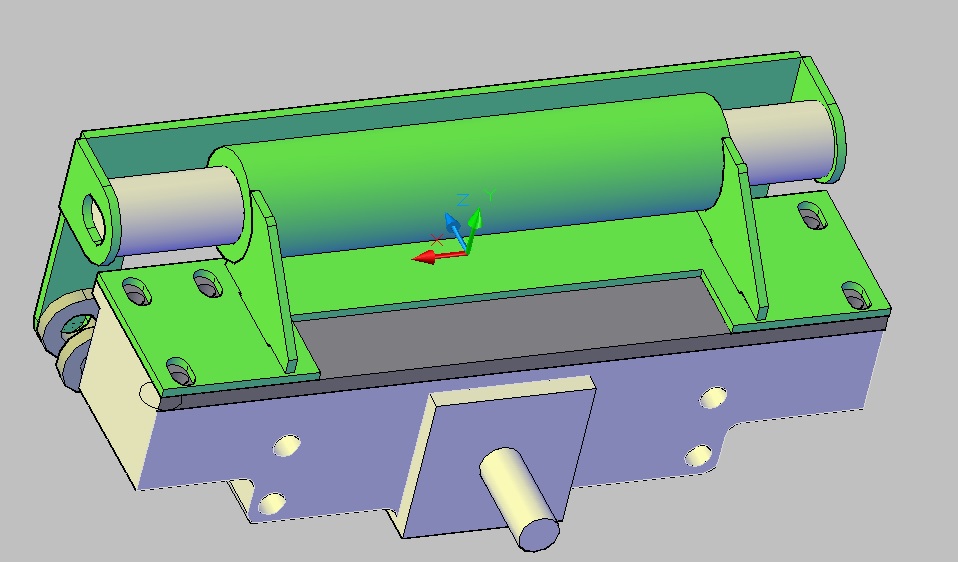
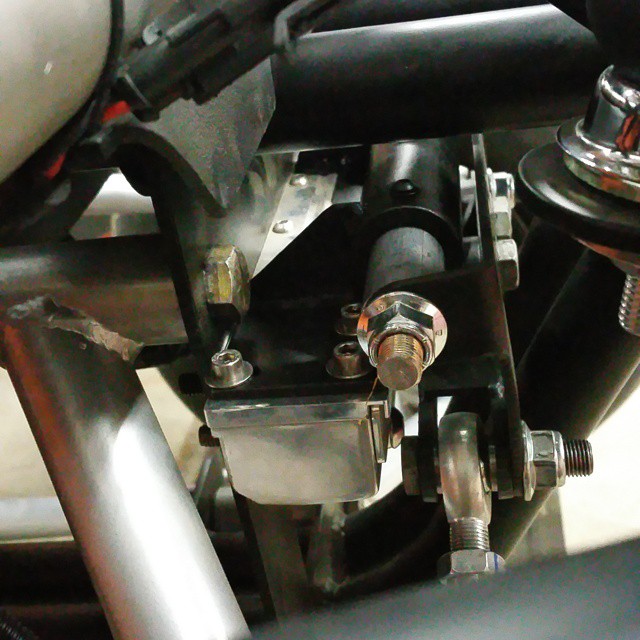
and Justin's version:
With my rack being mounted in front of the diff (I'm going to strive to use this placement - I really want front steering), along with a support setup similar to these two, I may be able to drop my actual mounting point for the tie rods down some (can't tell - looks like JGS may have done this?).
I'm assuming (since I've not started on steering design yet) that this will help make life easier when it comes to dealing with bump steer and Ackerman.
Sept 22, 2015
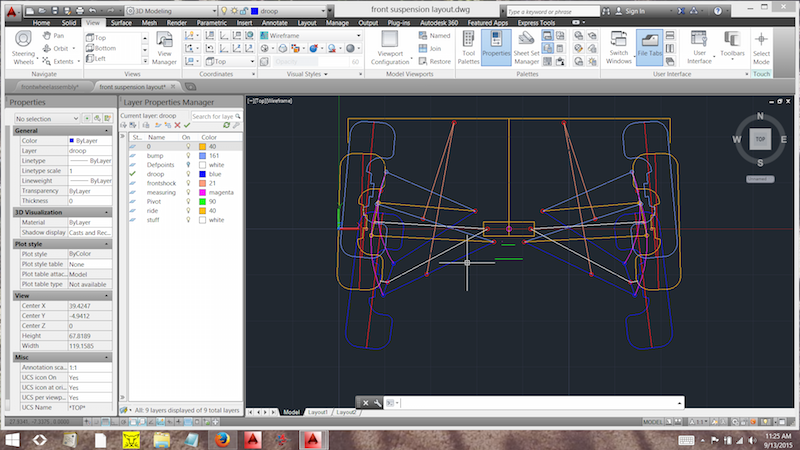
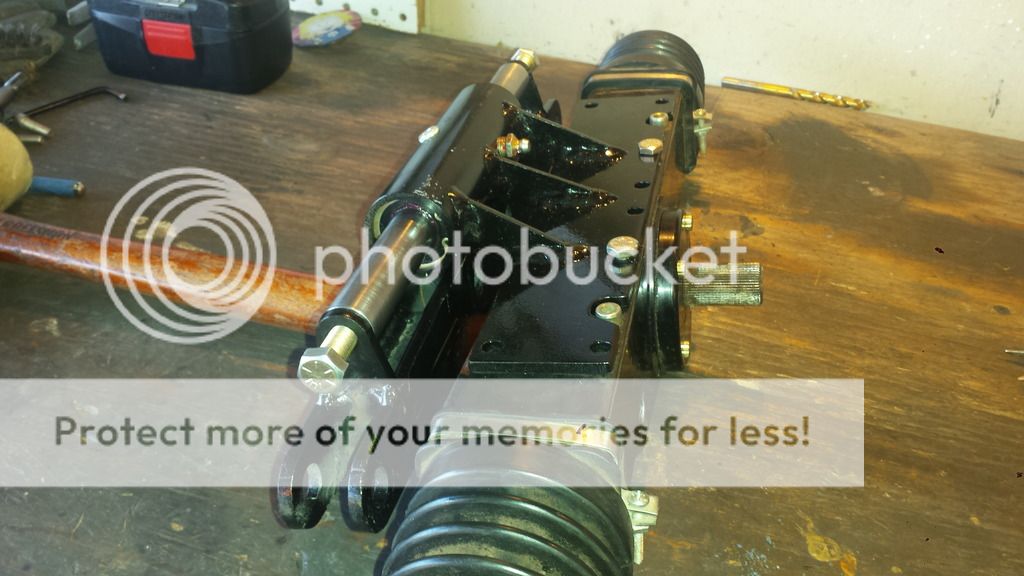
Spent most of the day modifying my front end. Narrowing the front by 1" lets me have less scrub and I redid my axle droop - 20 honest inches of travel is going to happen up front.
I was having to do too much camber change with an overall width of 74". 73 will work better and still have an aggressive look/stance.
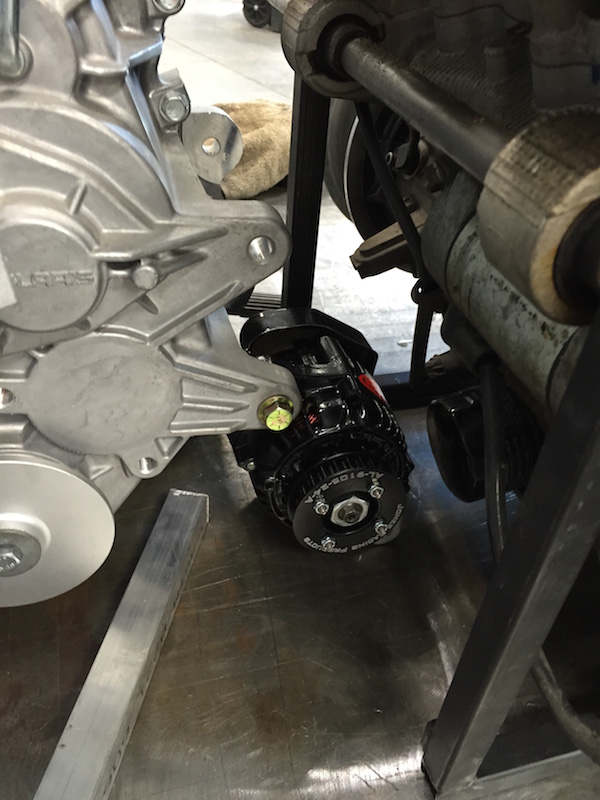
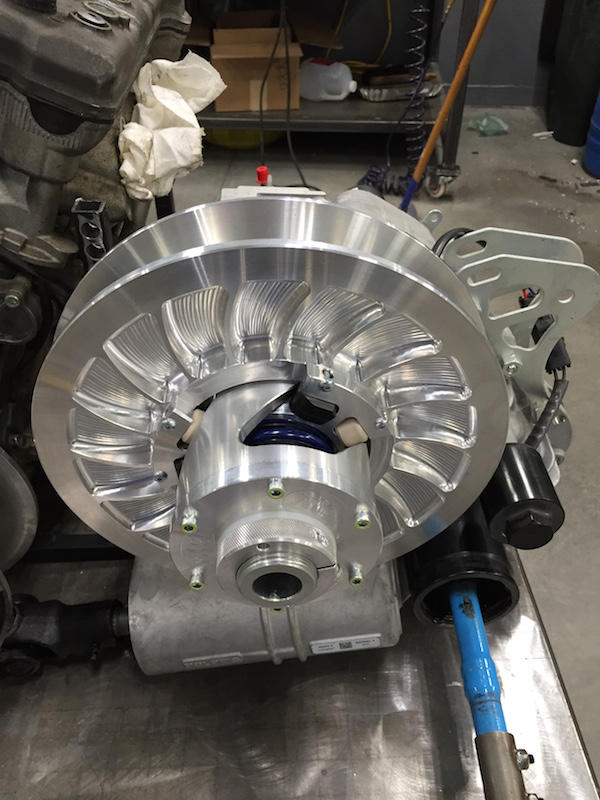
Got my STM driven clutch today. Was told by a tech that if I can stay right at 12.5" center to center between the clutches, all should work well. It looks like I can pull it off.
I'll try to upload a couple of pix tomorrow.
Sept 23, 2015
I mentioned clutch stuff yesterday. Pix today:
I love billet stuff! It's pretty, has lots of cool little parts, an adjustable something or other (not looked at the instructions yet) on the end. Trick piece! It (knurled nut) might be belt width adjustment.
So here's a drive train:
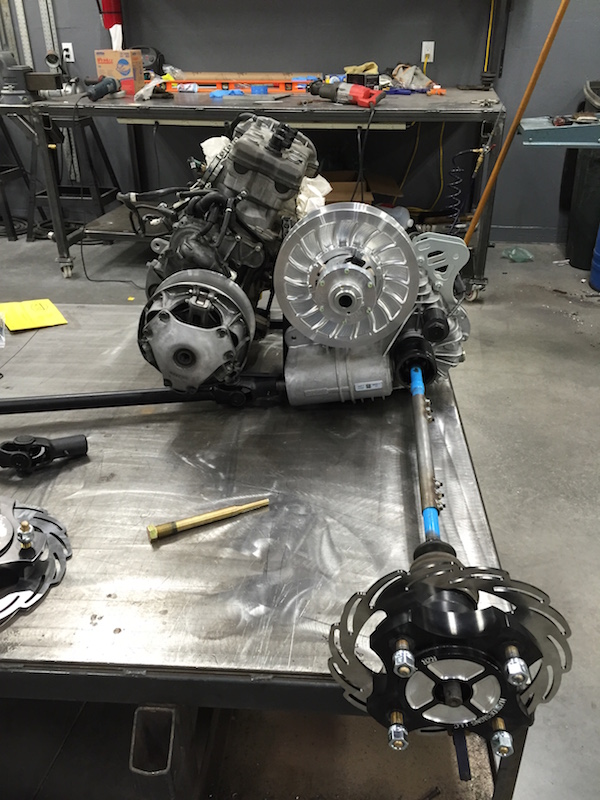
"Close" alignment. The engine and trans are going to be good neighbors and not fight - I was worried they were gonna with the 12.5" center to center belt. Turns out the clearance and the mounting tabs between the two pieces is going to be just right.
Whew.

No clearance issues for the exhaust! Dodged another bullet.

Oct 23, 2015
While I wait for some files back from Flyer, I'm focusing on some of the other things for this project. For some reason the lights have my attention right now. As I've shown here recently, I've been playing with different diffuser ideas and such. Today I got three colors of translucent filament for the 3D printer. I'll probably play with them this weekend.
One of the things that's going to be done will be vacuum forming. I want to do the headlights and tail lights with Lexan and make a plug of the lenses in the body panels and nose/hood before I cut anything out.
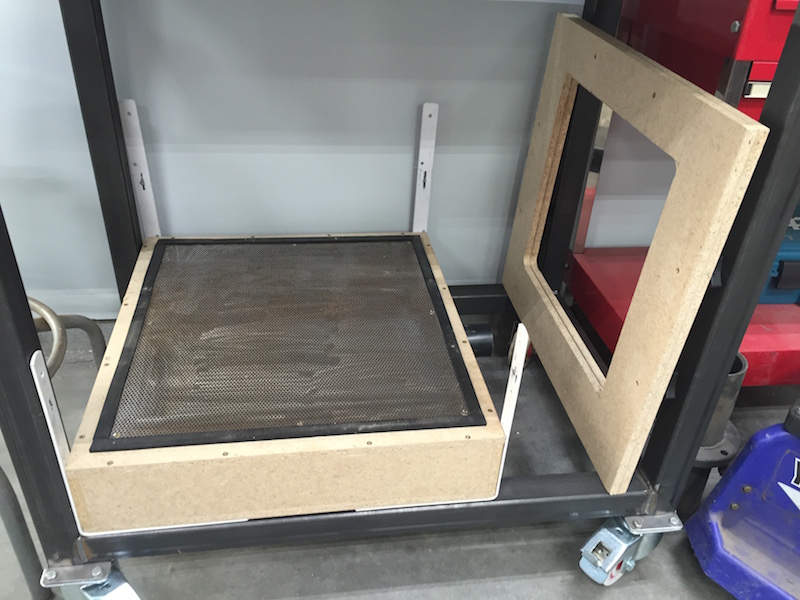
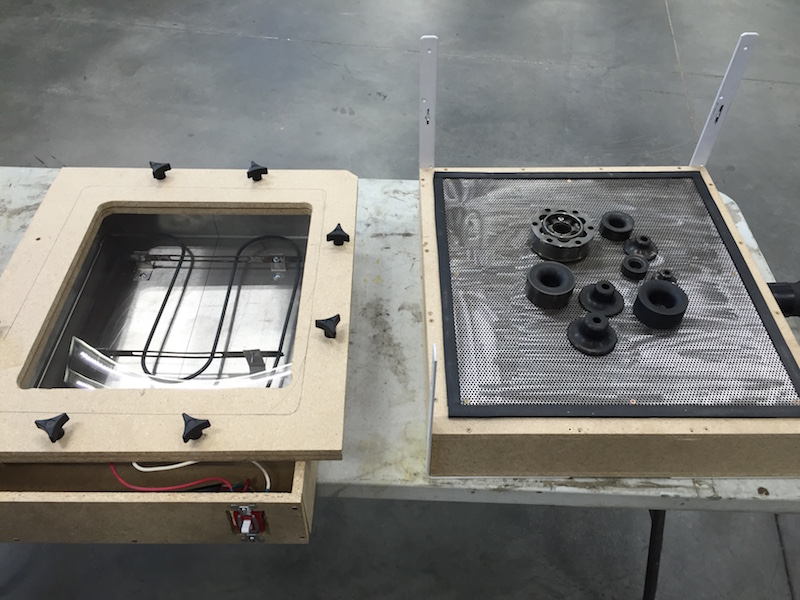
So You-Tube was accessed and hours of stuff was watched last night and this evening, I have a vacuum forming table. Still need to design and make the heating table - not sure if I'm going to try an infrared heater (was one idea seen on video) or go with the classic oven coils.
I have a sheet of thin stainless that I'll use for the heat source containment and reflection.
The unit is 24" wide by 19" long and about 5" tall. The work area is roughly 14" x 18".
I was going to use expanded metal instead of perforated board, but I managed a score of 1/8" hole 1/8" thick steel plate. It's stiff enough that the vacuum won't pull it down, has a massive amount of air flow capability and should work well.
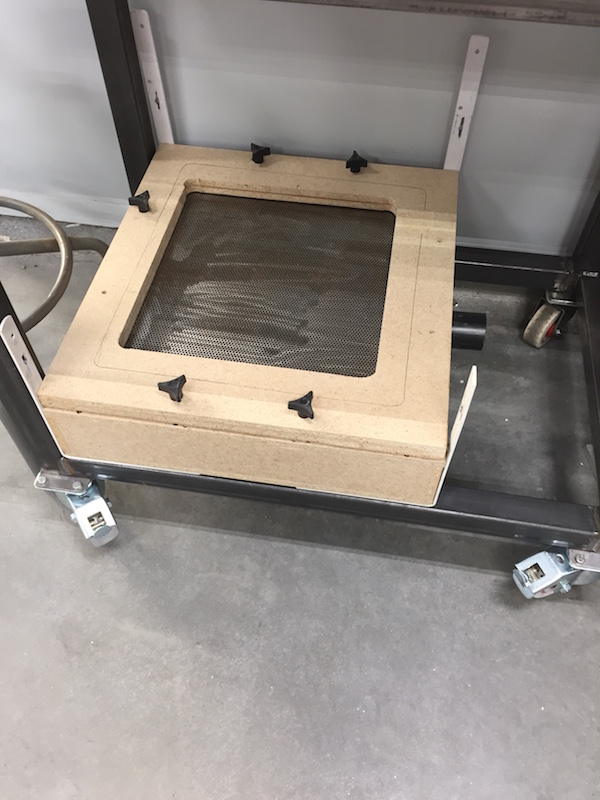
I still have to go get three more knobs (of course Loathes only has half of what I need...) for the frame. The Lexan gets sandwiched between the two frame pieces, then the frame gets set over the top of the heat source.
The four uprights help guide the frame in place.
Frame in place.
I'll start moulding up the plugs and see what I can do here soon.
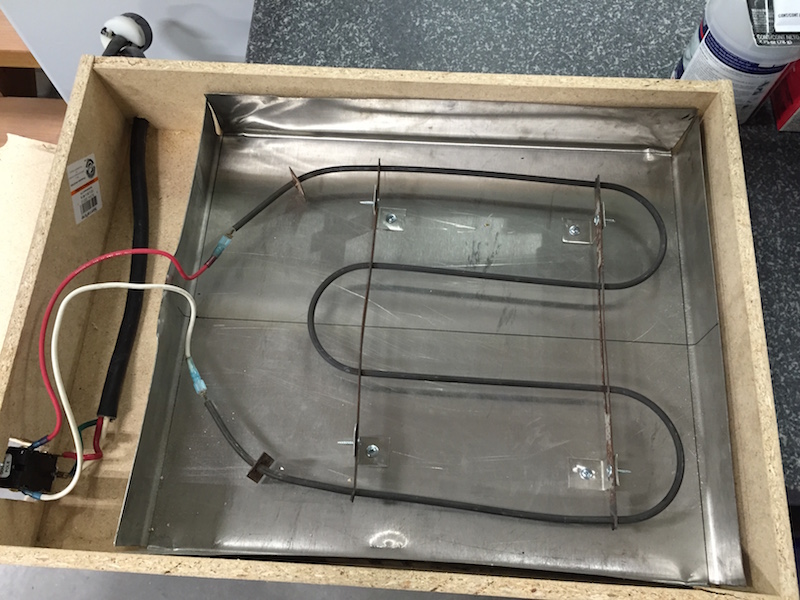
Found an appliance place that was actually open on a Sunday and they had a nice heavy duty oven plug and a heating element that was just the right size.
Got the heating box done and was tickled when I threw "The Third Switch"* and it didn't toss a breaker. The element got hot, gave off that nice "I'm hot" smell and should work well. I need to find my infrared thermometer to track the temps when I start doing the heating of the material.
I lined the box with some thin stainless - it's actually quite a decent heat shield. (or I'll end up with a fire and a charcoal box?)
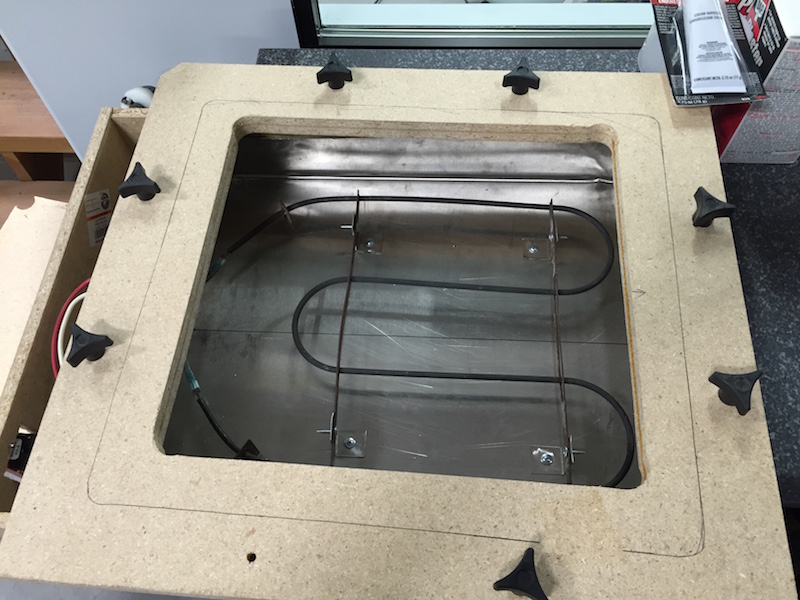
The frame that holds the material to be formed fits right on top.
Tomorrow I may get motivated and see how well it works. If I do, I'll video it.
Also got some translucent PLA for the 3D printer. Red, Orange & Blue.
I did a panel that has little pyramids all over it for dispersion this time - it's only about 15 minutes of run time. I'm making the webbing inside hexagonal for better light dispersion. - been looking at tail and head lights on pretty much anything in a parking lot and have noticed that the hexagonal pattern in the reflector is quite common.
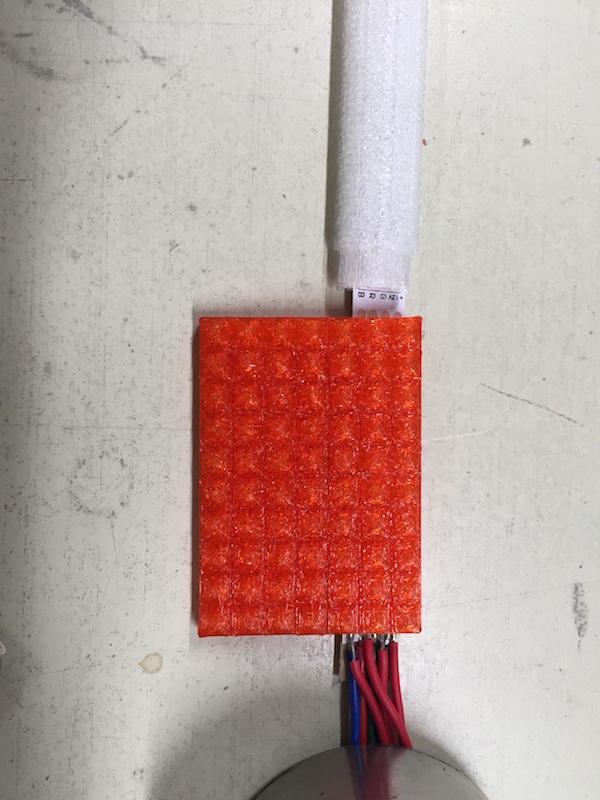
Running through the colors that the RGB LEDs will run showed some interesting things - some of the colors were bright, some don't change one bit (the red's filtering out stuff) some are really faint. I think I'll be able to come up with some pretty decent looking and well seen reflectors with this system.
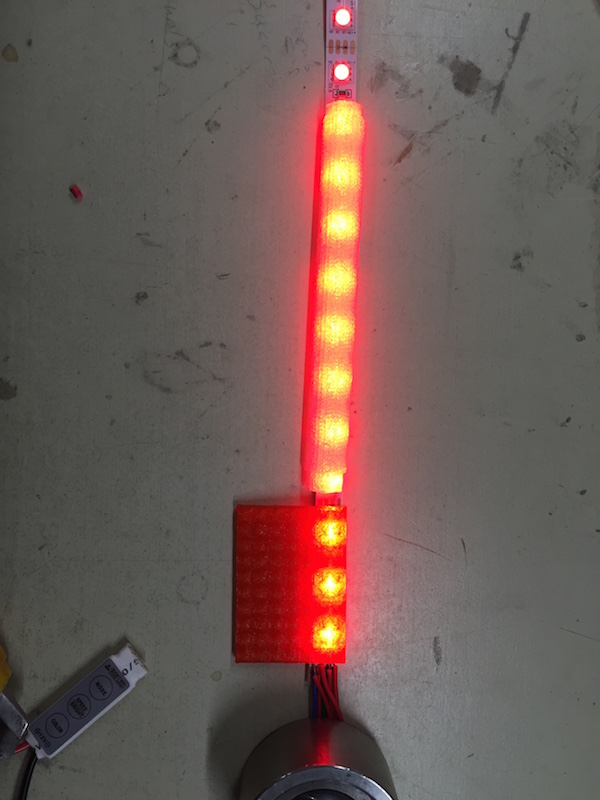
I also piggy backed two of the controllers together and they'll interfere with each other if they're both plugged in and operating, but if I switch from one to the other, they'll show the color that was last selected on that unit. So I can have running lights that are white and then blink orange by just switching from one control to the other with the blinker switch. Cool stuff!
* - anyone recognize the reference? I've been wandering around all day saying it to myself... "Not the Third Switch!" yeah, just entertaining me self.
Oct 28, 2015
I went with the $40 burner and plug for a start.
Did my first round - sort of successfully. Heated the Lexan too quickly and got bubbles. Didn't get heating uniform either.
I also tried to form too many items, so I got bad pull down.
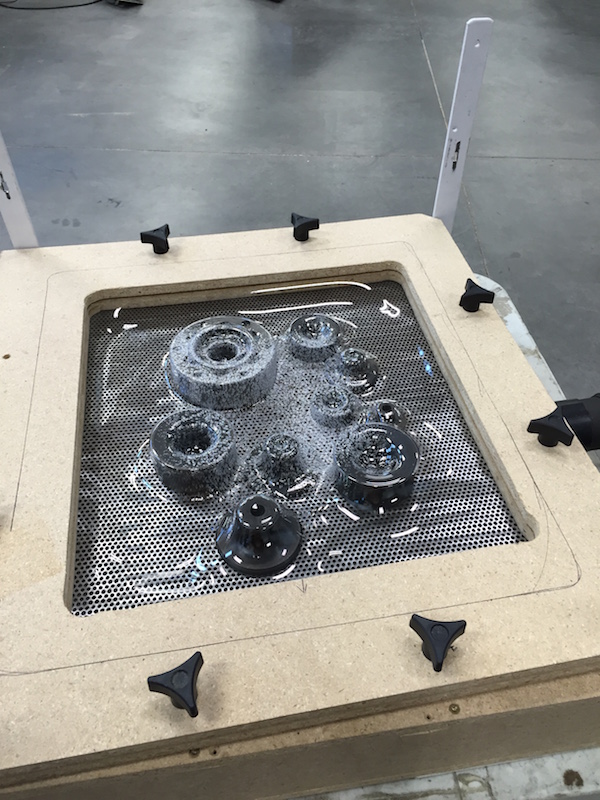
All the RC cars and some of the fuselages on the old helis I played with were Lexan. I read that you have to get it up to around 400F to work. I was at 380ish (depending on where I pointed the infrared thermometer) when it started blistering.
The process worked, though. Now I just have to dial it in.
I'm guessing that I need more room between the coil and Lexan (thank you Bull - good call) and need to rotate/turn the frame over to get everything heated thoroughly.
I would think that part of the problem is that this stuff is .08 thick, so it heated the surface faster than it soaked through - hence the bubbles. They pretty much blistered on the bottom side "suddenly". All of a sudden, they started popping up. (or down, in this case).
The infrared heater idea is sounding better and better. I'm seeing consistent heating as the key.
My brain hurts.
The drawing just keeps getting bigger.
The spindles ended up having to be 1" longer in distance between the center line of the CV and the bottom pivot. Redesign time...
I'm working on getting the spindle body shaped. Not a clue where the tie rods are going to mount - Flyer and Justin are working on that. I just keep nibbling out blocks until it looks correct. It's been really tricky to visualize and then get modeled.

Nov 11, 2015
The two guys (Flyer & Justin) that helped design the MR's suspension are both wizards with Solidworks.
B>Justin:
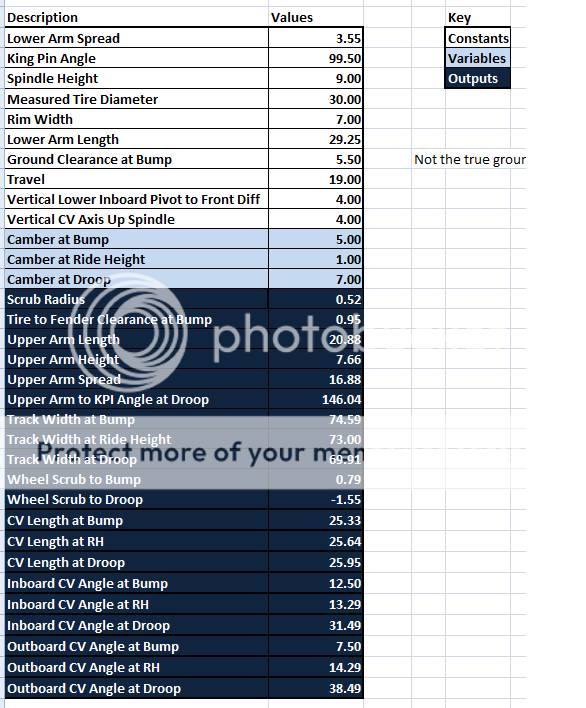
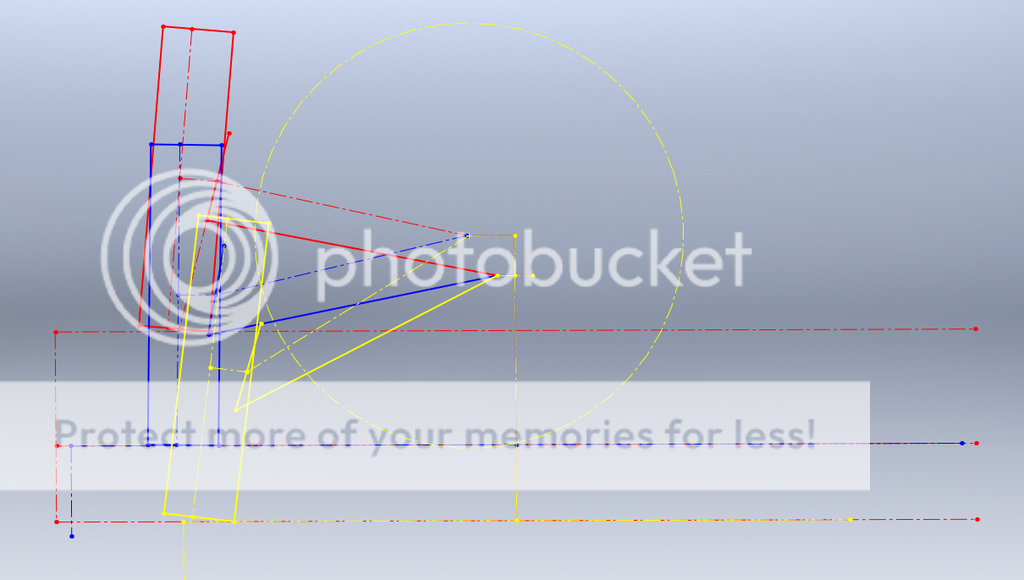
Figured you guys would be interested in an update. I've started helping K-Fab work out the front suspension design. First step was to setup this Solidworks geometry calculator I made when I designed my car. It's pretty slick, enter in the white and light blue parameters, hit refresh and watch the dark blue parameters fill in. Makes it really easy to make small changes to the geometry and see the effect. I should have some progress on the 3D design by tomorrow night, pictures to follow.
Note - these are not the final numbers, but a starting point.
Nov 11, 2015
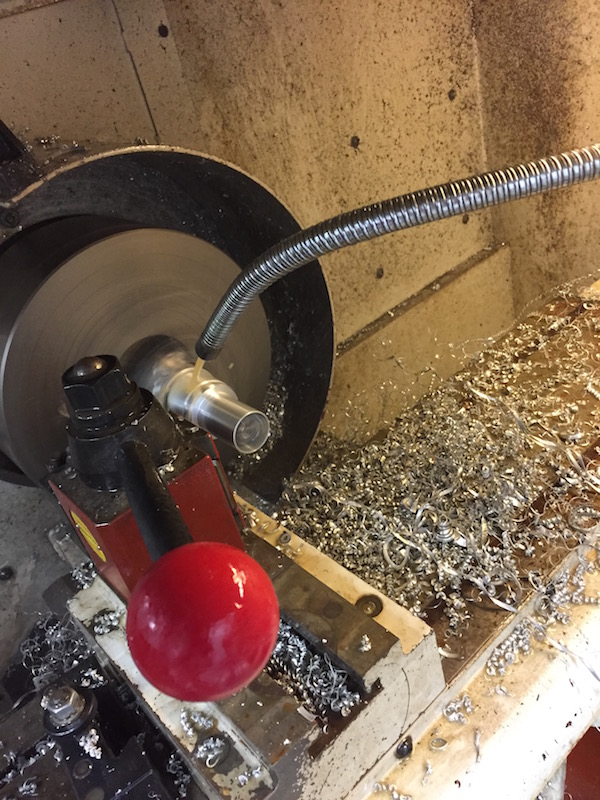
Made parts this afternoon - all is good now. Who knew that having a compensation for a cutter's end radius of .0162 would screw up so much! Remove the radius outta the tool's setup and all worked just fine. Stupid ProtoTrak! - they have funny little issues like this.
This is my second round with this project - a friend of mine that does dirt bike suspension stuff has made a kit that takes the KYB internals and puts them into the WP forks on the newer KTMs. Apparently the closed chamber KTM forks suck.
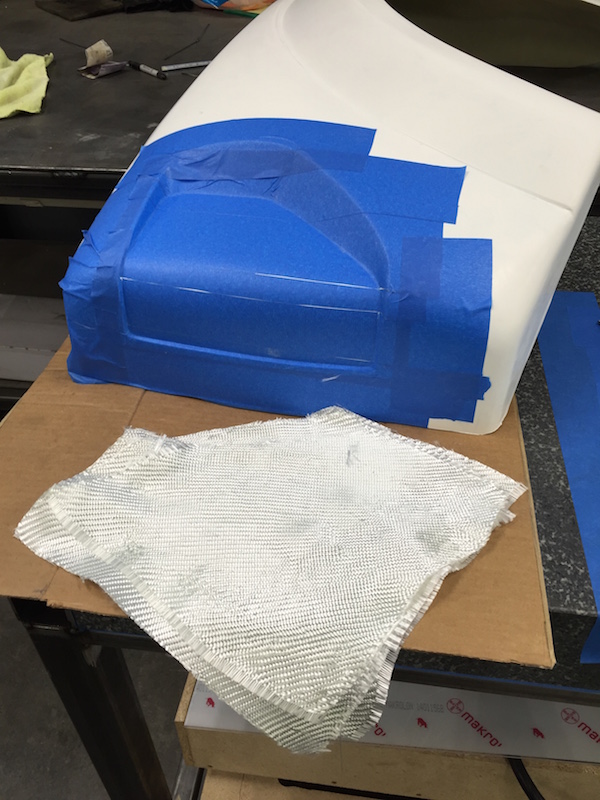
Body being cut off - this is the final stage of the first of four machine processes:
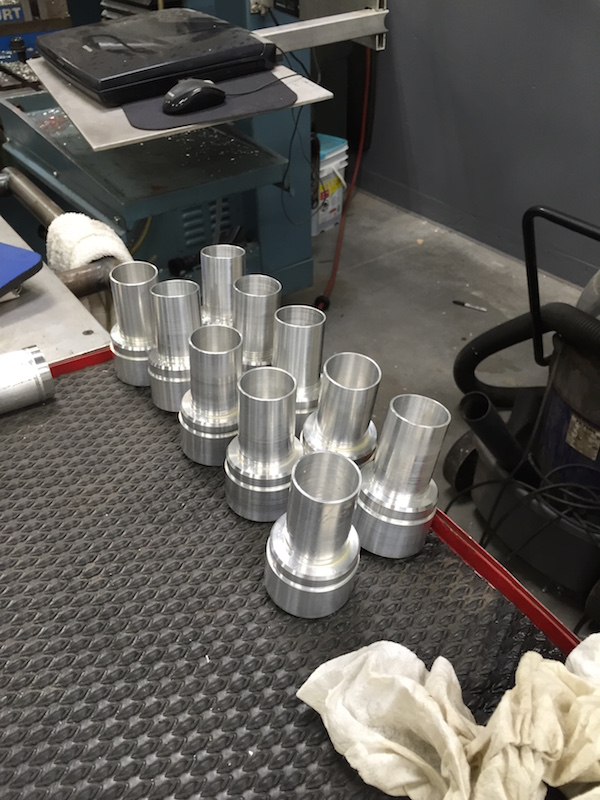
Three bodies and one completed one. He's anodizing them black and I'm really impressed with how well they turned out - honestly I have a hard time believing I made something that looks so nice after anodizing. They look so... professional!

Ten little tubes sitting in wait.
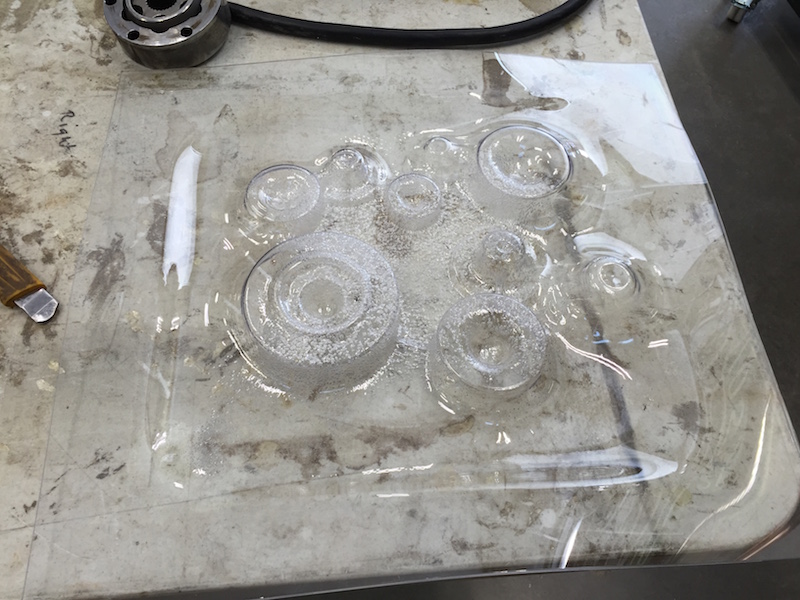
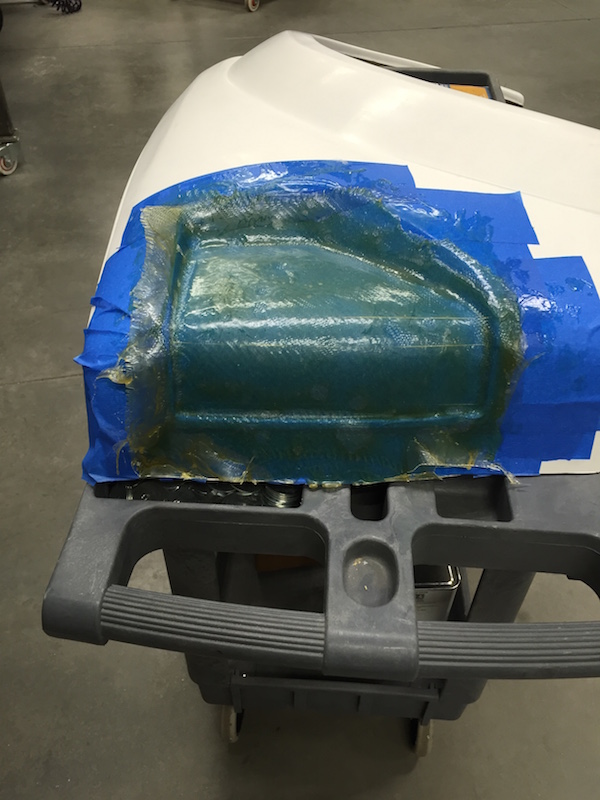
So, while the lathe was working away, I made a mold of the left head light so I can make a plug that I'll try to vacuum form around.
 "
"
It came out really well. Blue Painter's tape is the shit!

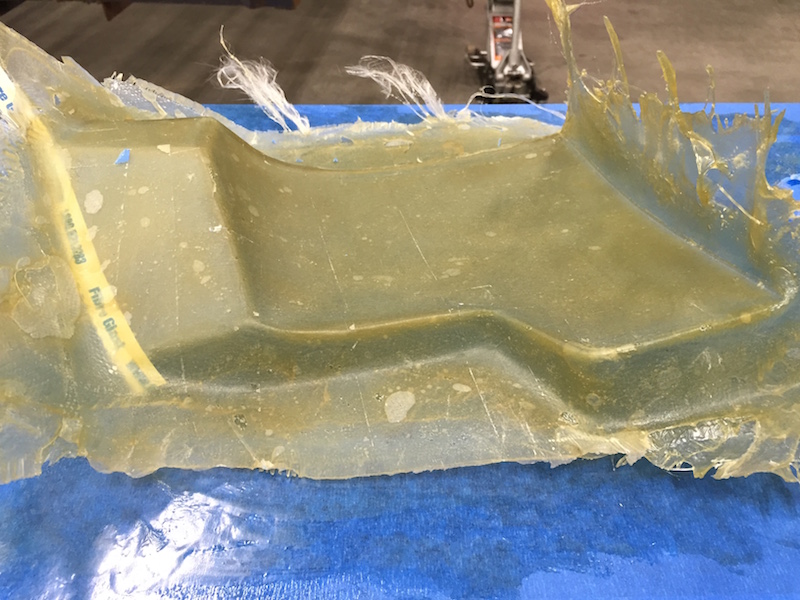
I'll make a plaster mould off the back side of this and then detail the plaster. I'm not sure if I should do something like Bondo and then the plaster or just plaster or? Either way, once I have the plug, I'll have something to try to vacuum form over.
Need to go watch a couple of Redliner's videos. He has some good ones on glass.
Nov 11, 2015
Justin
Flyer and I made some progress on the design tonight.
We figured out the max droop, full steering lock parameters. Sent some info to Richard so he can weigh the options. Probably start on the steering tomorrow night.

Nov 17, 2015
Justin
Hey 'K, tried my hand at surface modeling for the first time. I have an ok version of the front clip, at least enough to know clearance for the tire at bump. I don't want to see that sweet sweet fiberglass damaged.

Nov 20, 2015
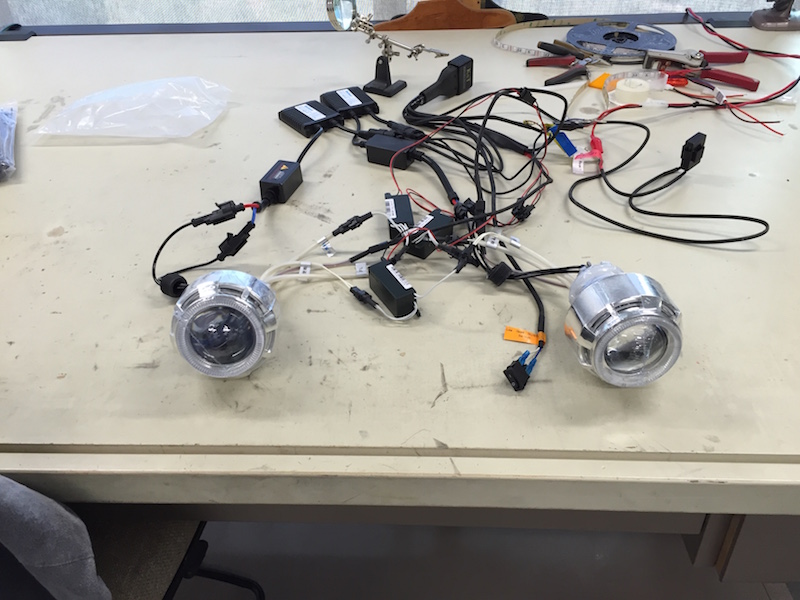
Ordered HID headlights with halos and demon eyes. Reviews I've found on this company have been good.
2.8" diameter, white halo, blue demon, 55W HID
Now I need to get onto making the housings and figuring out how to form the lenses for the lights.
Tail lights will get a similar treatment.
More headlight work.
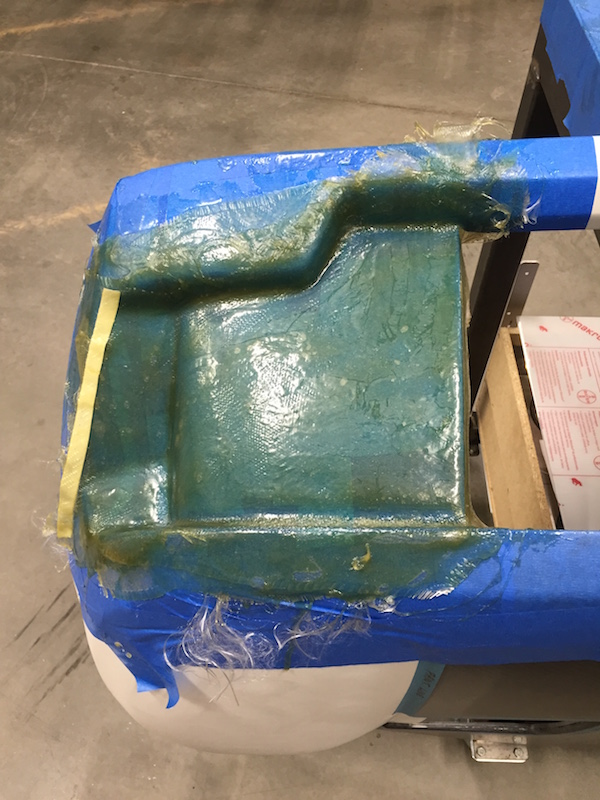
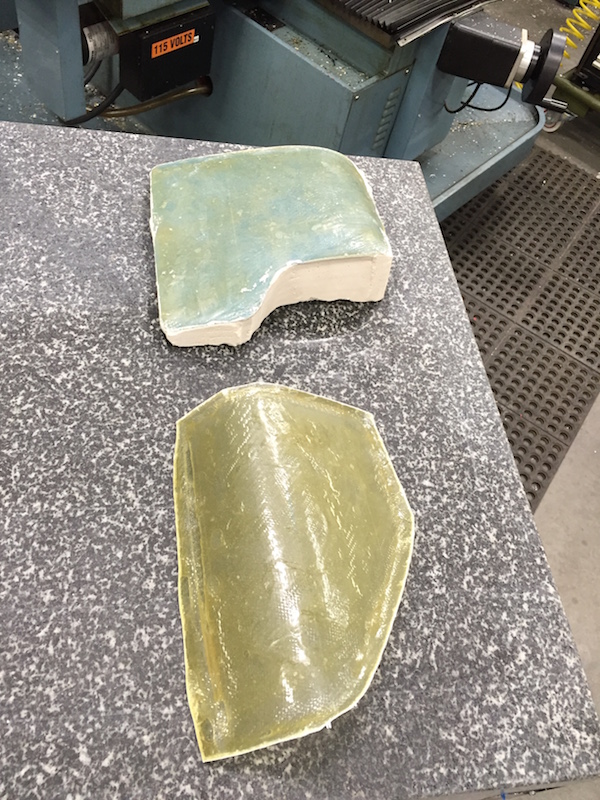
Got the excess cut off the mould side of the light and fitted it:

Covered it in painters tape and built a small box around it:
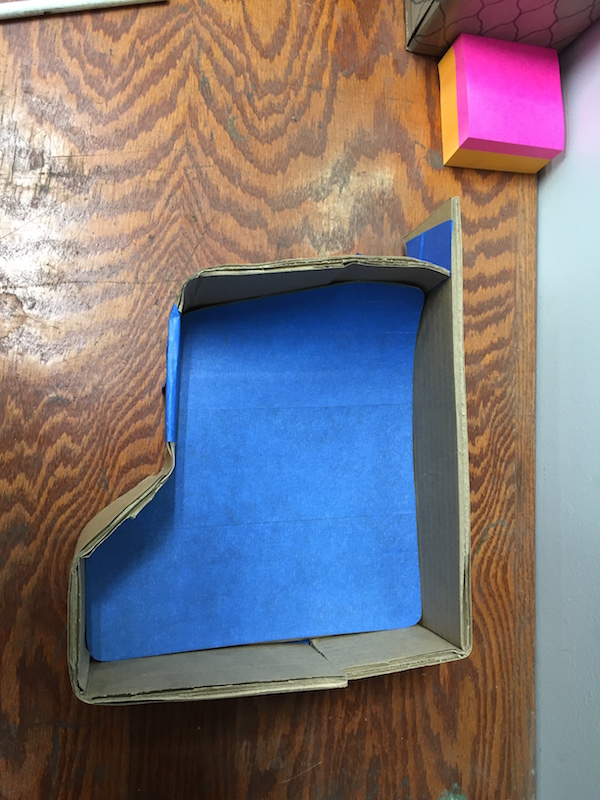
Filled the box with plaster:
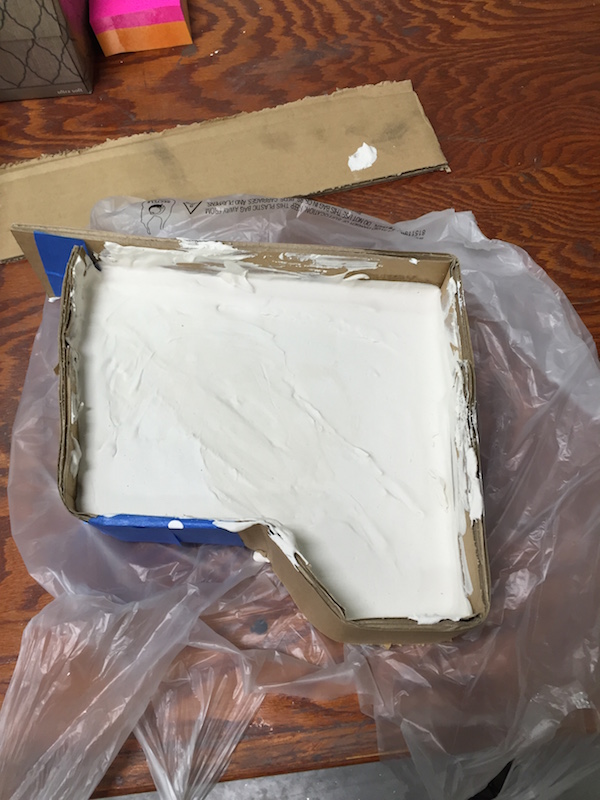

Ended up with a nice plug - I've not pulled the fiberglass off yet, as I'm wanting it to be completed set up and dry. (which doesn't take long in the desert...)
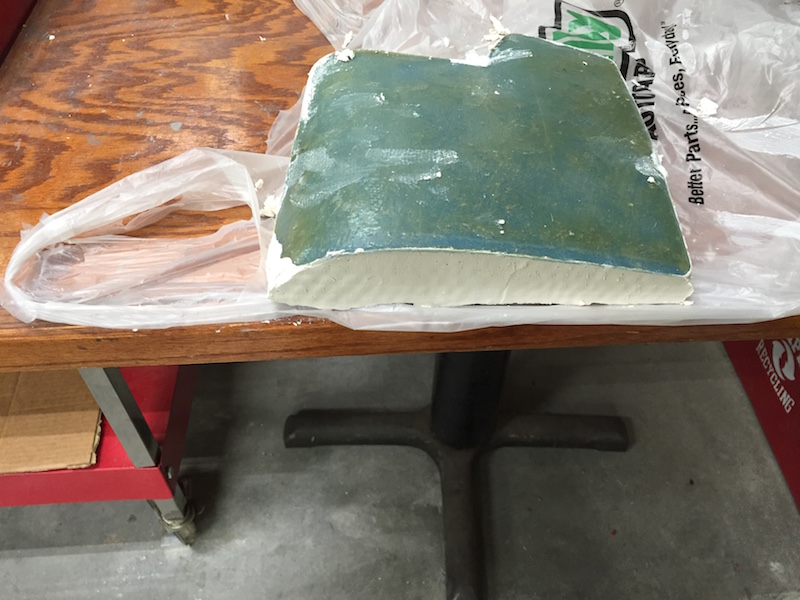
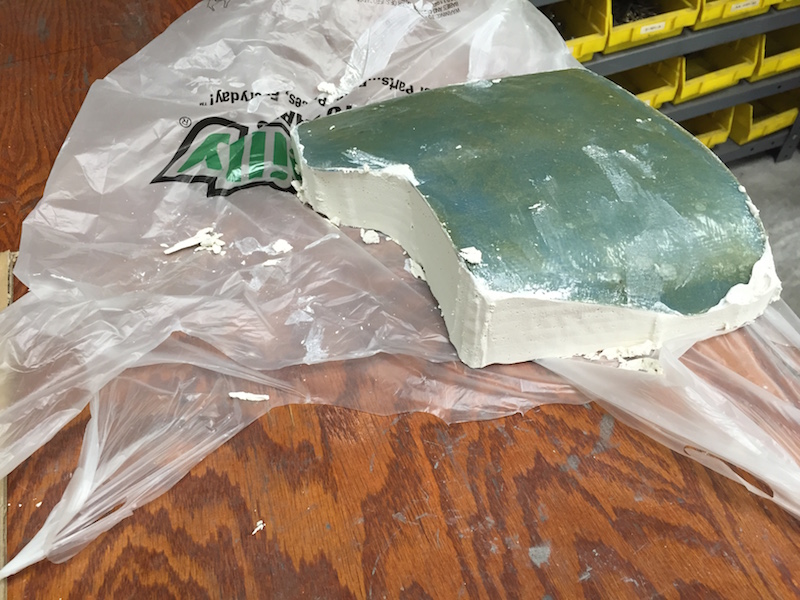
Since I had the bed side down, may as well do it's mould too:
Tonight's work:

I got smart this time and trimmed the majority of the crap off the tail light while it's still "green". Cutting all the excess off the headlight this afternoon was a pain in the butt!
Dec 1, 2015
Got my headlights yesterday so I had to play around and see what they did.
Pretty cool. Two halo rings (they call one an Angel Eye), a Demon Eye and then the HID output.
Not sure what I'm going to do with all these wires!
Blue Demon Eye:
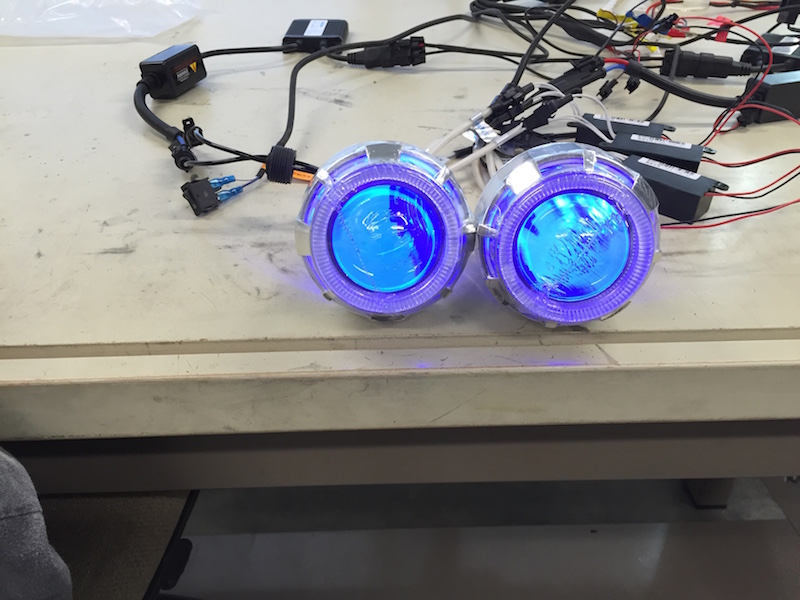
Outer halo active:
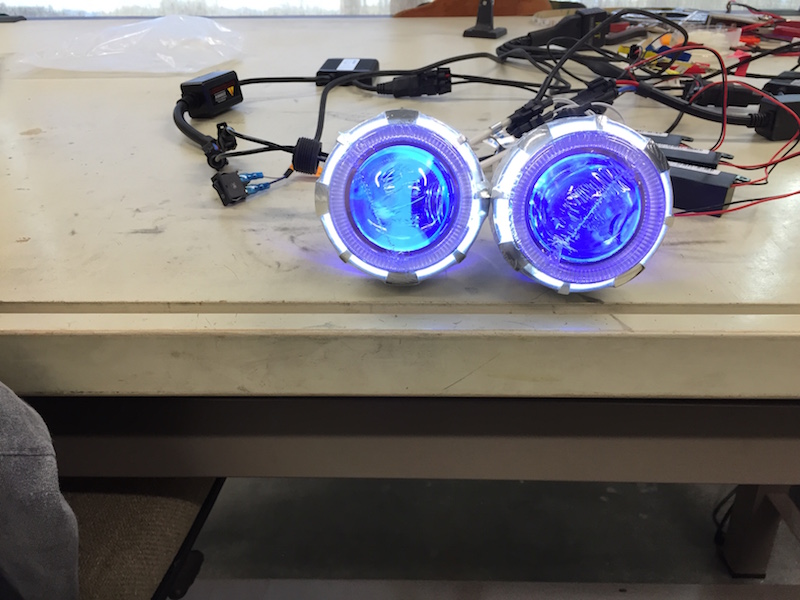
Inner halo active:

Everything active:

The light pattern seems to be pretty good. It's very defined on the upper line and when you activate the high beam, it opens a shutter that allows all the light out.
I also worked on the plug a bit more getting everything shaped and sanded. I still have to do a skim coat of Bondo that I'll be able to sand smooth and get all the edge radius work done.
Hopefully I'll try forming one this evening.
This concludes the building that happened up through the end of 2015. Click on the link below to be taken to what happens in 2016.
The Mini-Raptor build during 2016
Return Home