

Home of K-fab

|
|
|
|
The Mini-Raptor Build, 2022
2016 build
2017 build
2018 build
2019 build
2020 build
2021 build
2022 build
2023 build
Jan 10, 2022
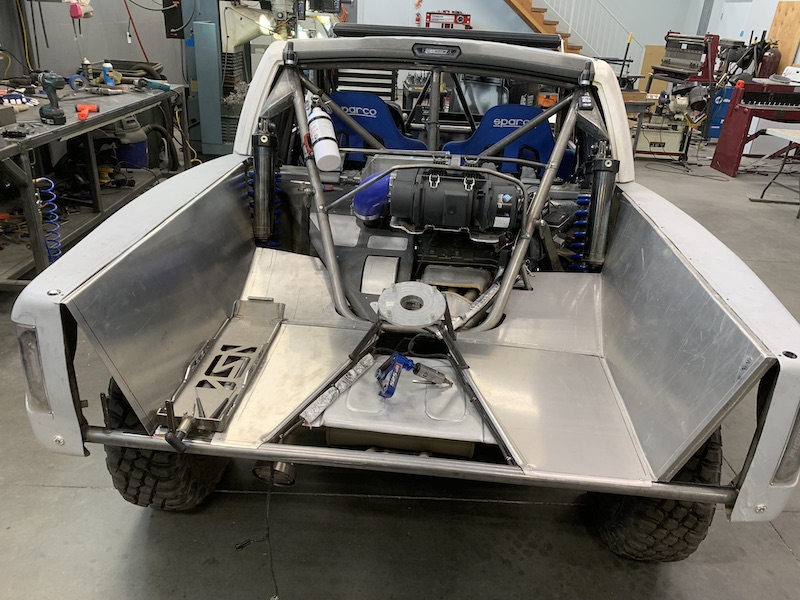
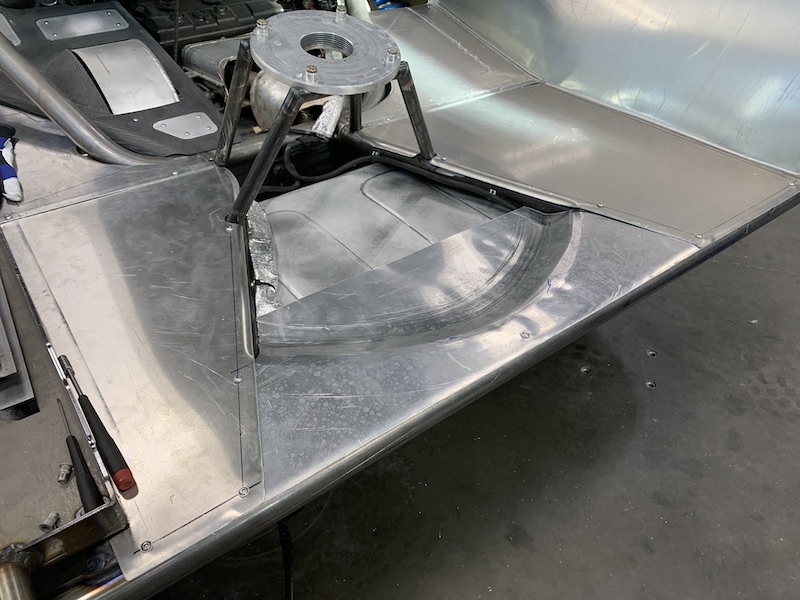
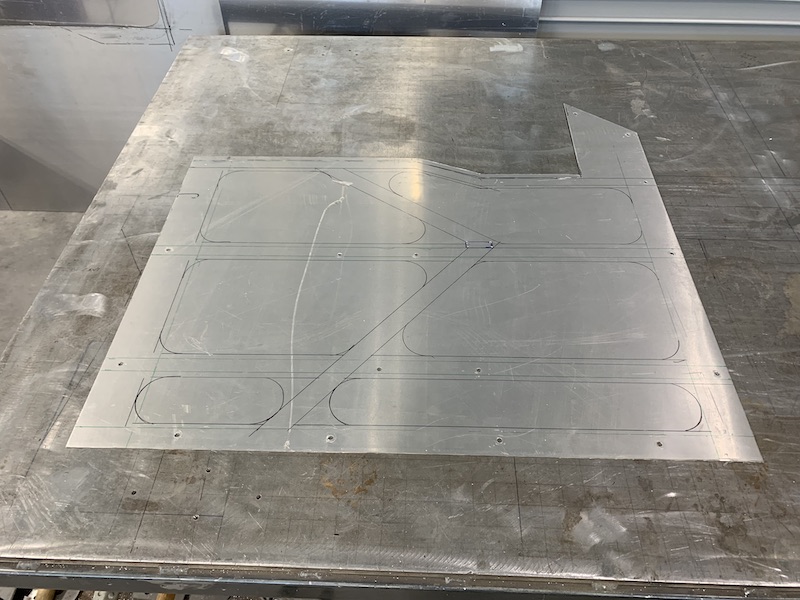
Got both bed sides and the one right lower bed panel in place.
Still have to do some detailing and fitment.
I plan on rolling in some "windows" in the flat areas for some character and also rolling the edges for stiffness in key spots.Started messing with the panel that goes under the rear of the spare tire. That's going to be an interesting lesson in sheet metal manipulation.

Jan 20, 2022
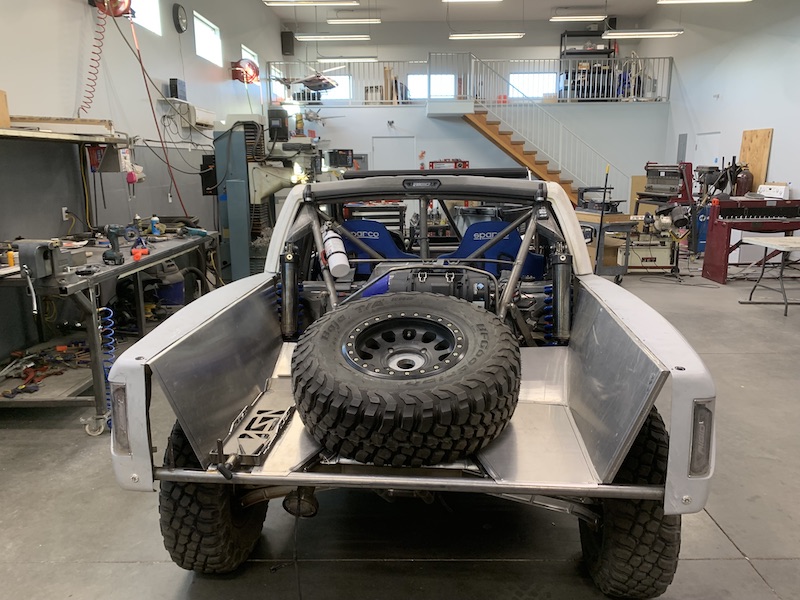
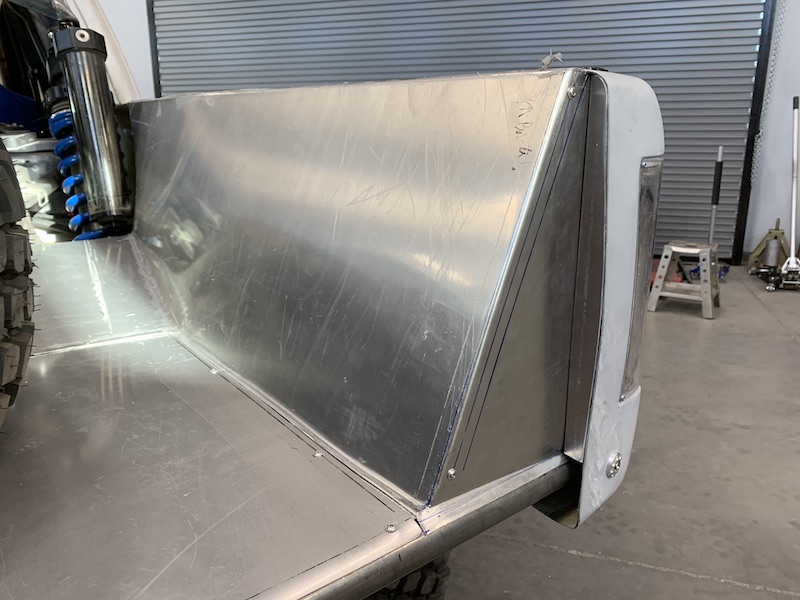
The bed is done - unless my first test run shows that either the wheel area needs clearance and/or the shock shows me the same thing.
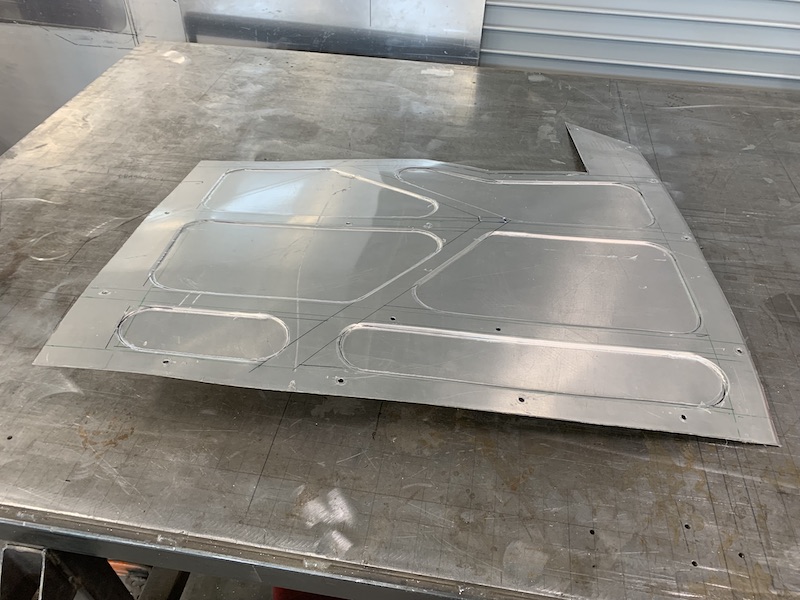
Rolled in a radius along all the free edges of the panels to stiffen things up. It's surprising what a little lip does.

Got the middle rear panel clearanced so the spare doesn't ride on it.
I've knocked out the bumpy spots a bit and will get after them a bit more before the panels go off to Line-X for coating.
I've decided that I'll get them covered in the stuff - should make for some sound damping and will also make the panels darned near bulletproof.
Being that I didn't (know to do it before folding) get any sort of features rolled into them the Line-X will cover up my missing features.
Finished up the rear of the bed sides too by closing in the back side by the tail lights. This worked out better than I was expecting.

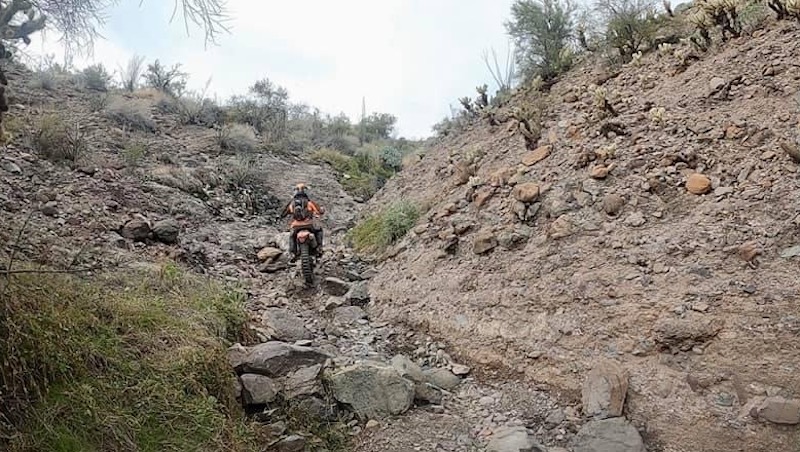
I did get a ride in last weekend with two guys who are a decade younger than I and like riding stuff that's a bit more challenging than I prefer...
Gassed during the ride - kept taking the wrong line, falling over due to short legs and large rocks. I bailed from the ride not long after this and went back to the truck with my tail between my legs. No crashes, but man oh man, that ride wore my ass out!
This was Thomas going down one of the "easy" spots... Actually it's not quite as bad as it seems, just tight and definitely a one way trip.
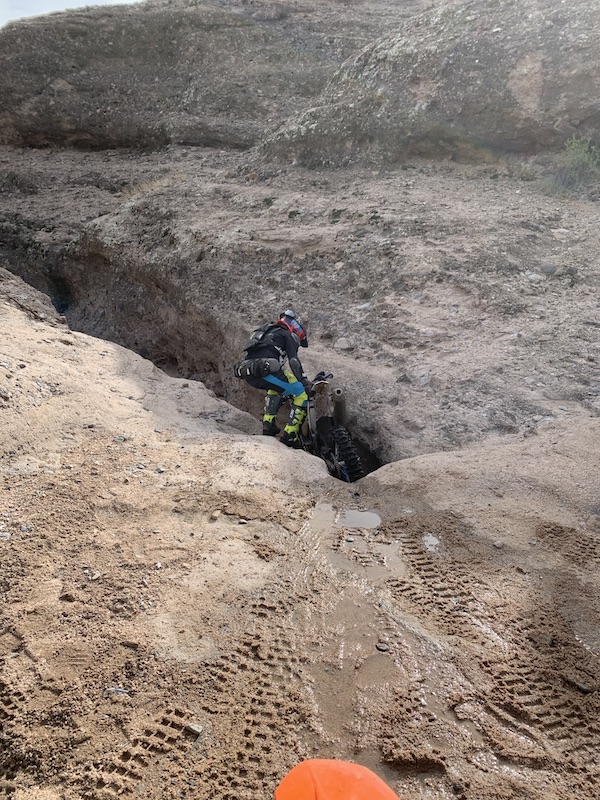
Here, let's go down this trail, said Thomas. I should have bailed here.
I made it down that section fairly well. It wasn't until they tossed in a few step ups that I started getting beat.
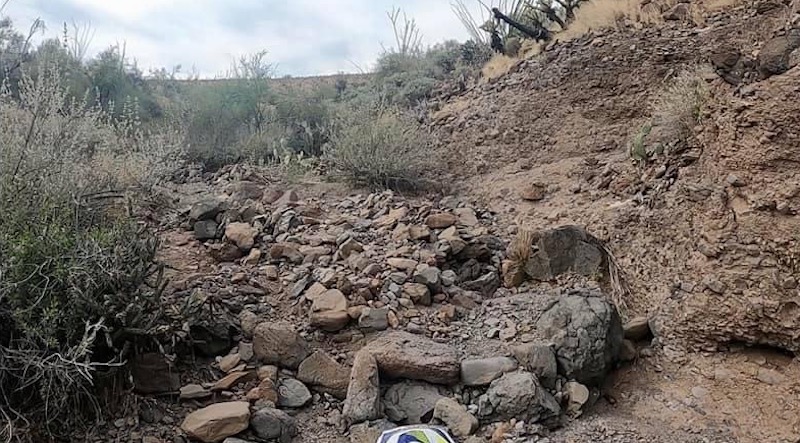
Got caught between/by a couple beach ball sized rocks after this step up.
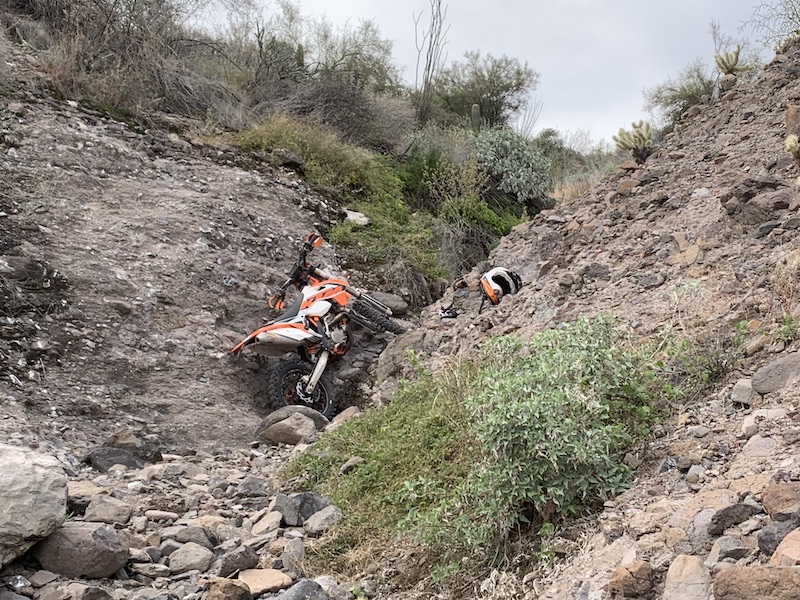
Short legged and tired I decided it was easier to sit down on the prickly pear cactus that was hiding by one of the rocks.
After standing back up (pretty quickly), trying to throw a short, very tired leg back over the saddle and missing, the bike decided that I'd have more fun laying back on the prickly pear and then pinning me to the ground. I got it off of me but not before filling my left arm and back with pokeys.
Jan 21, 2022
Another test run.
All systems go sort of?
No leaks, no hood loose, nothing in the bed hit except the limit straps so I'm trimming them now.
Still need to replace the secondary clutch temp sensor.
Looks to be another air bubble in the coolant system (sort of expected). Watch the water temp fluctuate. Engine ran cool.
Shocks are feeling better - still need rear end rebound damping - it's springing up too quickly.
Fuel gauge needs tending to.
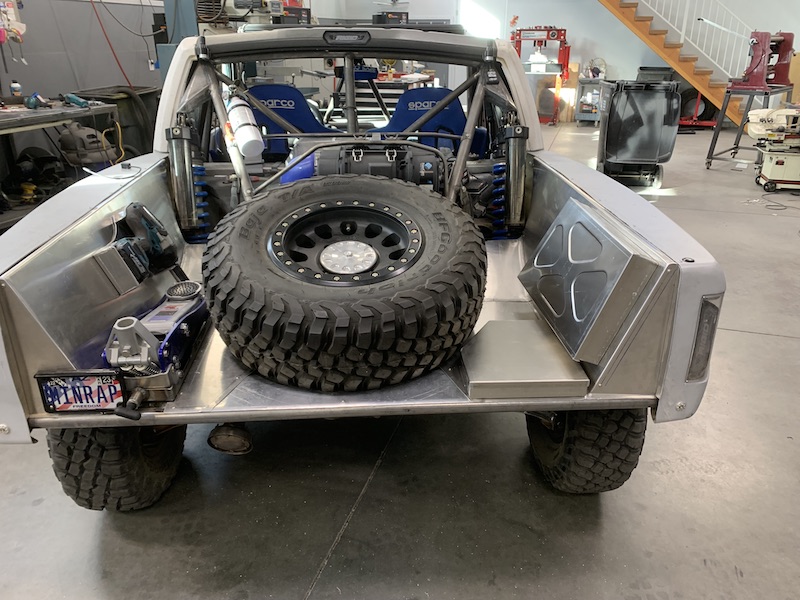
Realizing that I have room for a tool box on the other side of the spare, opposite the jack.
Jan 22, 2022
kustomfab2003
Looks like it handling pretty dang good, much less head bobble action on this one, there will always be some. Great job!!
Me
I was surprised at the difference between this and the last run.
I started out with all of the shock adjustments at 5 turns out (no clickers, just a bolt head with an indexing dot). This left the bypass ports fairly open - probably to the point that the valve control springs probably weren't involved anymore.
Before this run I shut everything down two full turns. A fairly large change and I definitely feel it. Right now large changes let me know if I'm headed in the right direction.
It definitely feels less floaty and doesn't feel nearly as squirrelly. Much more planted and easier to keep it headed in the direction I'm pointing it.
Yesterday's run was in two wheel drive and felt more in control than with the previous settings and in 4x4.
Front end seems to be closer. There's definitely room for improvement but at least I'm seeing change in the right direction. I'm sure as I get the rear dialed in the front will show where it needs more massaging.
Rear needs to have mid stroke compression loosened as it feels like it's packing a tad. Not able to tell what the full bump compression is like but I'm also not bottoming enough to get into it's tuning yet.
Rebound - too quick coupled with what feels like too stiff mid stroke compression packing and the rear kept popping up over rises and such. - especially off throttle (normal reaction but magnified).
I need to take my tripod out, set up a camera and do a couple of runs across a section of dirt the unsettles the chassis appropriately.
Jan 24, 2022
kustomfab2003
Let me know if you want me to hold the camera and follow along the trail.... I fly out Monday (to the land of the frozen) but will be back on Friday afternoon and then back to ND on the following Monday again back to the frozen land...
Me
Next weekend is Robyn's big 60 Bday so we'll be busy.
I need to head your way anyhow - know of any whooped out roads in your new area?
btw - I noticed the new location in your profile. Yay!
bdkw1
Are you running the sway bar?
And video would be helpful.
Me
Yes to the question and agreement on the comment.
jimmyg
Huge step forward! There is no way you would have committed to some of the corners before like you are now. Much more trustworthy and shore footed. Having all them bars around you makes me happier to.
Outside footage sounds like a winner to. So long as Josh stands WELL back!
Me
LOL! Waaaaay back!
Bars - so overrated.
It seems to be going where I point it so that's a step forward. I guess, sitting here thinking about it, it did feel a lot (alot? ) different this last run. Progress!
odypilots
Looking good, K. It's great to see projects finished. The fact that you took yours to another level makes it even impressive. Good on ya!
Me
It will be great (in my best Trump) to finish it.
Still have the hvac system to install, interior work (dash is sitting on a shelf mocking me), closing up the cab. Then I get to fully disassemble and paint.
Oh the joy!
At my present pace there's easily a yrs worth of work left.
Jan 31, 2022
Been hacking away. Got the majority of the bed stuff figured out. Have a plan as to where stuff gets planted.
I'll be Line-X covering (dark grey) the panels (makes them damned near bullet proof, will help damp sound) and then the boxes and holders will get powered coated some other color. Right now everything is bright aluminum so it's kinda utilitarian looking.
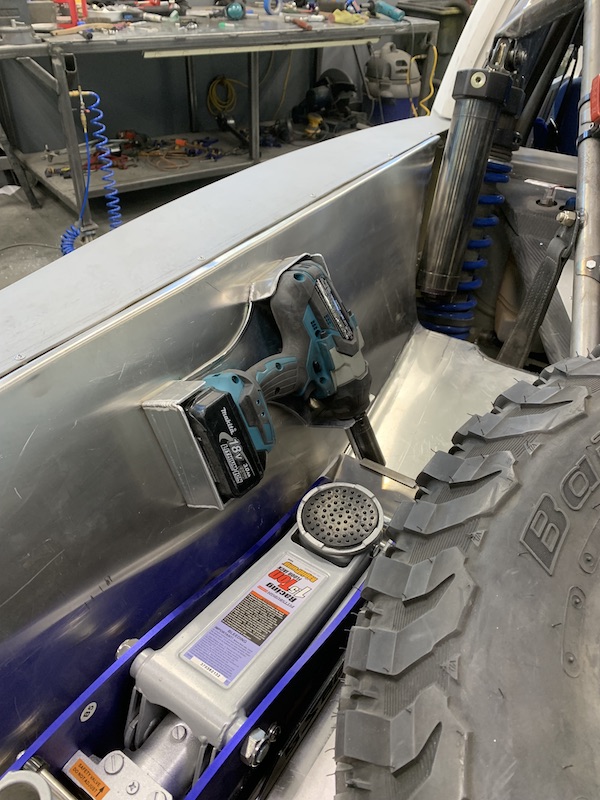
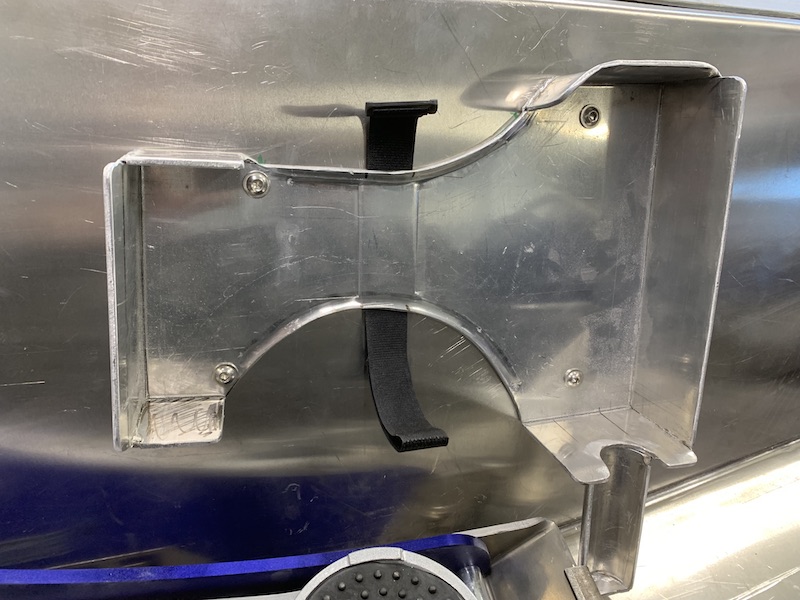
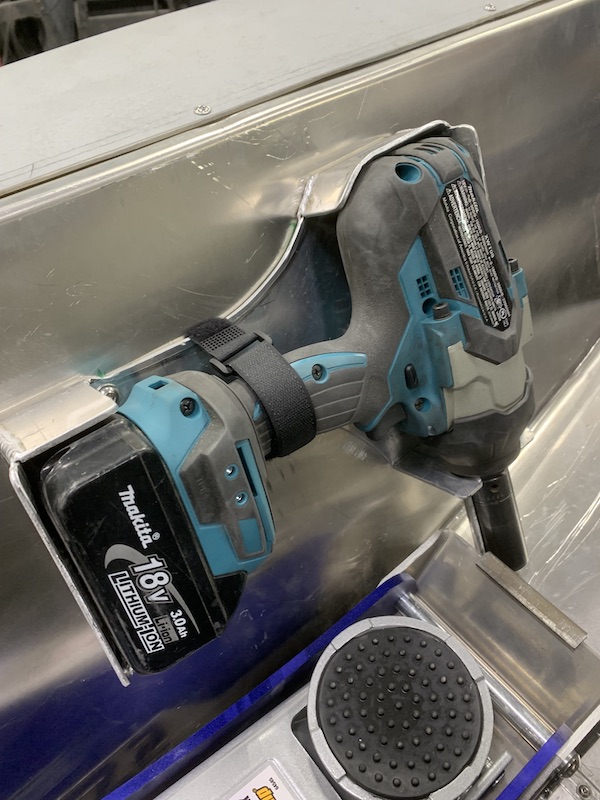
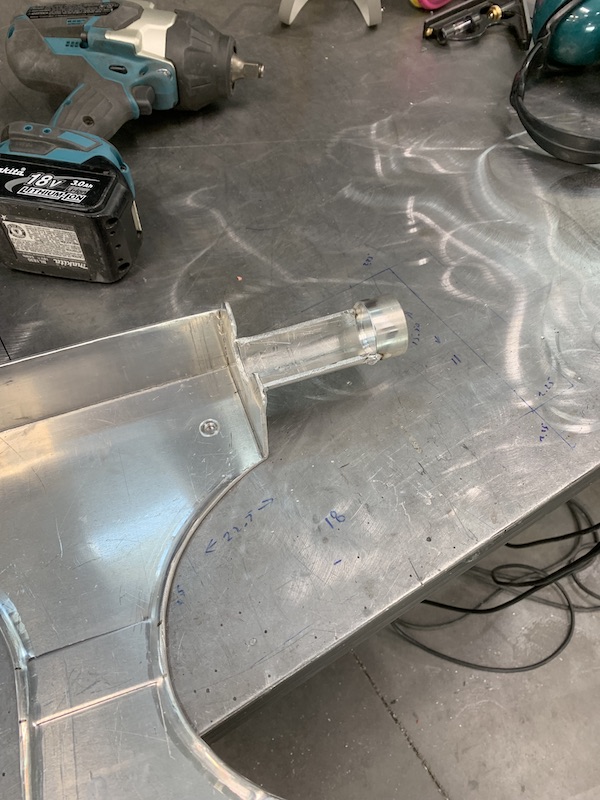
Makita 1/2" impact goes for a ride - this thing replaces the old Snap-On that I had and makes the old Snap-On look tame. I'm kinda scared of twisting stuff off as hard as it hits. It also does not live in the truck - that's a shop tool (and I'll forget to take it with me and then have to swear and use caveman tools).
Used .125" 3003 and formed a frame around the impact - also made a socket capture. We all know that as hard as it is to pull a socket off if I didn't do something to keep it from going on a walk about it would disappear at the first good hit. Vibration has a way of removing stuff that's not supposed to go anywhere.
Impact in place - just got the Velcro strap that will go around the handle. The thing fits so well that it won't take much to keep it in place.
Got that done and then got busy making fancy boxen out of .045" 5005.
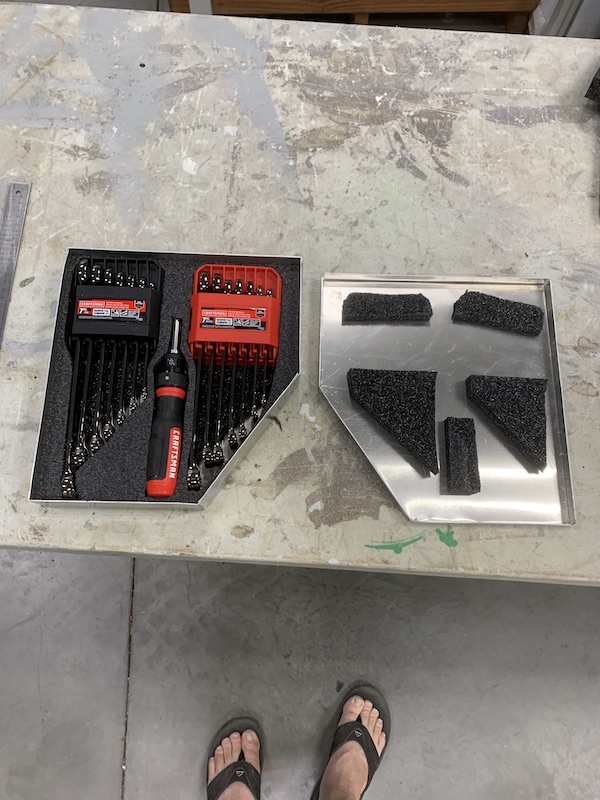
One for wenches (Arrrgh) and a single vodka & orange juice, one for the socket set and room for other stuff like zip ties, duct tape and a tie down strap or two. Pliers fit under the socket set - there's a little compartment. I'm waiting on foam that will get cut to hold the tools in place.
Craftsman! Sears is gone but Ace Hardware carries Craftsman. Woo hoo. Just found this out in case you can't tell... Bang for the buck, they make good stuff, have always stood behind it and it costs a lot less than from one of the trucks. Plus, it's going in the back of an off road truck and won't get used often (we all hope!).
Wrench set in SAE and Metric because I have a bastard fastener machine.
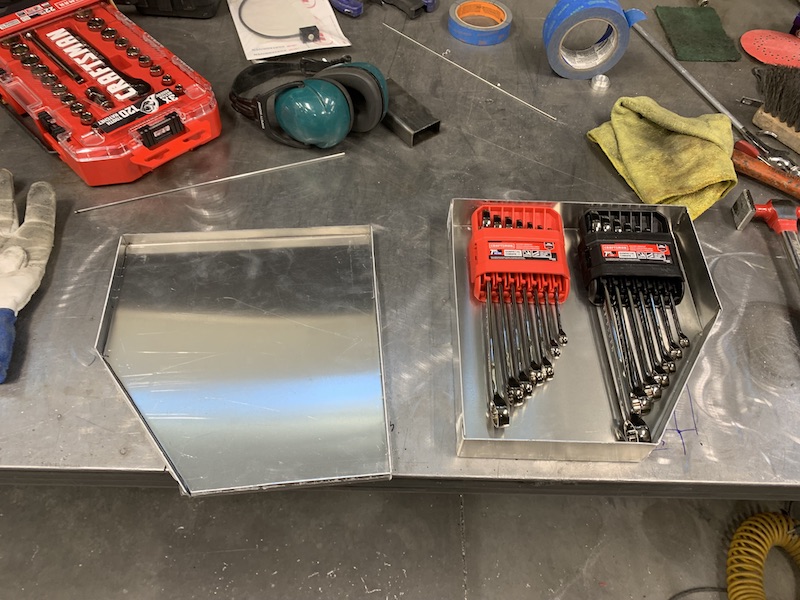
The lid fits like it was made for it - because it was... (insert rim shot)
Originally I was thinking it would go here and then the other box would go forward then I started looking at the shape and the area on the flat by the spare tire. For ONCE I was smart enough to not mount anything yet. (didn't have to do it twice! Yippee!!!)
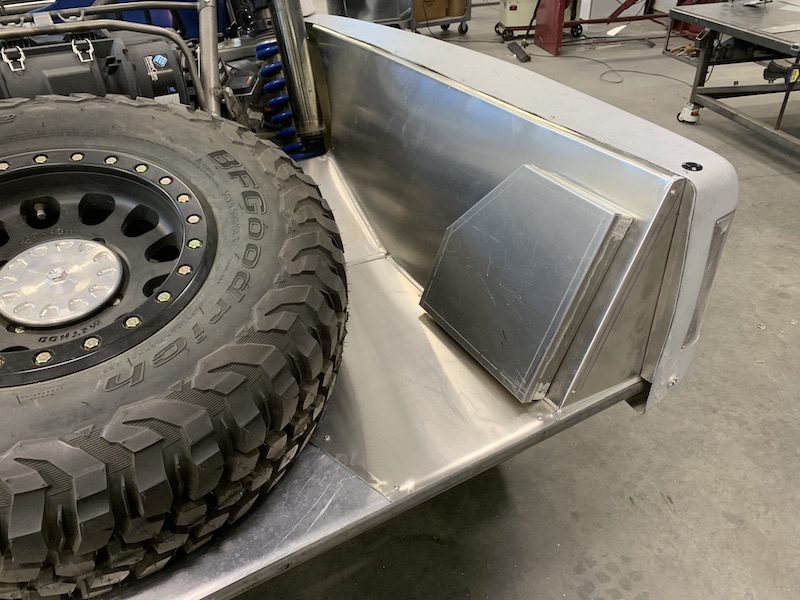
So then I made a boxen that held the socket boxen and had room for other shit (I'm hoping a hammer - may be some mods required and I need to get a hammer).
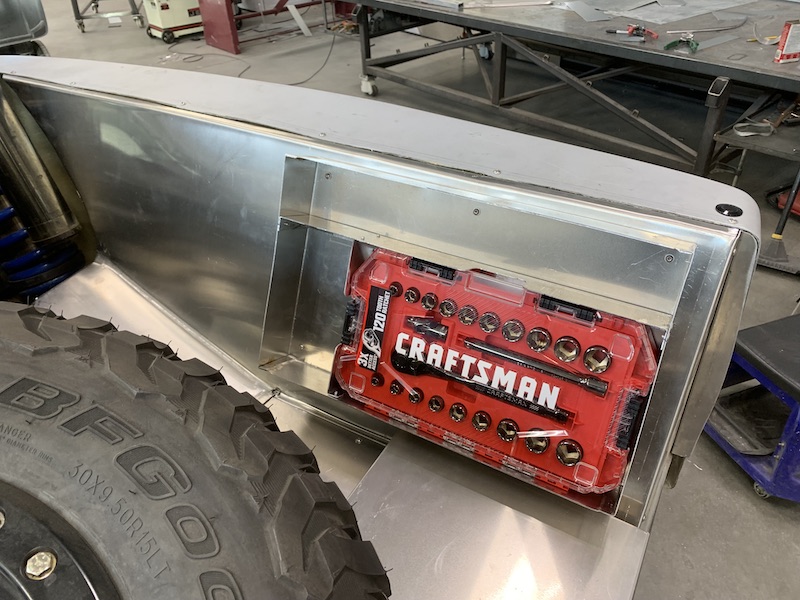
Didn't take long to realize that the wench (Arrrgh) boxen fit on the floor panel and that the socket boxen fit on the side of the bed panel. I fastened stuff and there it sits. Was really careful to make sure I could get the wench (Arrrgh) lid off before attaching the socket boxen to the wall. (didn't have to do it twice! - beginning a new theme)
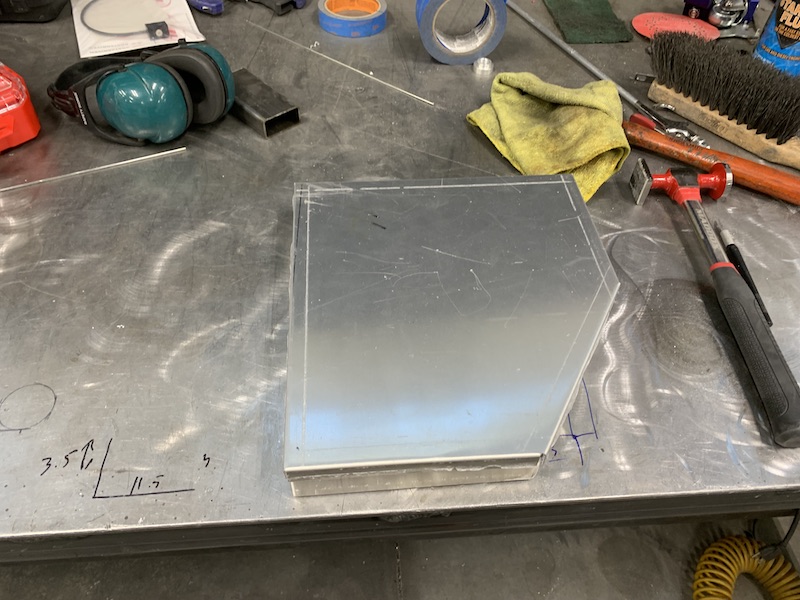
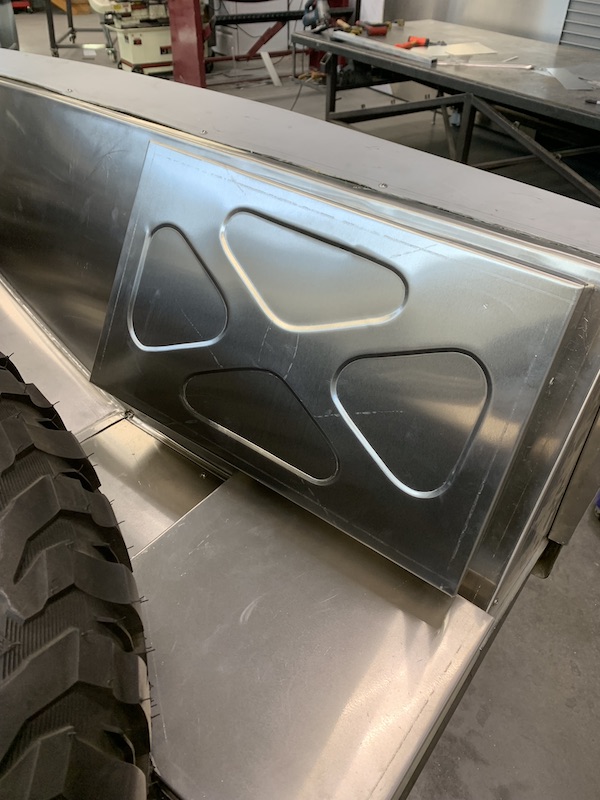
I knocked out a pretty trick lid for the box - this is my first try at doing the recessed panels. (patting myself on the back - impressed myself that it went so well and ONCE!) Now that I know you have to do the pockets BEFORE folding I'll have some fun. The bed looks plain without them so I'm covering it up. The Line-X will also help take away the plain look.
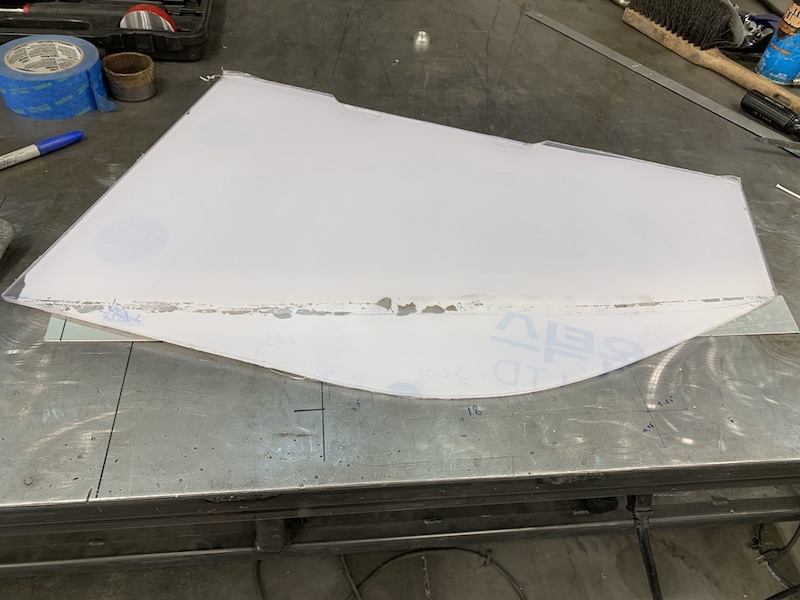
It did warp along the long axis but not badly. The panel is about 17" long and the warp was maybe 1.5" worth of bow.
As soon as I bent the edges it flattened right up. It does the wonky warp and hold thing right now but that will go away as soon as I weld the edges of the corners together (ran out of time).
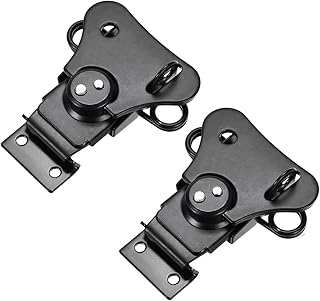
I'm waiting on what they call butterfly latches to hold the lids on - it's a quarter twist thing that pulls down to clamp.
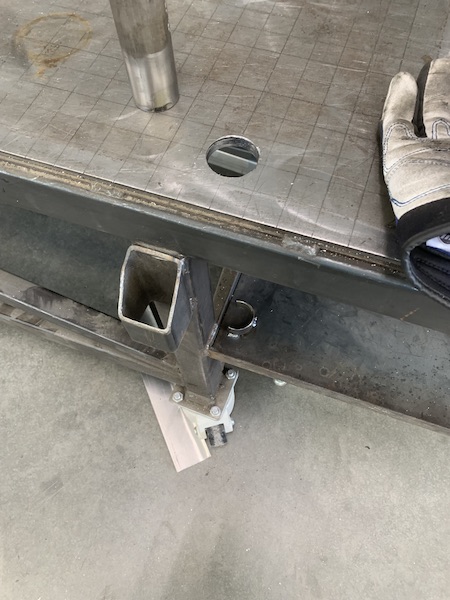
Planned on putting the spare belt stowage on the panel next to the the jack and then realized I don't have a spare belt after looking for it - and no, I didn't find my injectors whilst looking for the belt.
It's supposed to arrive today.
Thinking I'm tackling the doors next - still have to make the windows curve to fit and the door panels.
Avoiding dash and HVAC.
Jan 31, 2022
fatboy1214
K-Fab are the tool boxes just held on with a few rivets? Do you have any concerns about them breaking since they're holding weight and bouncing around? Overall they look awesome!
Me
The bottom one is mounted to the rear "bumper" tube and then to the lower panel, all via 4mm rivet nuts.
The side box is held on with six of them.
They're well supported. I shook and pushed and tried to move stuff and it all seems well secured. It's also part of the reason I didn't mount things farther forward on the panels as there is a bit of movement/flex.
The weight for the area is fairly light and the boxes actually help stiffen the structure.
Feb 4, 2022
More progress. The bed area is done as far as I can tell - I'm sure something else will pop up on me.
Finished and mounted the wench and vodka & OJ holder a couple days ago - Monday, I believe.
I've not adhered the five pieces of foam to the lid yet - will after powder coating. Right now I they just get put in place and then the lid latched down.
Mounted it to the flat bed plate. The two back screws hold it to the bumper tube (nut inserts) and there are two other screws holding it farther forward. Makes for a nice solid mount.
The butterfly latches work perfectly. Small, simple. On this box I didn't use the capture, I cut a slot in the edge of the lid and let it be the capture - two less components to work loose.

Tuesday I started working on getting the socket boxen lid finished.
Decided I'd do the same capture setup I did on the first boxen lid so I welded up the corners, made sure the lid still fit and then cut the catch slots in the edges. Four slots cut, time to remove the lid and start locating the latches on the boxen.
The quill (Z axis) was pretty low so in my wisdom I hit the return to zero button on the Proto-Trak's control, knowing it would retract the quill a few inches and give me clearance to get the lid out w/o screwing shit up.
Up goes the quill to it's home location so I have room to move around without fighting the .125" end mill that's hanging in the way of easy lid removal from vice.
Then the table heads to 0,0. NOOOOOOOO!!!!!!!
Brainless wonder here was just thinking get the quill up, not move shit around. One edge of the box lid was already really close (almost touching) to the back of the mill. As soon as Y axis started moving my box lid got shoved against the mill, the lip that was in the vice held tight and I suddenly had a pretzeled lid.
SHIT SHIT SHIT!!!!
Tried to straighten it - nah, of course not. It was too wadded. Guess it wasn't one shot at the lid. In fact, it ended up being three shots. Lid #2 ended up getting one of the edges trimmed at a bad angle (the lid moved as I stepped on the shear pedal). Shit!
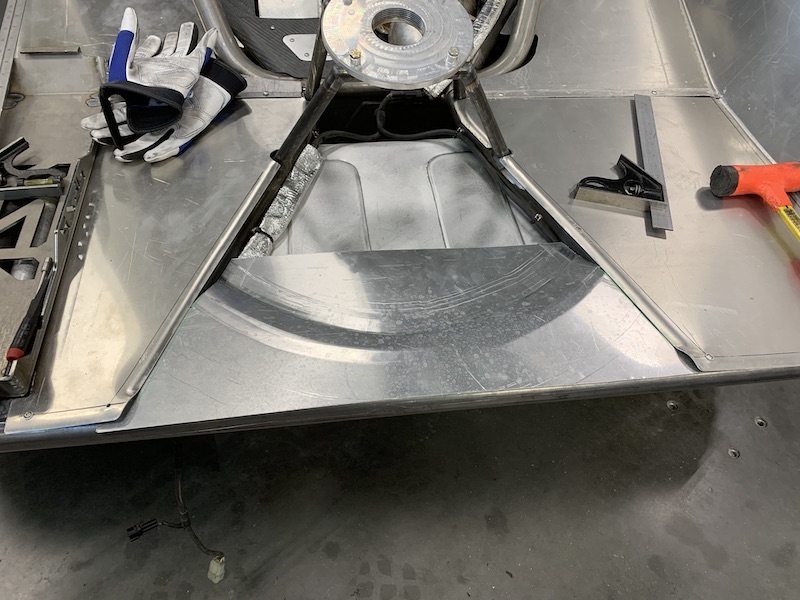
I'd mentioned somewhere earlier that when I put the recesses in the sheet for the lid that it warped, albeit minimally. Here's the warp:
The bow disappeared as soon as I folded the edges.
Once I got the lid fit to the boxen and welded up I used the captures that came with the latches instead of cutting slots. Argh... First lid was SO much better than this one. Oh well. The boxen are finished.
Spare belt arrived. After dinner I headed back to the shop with belt in hand ("I'm just gonna take this stuff to the shop, I'll be back in a few.")
Got to the shop, laid the belt against the bed panels in a few places and found a home.
Grabbed a piece of sheet, made a couple measurements, drew lines. Fold, fold, fold and I have a basic piece that holds the belt well - and of course, in my theme of do it more than once, I didn't make it "tall" enough - 5" spread is too tight. It's made the belt too long to fit where I wanted it to. No big deal - this was sort of a test piece that I knocked out just to see how things would fit. I headed back to the house.
Yesterday started well.
Took a couple of new measurements, cut a new piece that was 7" tall, rolled edges, got all fancy and cut a big window in it, rolled those edges, smoothed everything out and had a damn good looking piece with some artistic character. Perfect.
I'd rolled an edge on one end of the new holder and got it a tad wrong. No biggie - take the plastic hammer and beat the bad edge back flat. I've gotten good at this. I'll just flatten and re-roll the edge.
Nice metallic sound of a hammer hitting an aluminum sheet against the table - whack, whack, whack, THUD! First time I've managed to nail a finger with a hammer in I don't know how long.
Oh shit.
This is getting ready to hurt.
Yup, there comes the pain! Fortunately I didn't hit the nail bed - just the side. Still, I managed to compromise the nail and start leaking (and dancing and and swearing).
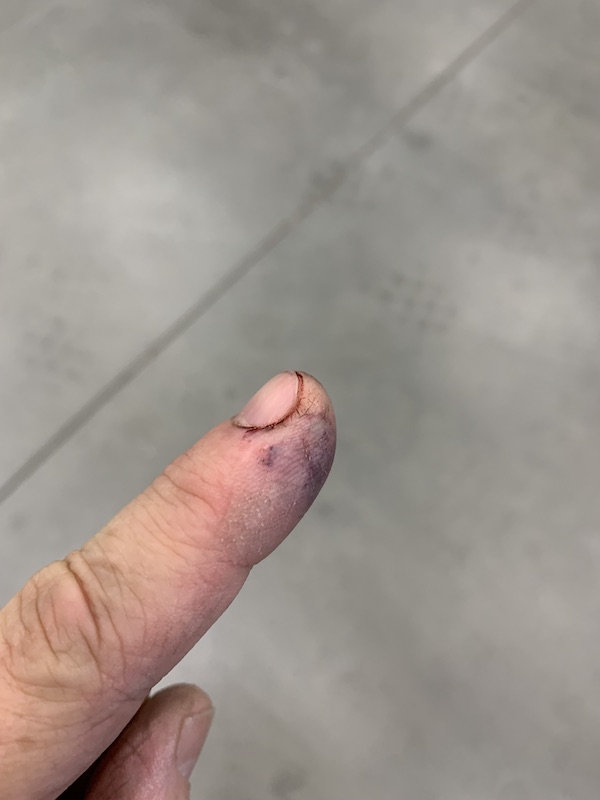
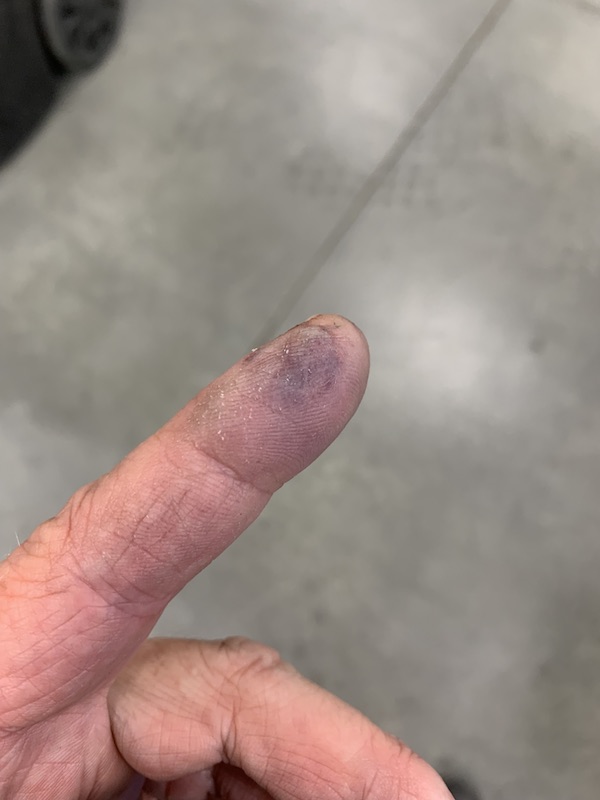
Stupid finger kept leaking through the day. Blood really shows up on bright, shiny aluminium.
Try #3 - and I'm not wasting another large piece of sheet. That's two lids and two belt holders worth of sheet that have headed to the trash bin already.
Went about it another way - made two holders that are 6" wide and hold the belt w/o it flopping around.
Finished holder w/o incident, mounted where it's supposed to be without anything hitting, interfering and such.
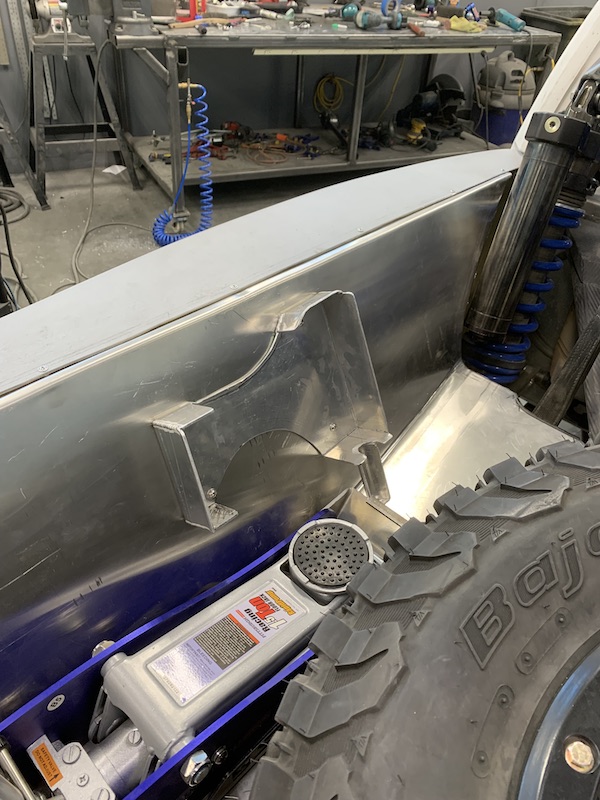
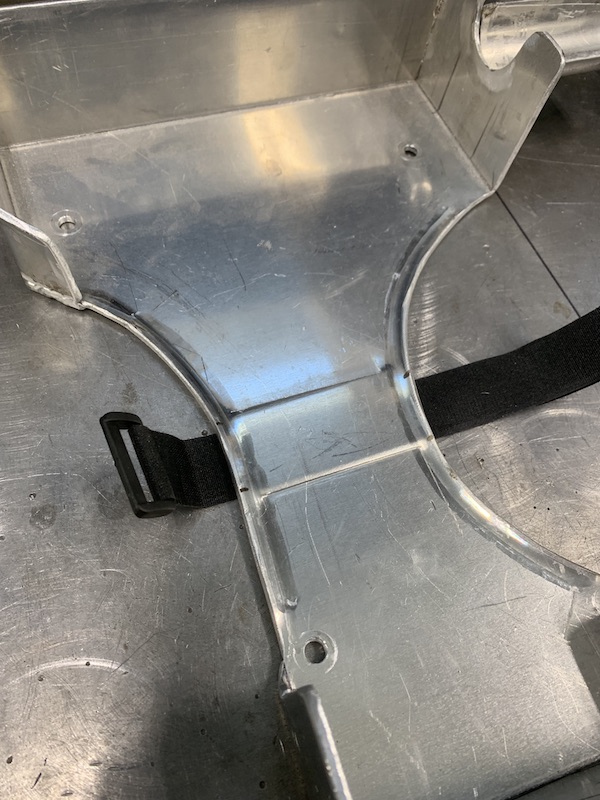
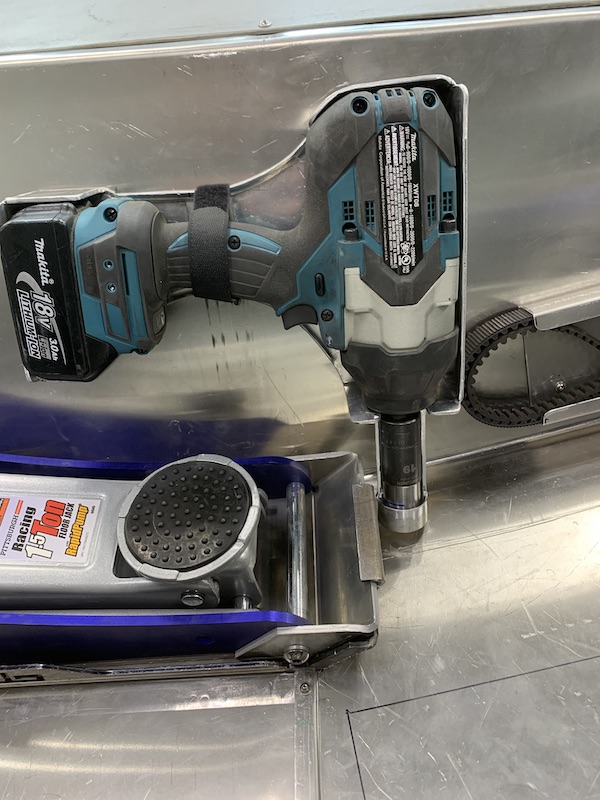
I also finished up the impact gun's mount. Took Kustomfab's advice and threw a bit of heat to the curved edges to anneal the area so I could roll the edges. Kustomfab's roller is supposed to be capable of .120" and this is .125". The heat trick worked well. I slowly worked a lip into the edges.
It's also fun what one can do with a 40 ton press. I needed a little clearance and slot for the Velcro retaining strap so I cut a piece of .045" scrap just a tad wider than the strap and two more that fit between the rolled edges. Strap scrap underneath the holder, the two other pieces on top, aligned and offset just a tad with the bottom and then stepped on the squish pedal. Turned out perfectly. The strap is secure but is also able to slide just a tad.
Next are door panels and making the windows fit.
This should be fun....
Feb 7, 2022
odypilots
... once it's driveable, to me, everything after that is polish!
Me
I agree on so many levels.
It's been sitting in the shop talking to me the past few days (alas, I've not been able to get out). Come drive me. Take the wrench to the shock adjusters and drive me!
At least I've been able to get some stuff done.
Feb 15, 2022
Figured out why my secondary clutch temp reading was all over the place - the little glass lens over the infrared seeing eye was compromised.
That's number two to be taken out so maybe I need to make some sort of shielding that still lets the sensor see what it's supposed to but keep the rocks and crap from taking them out. I wonder if a small screen over them would interfere with temp readings? Time for a test. With the bed liners in getting to stuff has become a major biatch.
I also FINALLY got the fuel sender to talk to the dash. This has been an ongoing challenge and I won!
Presently shows fuel level in percentage but may convert it to gallons. Dunno... It's probably a better representation of what's in it by percentage.
One thing I did realize is that it's going to go through the first half of the range reading a lot faster than the second half. The tapered box will drop level at a slowing rate as the level gets lower. So maybe percentage is the way to display.
Regardless, if it's less than 5%, HEAD HOME! I got the reserve light set at .... uh.... Hmmm... I need to see where that actually is in the grand scheme of things.
There is a reserve light and it is operational, I just don't know what the capacity is when it activates. Notes shall be made.
Next was to move back to the doors/windows/panels.
Folded the Lexan window and am not pleased at all. Trying to heat up an area until it droops is tricky. The heat tape kept moving around and sticking to the Lexan.
My idea was sound, the results kinda suck. Instead of doing a hard break/fold, I think I'm going to take a sheet of aluminum, get it rolled to the correct fit and then stick it on top of the stove, turn on all the burners and see if I can get the window to gently lay over against the correct bow. As usual, it's one for test, pitch it and do it correctly the second (third?) time.
I've thrown a movie clip up of the window in action and the display but it doesn't want to show here on the site so try clicking on this if you wanna see it:
There needs to be tweaking.
Next up is the door panel. I'd planned on using the bead roller to put recesses and such into the panel but nope, it doesn't fit. There are folds that are too deep to fit in the throat of the roller and it's also about 6" too shallow so I can't reach the middle of the panel.


So, being that I can't mess this panel up with a bead roller it's going to become a carbon fiber mold. I'll use the same technique that I did on the rear clutch cover to put recesses in. I'll cut some .125" panels that will for the recesses and then mold over them. Ah the joy...
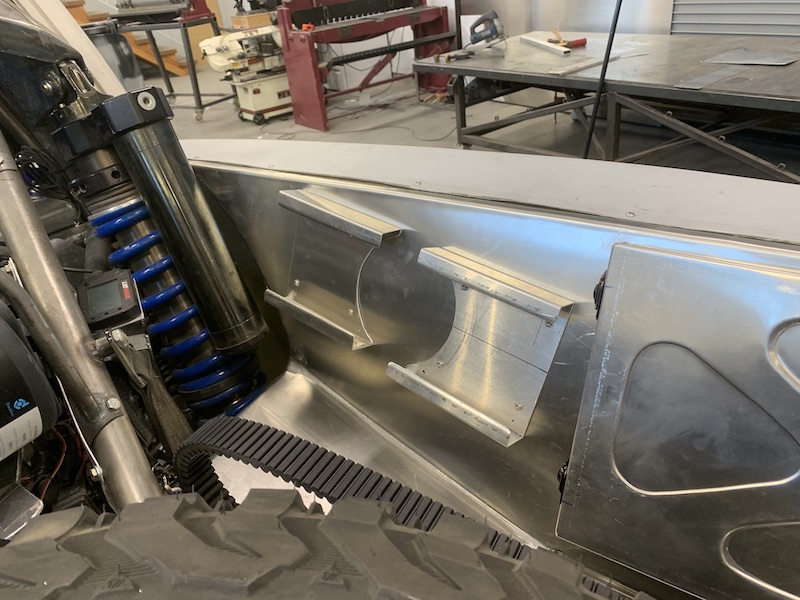
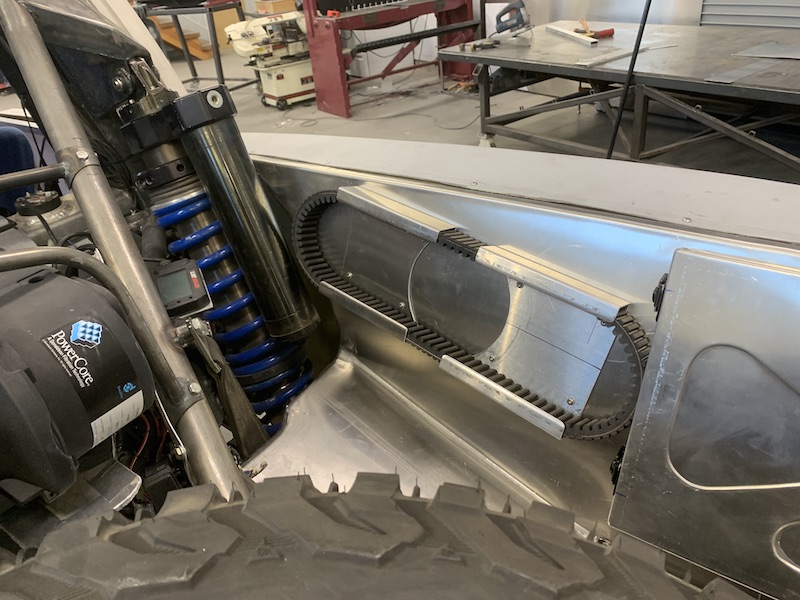
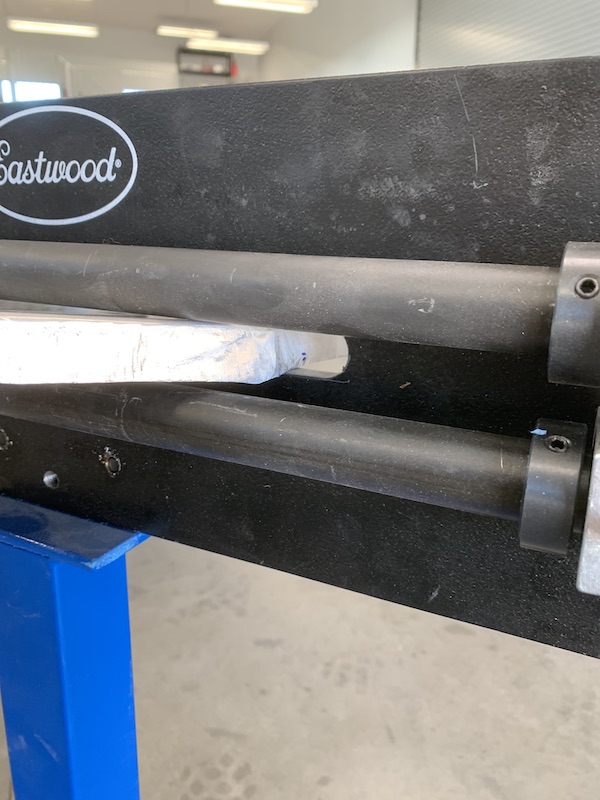
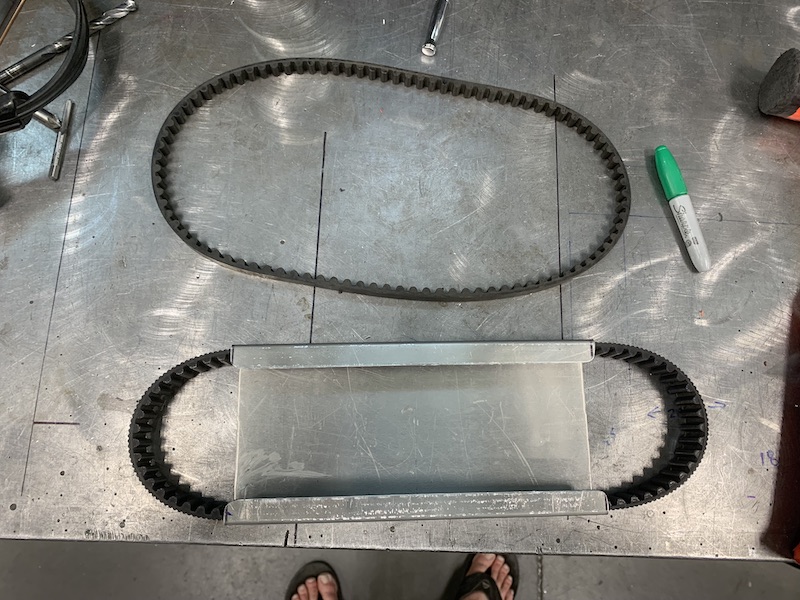
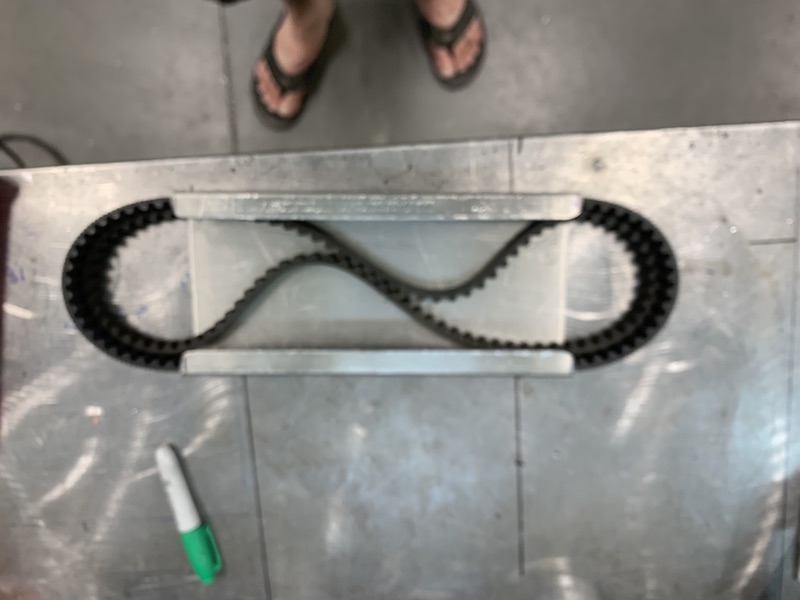
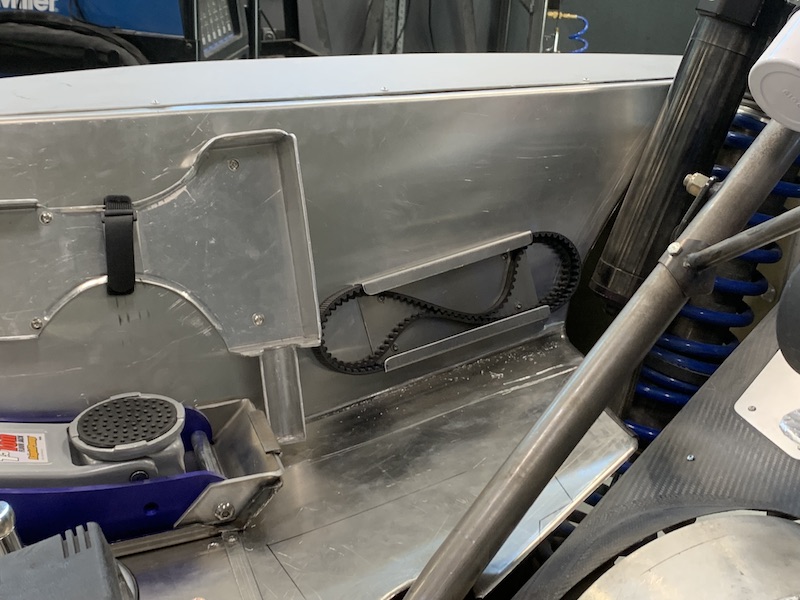
Also knocked out a spare supercharger and alternator belt holder. The alternator belt fits inside the supercharger belt nicely and thus far stays where it's supposed to be (I probably looked like an idiot wandering around the shop shaking the assembly violently trying to get the belt to pop out.) These holders are so stupidly simple and work so well.
fuzzy...
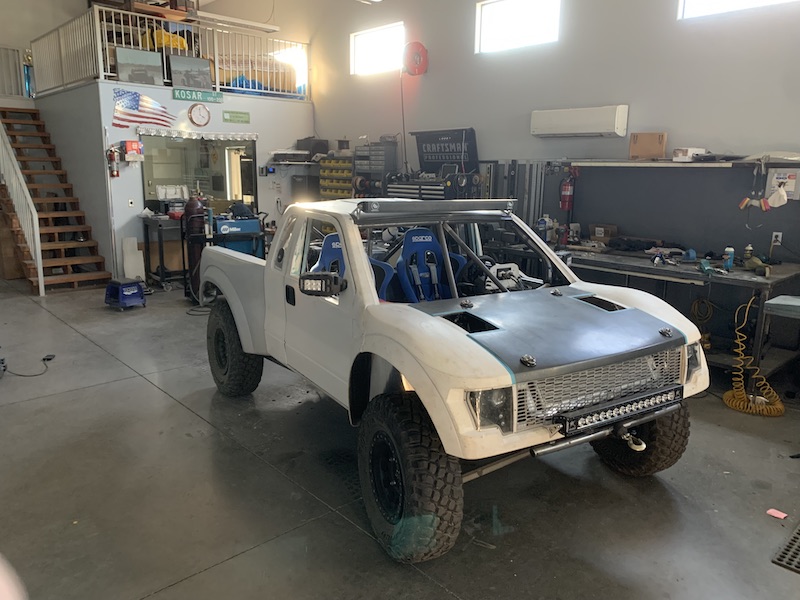
Gratuitous front shot, just because:
I'm taking the MR out this afternoon and playing with shock settings. Need to open up compression on the rear at the end of the stroke and slow down rebound to eliminate the kicking.
I've also richened up the engine across the board (I think - need to watch a couple Power Commander videos).
Progress!
Feb 23, 2022
Still playing with the bead roller (actually, I ordered one of my own - arrived this afternoon).
Decided that the header shields needed a shield (if nothing else to cover the big hole under the front of the spare tyrah).
Planned on rolling recesses in both parts of the panel but alas, no clearance on the down side.

Ended up only making the recess in the flat section - it was gonna hit the existing header shield.
Decided it was time to go back out and play (test is what we'll call it...). Did a bit of shock tuning (made a difference).
Took the MR out to the local power line road. It's not quick off the line but 30 to 60 is pretty impressive.
Suspension is closer. Needs more damping in the last compression zone, a bit more rebound damping across the board - now that the rear isn't so hyper I can feel the whole truck move. Last changes to the rear really balanced front to rear so they're playing together nicely.
It's a trip driving it down Scottsdale road. Definitely got some funny looks. One guy in a pickup came up on me, slowed down and gawked pretty heavily.
Pulled into our neighborhood in front of Robyn (last right hand turn in video) - she said all the tail lights worked (yay!) and that it looked pretty trick on the road.
I'd made a fancy impact gun holder, even included a little holder for the socket. Yeah...
Got back after the test run and discovered that the deep well 19mm impact socket had taken a walk about. Arggghhh..

Off to the lathe, made a socket socket, welded it in place and I dare the damned thing to take off again.
Now that I have my own bead roller I have a little fabrication to do - gonna make extensions so I can do the door panels. I think it'll work pretty well.
Mar 11, 2022
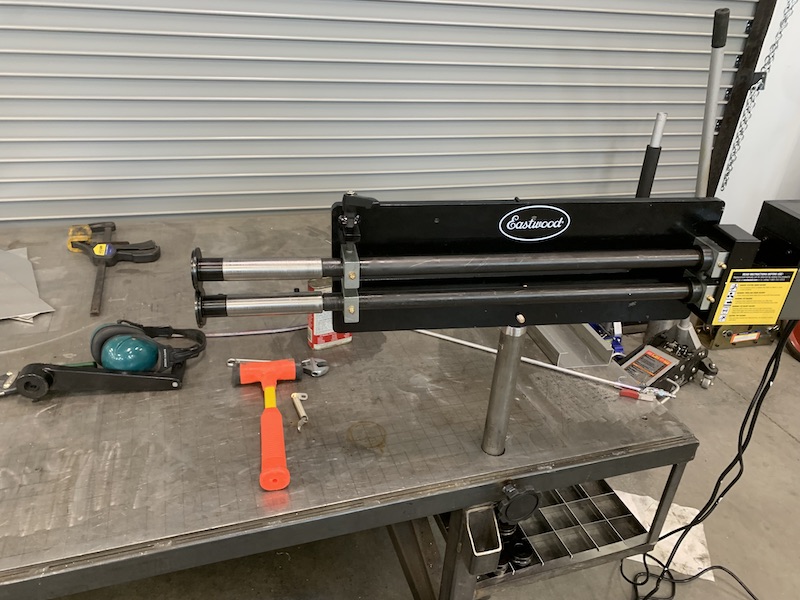
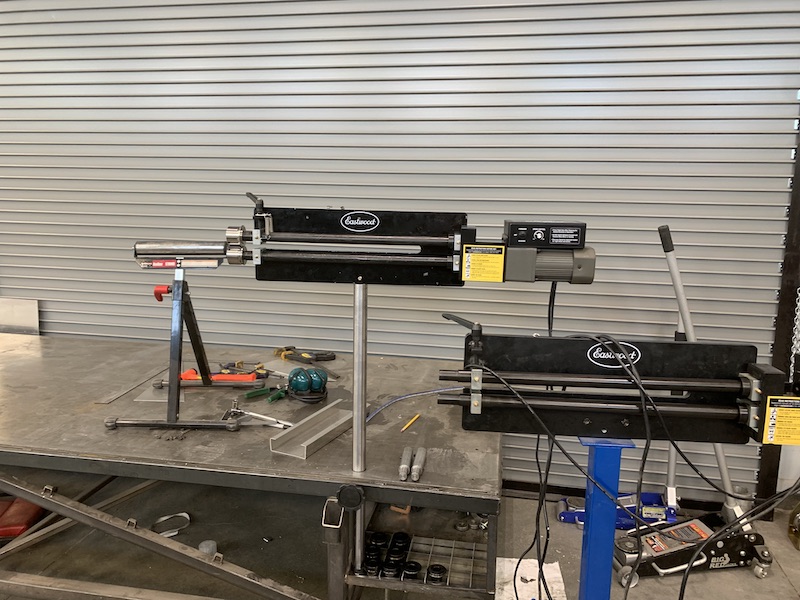
Not much of a Mini-Raptor update but a tooling update instead.
I've had so much fun with Josh's (Kustomfab) bead roller I decided to get one of my own. I'm thinking it will be quite handy making yard art - you know, things that spin in the wind and such. Kinda the direction I want to go when the MR is finished.
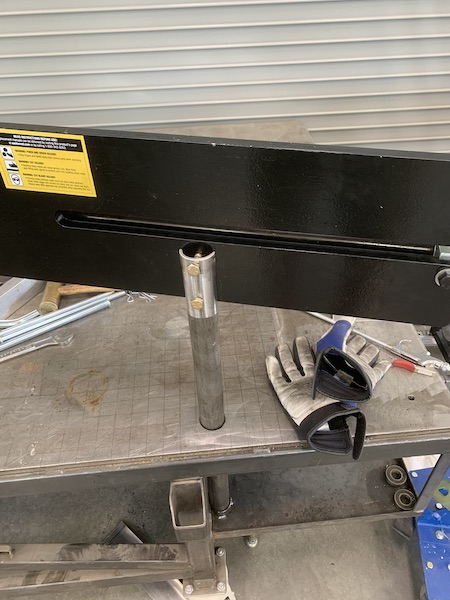
Thought I was going to get a rolling stand, or had been thinking about modifying the two engine stands I have that I used to hold the MR frame while welding and such. Then I realized that I use Josh's unit over by my build table a lot - it's large, I use it for cutting the sheet metal, etc. So, it just makes sense to stick it on the table.
A little bit of scouting on the ends and yeah, that's gonna work. Has a storage shelf, room for the unit plus area to keep the sheet, blah, blah.
Time for a hole to put the stand tube through and a capture for the bottom of the tube:

Squared everything up to the table before putting the lower locating ring in place:
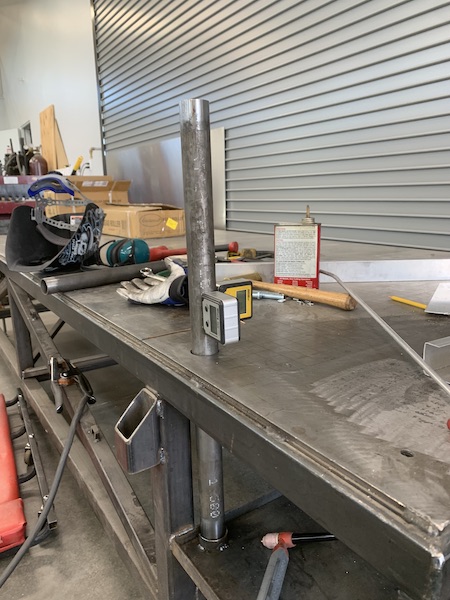
Cut away an area to mount the roller's frame to the tube:
Tada!
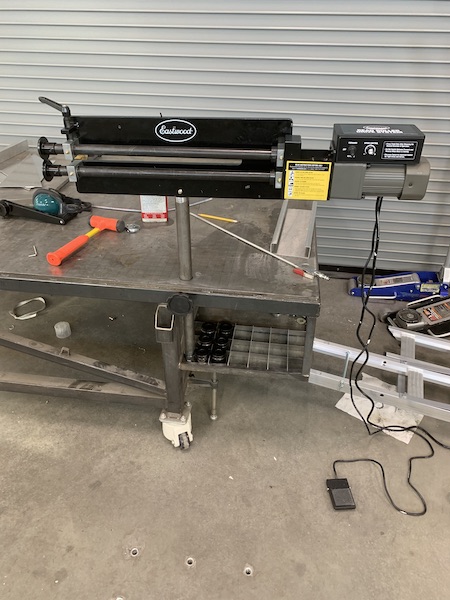
It's a couple inches shorter than Josh's setup. I think it won't be an issue but if it is, making another tube is pretty simple - may end up with a couple for variable height.
Used a knob that came with my bike hitch hauler to lock the thing down from spinning - may have to cut flats into the tube so it bites. Even with it 'tight', I can spin the roller fairly easily.
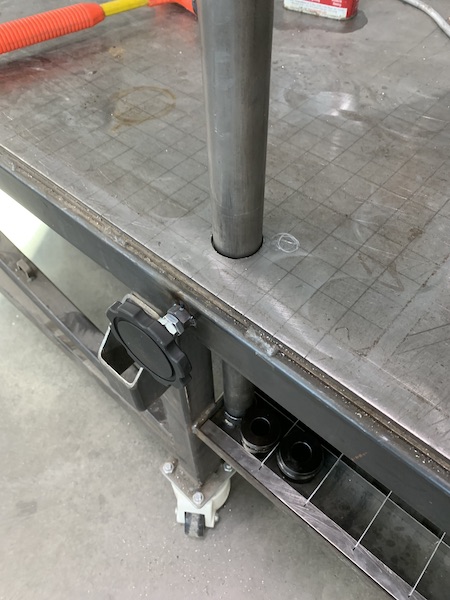
Even have storage area for the dies (and room for 12 more). Cut a bunch of 3/4" tall strips and then notched them with the jig saw so they key together:
Throw on a couple small rare-earth magnets for allen key storage - pretty much only need the two for the whole machine:
And, for ease of adjustment, I stuck a corner gusset on the bolt that clamps the upper bearing carrier. This is moved for adjustment during rolling. I've found that you don't have to tighten it with a wrench to make things work but having the ability to finger tighten just a tad makes life easier.
I'm also thinking that a retracing spring for the block would be nice but I don't know if I'll go that far. It would be placed somewhere in this area:
I'm also going to look into making a couple of (6"?) extensions that go on the ends of the rods that the dies attach to. That will give me a deeper throat so I can get to the center of the door panels. I'm only rolling .045" 5005 so it's fairly flexible and easy to manipulate. I don't think it will over tax the system. More pix on that when it happens.
Mar 29, 2022
Stuff.
Been busy with life - had guests and had to take them out in the RZR a few times (terrible, just terrible I tell ya! Having to go out into the desert - yeah, just terrible!
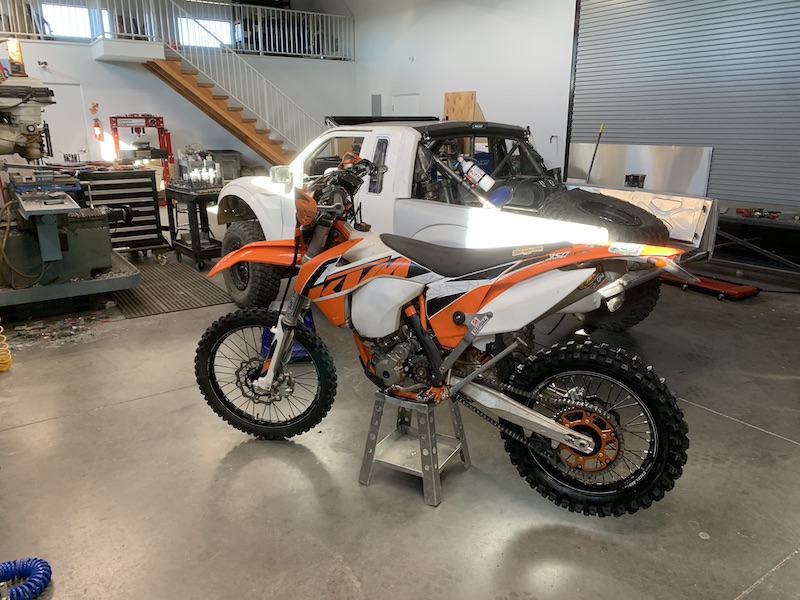
I've been having to go ride out in the desert on the KTM too. The weather's been perfecto! (we got rain today - EGO dirt tomorrow!)
Bead roller setup works well.
My 6" extensions work just fine. I needed 8... I also need a couple of really short set screws.
Test piece looks good.

I also added springs on the upper adjuster so it pulls the dies apart, making part removal a lot easier.
I got the idea from the video that was posted earlier in the thread.
Here's a video of the adjuster doing it's thing:
So I knocked out some recesses in the door panel.
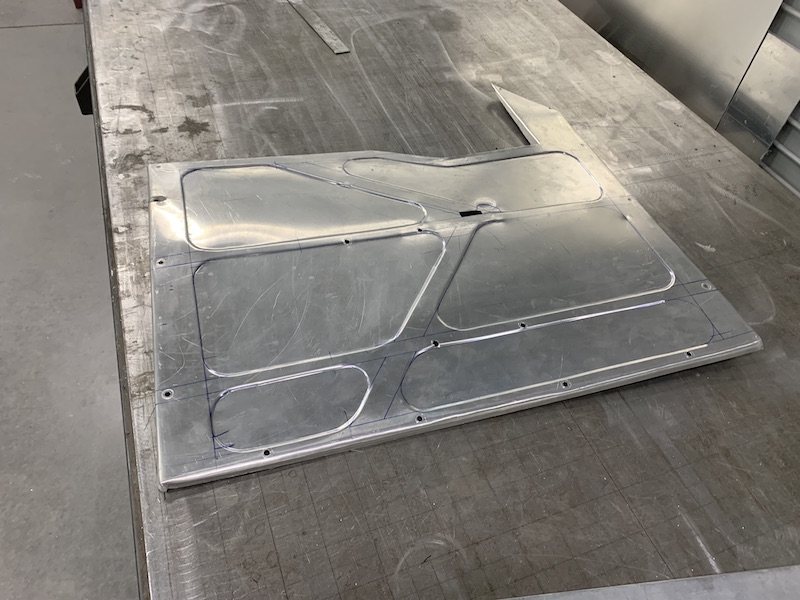
In normal Mini-Raptor fashion, it appears that this is Test Panel A.
Realizing that:
A) My rolls are not wider than the inner door braces/mounts. The thin raised strips need to drop over the bracing and they don't, they're too narrow.
Move all windows in 1/4".
2) The window sill is incorrect. It didn't fold along the upper brace correctly - it gets proud about an 1/8" at the brake in the sill in the middle.
I've been looking at that for awhile, kinda dreading fixing it. Time to redo...
But...
I now know to put the recesses (use the bead roller) on a flat sheet so the lipped edges don't catch on shit and I have a better idea on where to roll things and such.
Changing the dies between the two rollers also lets me get to different areas in different ways. As per most of this stuff, there's an art to it. Guess I'm getting schooled and I'm good with that.
Practice!
Speaking of riding...
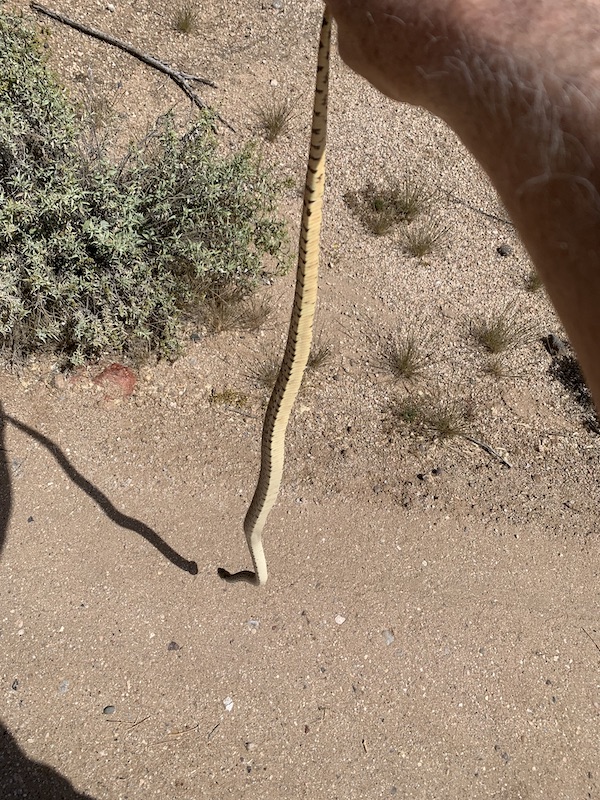
Came across a beautiful Sonoran Gopher Snake a few days back. It's a bit over four feet (1.2 meters) and one of the thickest snakes I've seen out here.
They are non-venomous and fairly laid back, plus it was on the chilly side.
It was sunning across the single track. Of course I had to stop and talk to it. It took a defensive posture as I moved around. It just wanted away from me.
Seems it likes my bike! Got a kick out of it watching me (looking over it's shoulder) and going thru the spokes of the front wheel.
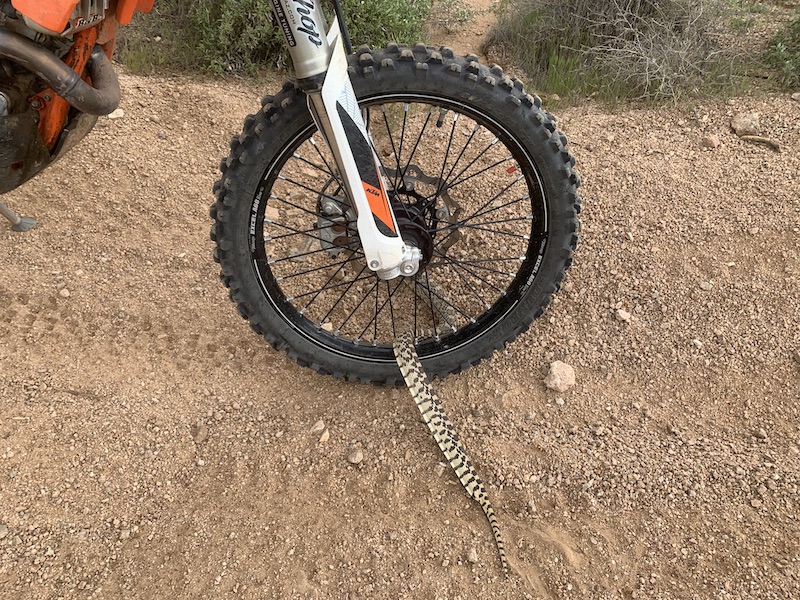
This shit makes me happy:
Apr 4, 2022
odypilots
The snake whisperer!
Me
I love the things. Most people are scared shitless by them, I stop and talk to/observe them.
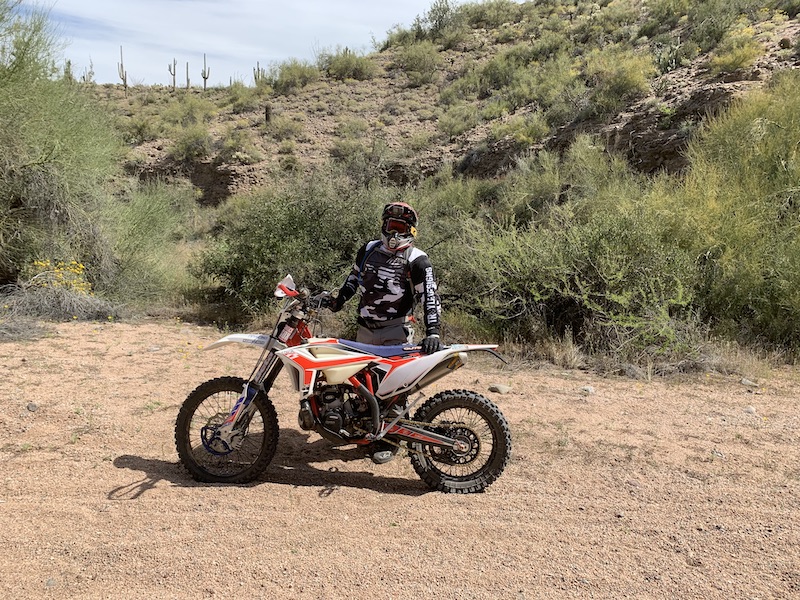
Kustomfab (Josh) and I were coming back from lunch after a quality ride yesterday and we came across another Arizona Gopher snake out in the street.
I pulled over, hoped out and went to have conversation. The silly thing just laid there looking at me.

I got behind it and started trying to scoot it off of the road.
It seemed completely unconcerned so I reached down and touched its tail. Usually this will cause them to coil up and/or take a defensive posture. Nah, still just kinda laid there.
I grabbed it by the tail, pick it up and then deposited it in the nearest bush off of the road. Stupid people run them over.
Strike a pose!
Actually Josh was just trying to stand up - caught a rock or something in the sand wash and tried to remove his left leg.
Said he heard and felt the pop from his groin over the bike sounds [smilie=shocked.gif] as his leg headed behind him. Ouchie!
Just another pretty pic. Top of a hill off of the trail that connects 404 and 388.
Okay, enough of the off topic crap...
Bullnerd
Lots of good stuff in that last picture.
Nice mods on the bead roller.
Me
Agreed and thanks!
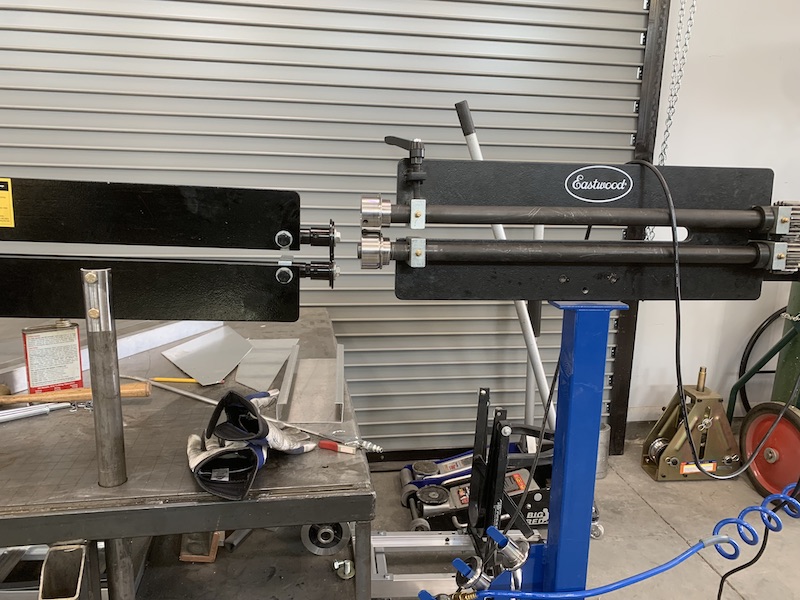
Another mod to the bead roller - raised it up 10" so that I don't have to stoop over to look down the rollers. Made a big difference on control. I rolled Josh's into the pic for reference and my other support shaft places the unit about two inches lower then Josh's.
Round two point five.
Cut two new panels and drew stuff all over them. The recesses all got offset inward about .375" from the first one. Stuff behind the panel clears now.
I took the original panel, clamped it to the new panel and center punched all the mounting holes then drilled 6mm holes where needed.
It bolted right to the door.
Then I put the recesses in it and it warped the shit out of the panel. I think I'm recessing too deeply (was Josh's comment and I agree).
I put the panel through my 3 in 1 bender/brake/roller and was actually able to flatten it quite a bit.
When placed on the door I discovered that it shrunk the hole distance from top to bottom and side to side about 1/16". Quick pass with the 7mm drill and the panel bolted right in place. Woo hoo!

I also took the body hammer to the sides and bottom edges and rolled them against the door. This flattened it a bunch.
Passenger panel dawn up, next to the driver's second panel:

I'm presently in process of getting all the mounting holes in place. Got two on top located and then have started finding the other dozen. I have a bolt that I machined the head thin, with a pointy tit in the middle. Stick bolt in hole, screw panel in place, hit panel where pointy bolt is. Instant "drill here" spot. Remove all the bolts, drill the hole, place pointy bolt in next hole, repeat.
I'll be running it through the roller and beating areas flat again as needed.
Probably going to step back from the MR for a little bit.
The 350 just ticked over 6K miles and needs some TLC - it's running hot (radiator cap is suspect) and needs the rear tire replaced. Riding season's coming to an end here pretty soon so I wanna get in as much as I can before I have to go into nocturnal riding mode.
Sep 29, 2022
Went to lunch today. My wife stole my car to go to Jerome and I didn't want to drive her car or my truck so...
The MR has been taunting me each time I walk past it recently so I gave in and it went to lunch.
Took a short cut (3 miles out of the way) home. I started to turn in and there's a Scottsdale police pickup truck at the entrance of the power line road.
Keep driving... turn left at next street, pull over, put on brain bucket and get strapped in.
I'm hoping there's a feeder from the road I'm now on and the power line road. Nope. Time to turn around and go back. If the cop is still there, there is another entrance a couple hundred yards past where he was. I'm thinking I'll duck in and run - no way he's gonna catch me.
Turns out he's not there so all my worries we're for naught. Turn right, hit the fun pedal:
Sep 30, 2022
jimmyg
3:14 was a fair thump. You little ripper!
Me
There are a couple front end bottomings heard during the run.
It's the left front tyrah just rubbing the seam where the hood meets the fender. Nothing a quick touch from an 80 grit sander can't fix - remove the black witness marks left by the BFG.
TheDoc
yeah hahahaha looks like fun, I thought she was road legal and registered, or you still need a bucket when driving??
Me
She's registered and street legal.
I've bonked me brain really hard a few times. There's not a lot of (or enough) headroom so anytime I get happy on the fun pedal, I want a brain bucket in place.
Ironically, the helmet I'm wearing is the one I was wearing in April of 2021 when I ko'd myself with that two stroke beastie and broke a bunch of shit, including the left rear of the helmet.
Worst head hit I've ever had - concussions are no joke (took 9 months before I was as over it as I'm gonna get).
jimmyg
I must admit I was waiting for a Police chase video that never came but I do remember it getting it's paperwork done a few pages back?
Or is it the drive not the car that's "Of interest".
Me
LOL! Yeah, I was too.
Definitely not the vehicle. It gets a lot of looks because it's unique but nothing that would make the cops come after me (as long as I'm being good). I always find it comical to see a pack of (usually rental) quads driving down the street. Only in Arizona! Any other state and you'd be in cuffs.
The power line road is probably suspect…. I see little white signage (1:46) stating something about no motorized vehicles allowed but I'm usually going by them too fast to fully read just what they say.
LIDUNO
Was that a little drifting near the end?
Me
Off throttle induced oversteer followed with a stab of the skinny pedal to get the chassis rotated back to the correct direction.
Only (slightly) sketchy moment is at 3:10.
I'm not familiar enough with this trail and ended up bottoming out the chassis after getting it light over a rise then slamming the face of another rise that followed.
If it had more rebound damping it would have stayed planted and not bounced, which sort of drifted me towards that big rock. All I know is my focus went from the strip of dirt that I've been running down to looking at a large rock thinking “That could be ugly!” Wasn't enough to get my heart rate up but was enough to get my full attention.
I need to vacuum bleed the cooling system again. There's a bubble that keeps getting trapped just where the hot coolant leaves the head. Temps will fluctuate between 235F/112C and 165F/74C as the hot surge gets to the thermostat until the whole system gets to temp. Then it stays a fairly constant 175F/79C to 195F/90C which is normal operating range for the engine.
It's running rich from mid revs up when I floor it. Looks like my Power Commander is applying the mapping I dropped in. I have a tune on the fly button that activates a learning mode and did notice the rich burble was getting less & less as it learned.
It's twitchy on center on pavement. I need to check toe. It acts like there's too much toe out. Really darty and has a really loose feeling steering about 5 degrees to either side off center. Requires two handed steering and a constant paying of attention.
Bike is serviced (I'm now a bib Moussekatier - no mo flats), the kaleidoscope I'm working on is 75% done, I'll knock out two more and then my focus will go back to the MR. It needs to be finished and yesterday's little rip was what I needed to put the fire back under my ass.
Oct 1, 2022
My little rip on Thursday got to me. Time to take 'er out. Too hot to go out on a bike but the desert's been calling me and so has the Mini-Raptor.
Spent about an hour out in the desert trying to flog on it.
Took it to the staging area in my van (instead of 25 miles of round trip on the road) and ventured forth from there. I figured that the farthest I'd have to walk back would be three, maybe four miles tops if shit went bad. I went prepared - full camel back, shoes, light shirt. Yeah, I'll be fine if it strands me.
Got some pretty funny looks from a couple of Rental Canned Hams.
Front end feels really good. It goes exactly where pointed and the feedback is just right. Shocks actually feel pretty close up front too. I'm really pleased with just how well it was working. I can hit stuff in the Mini that would knock teeth loose in the Gayzer.
Rear end is a different beast. It's bouncing and packing really badly. I kept loosening up everything and was starting to see improvements. I started with everything 1/2 turn of the adjusters open from fully closed so I expected it to be harsh but man was I surprised at just how harsh.
The engine was acting funny today. I noticed on Thursday that the mapping seemed rich - it burbles and hesitated to clean out (almost two stroke like) before coming on song. Today I couldn't get it to rev out at all. Top speed was 42 mph/68 kph in an area that I should have been running closer to 75-80 mph/120-130 kph. No doubt in my mind that the chassis can handle it.
Really bummed that I forgot to put the video card in the camera. Realized it on the drive home thinking about editing the short videos into one longer one. DOH! There it sits in the SD slot of my computer when I walk into my shop. It's in the camera now. Idiot...
I did get a Relive route recorded though (proof this event actually happened).
This concludes the building that happened up through the end of 2022. In fact, it pretty much is where I've stopped the Mini-Raptor's build.
I had such major PBO (Project Burn Out) that I had to walk away and do other stuff (like Kaleidoscopes and refurbish a toy hauler. But after pulling all of this info off of MBN, it's lit a fire under my ass and I'm going to get the Mini-Raptor finished so I can go out and enjoy it.
Click on the link below to be taken to what happens in 2023. - Not a lot right now... Like I said, gotta finish a couple other things first.The Mini-Raptor build during 2023
Return Home