

Home of K-fab

|
|
|
|
Technical Information
Chassis Tuning Wonder what things like camber, caster, toe in/out are? Read and learn.
Head Gear How to get a properly fitting helmet.
Jetting How to Jet your carb.
Shocks Theory on how they work, adjusting and setting them up.
Springs How they are rated, multi rate setups, formulae for figuring out rates.
Tire Information Charts on tire sizes and other useless info.
Recently I've noticed a trend among riders; Old, Young, New to the sport, Been there done that fossils and all sorts in between of not wearing a helmet - or just as bad, not wearing a helmet correctly. Well, the time has come for me to hop up on my soap box and jabber a bit. Go grab a Pepsi, sit back and take a read.
It may save your life!
I've taken this information straight off of Bell Helmet's web page. I hope I don't get in trouble for passing on such valuable information.
Six Key Steps In Determining Proper Helmet Fit.
Measurement
Try-on
Horizontal and Vertical Movement Check
Retention Check
Pressure Point Check
Confirming Proper Fit
Measuring the head is a starting point for the entire sizing procedure. Due to varying shapes, heads that are apparently the same size when measured by a tape may not necessarily fit the same size helmet.
A small metal tape measure, or a cloth tape may be used to make your initial measurement.
The circumference of the head should be measured at a point approximately one inch above the eyebrows in front, and at a point in the back of the head that results in the largest possible measurement. Take several measurements, to make sure you have the largest one.
Size Cross Reference
Head Circumference
| 21 | 22 | 23 | 24 | 25 |
| 6 5/8 | 6 3/4 | 6 7/8 | 7 | 7 1/8 | 7 1/4 | 7 3/8 | 7 1/2 | 7 5/8 | 7 3/4 |
| X-Small | Small | Medium | Large | X-Large |
| Adult Sizing | Children Sizing | |||
| X-Small | 6¾" | Small | 50cm | 19¾" |
| Small | 7" | Medium | 52cm | 20½" |
| Medium | 7¼" | Large | 54cm | 21¼" |
| Large | 7 ½" | X-Large | 56cm | 22" |
| X-Large | 7 ¾" |
Once you've determined your preliminary tape measurement, select the helmet that is closest in hat size to the tape measurement. If it is between sizes, round-up to the next largest size. Now try on your helmet.
 |
If you are not familiar with helmets, you should use these instructions on the proper procedure for putting one on:
A. Grasp the helmet by the chin straps, with the front of the helmet facing you and the top of the helmet facing down. B. Place your thumbs on the inside surface of the straps and balance the helmet with your index fingers. C. Spread the helmet apart with your hands, and slip it down over your head. |
Helmets of different shapes go on differently. Sometimes, the front of the helmet must go on first; other times, the rear. If the helmet flops down on your head with no resistance, you have your first indication that it may be too large. Obviously, if it won't slide down over your head at all, it is too small.
Many people unfamiliar with helmets are reluctant to pull down if they meet resistance as the helmet goes on. To tell if it is really too small, or just snug going on you should continue the effort to get the helmet on. Only if the helmet is impossible to put on should you move up to the next size, as helmets that go on snug generally fit very well once on all the way.
Remember, most people will select a helmet that is too large for them. They will regret it later, because ill-fitting helmets are more likely to be noisy, windy and fatiguing to wear.
We have noted that some people have a tendency to wear a helmet perched on the backs of their heads, like hats. Be sure that the helmet is sitting squarely on your head. Use the location of the eyes in the eyeport of a full face model as a gauge.
The eyes should be approximately in the center, with the top edge of the liner padding just above the eyebrows.
back to top3. Checking Horizontal and Vertical Movement
Now that you are wearing the helmet, use a mirror to look carefully at the way it fits. Check to see if the cheek pads are in contact with the cheeks. Is there excess pressure on the cheeks?
Look for gaps betweenthe temples and the brow pad.
Check the backof the helmet where the neck roll (if the helmet has one) makes contactwith the neck. Does it touch at all? r is it pushing the helmet away at the rear, causing it to roll down over the eyes in front?

After you have made your visual check, grab the helmet in your hands - one on either side - and try to rotate the helmet from side-to-side. Note any movement of the skin while doing this, as well as the amount of resistance to movement. Hold your head steady to do this.
Next check movement up and down, again noting skin movement and resistance. If in either test there was little or no skin movement, and/or the helmet moved very easily, the helmet is too large.
It is important to note here that you should think about the comfort of the helmet during the fitting process - with respect to comfort, pressure points, or anything else that will help you make the right sizing choice.
A properly fitted helmet will cause the skin to move as the helmet moves. And, it will feel to the wearer as if evenly distributed pressure is being continuously exerted around the head.
NOTE: Helmets are a little like shoes, in that they do break in a little. For this reason, the best attitude to have when fitting is that the helmet should be as tight fitting as you can stand to wear it - taking into consideration the length of time it will be worn.
For Example: A drag racer's helmet can be very tight, because it will only be worn for a few minutes at a time. On the other hand, a police officer, who wears a helmet for hours at a time is more concerned with comfort.
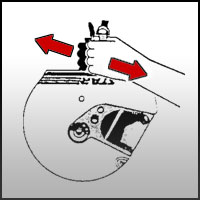
back to topNow fasten the chin strap, so you can check it. After the strap has been tightly fastened, hold your head steady, and note that this test may be a little uncomfortable, but that it is very important. Reach over the top of the helmet, grabbing the bottom edge with your fingers. Then try to roll the helmet off your head. If it comes off, it is undoubtedly too large.
NOTE: Do not use a helmet that can be rolled off the head with the strap fastened! Try not to cause severe pain, but do give a good, strong pull on the helmet. THIS TEST IS VERY IMPORTANT.
back to topFinally, unfasten the chin strap and remove the helmet. Immediately after the helmet has been removed, use a mirror to observe the coloration of the skin on the forehead and cheeks. A reddening of the skin in a small area may indicate a pressure point.
Pressure points sometimes are not noticed by the wearer until after several minutes, or even hours of wear. They sometimes cause headaches and are, at the least, uncomfortable.
If you notice a pressure point, note if you experienced discomfort in that area while wearing the helmet. If you can't remember, put the helmet back on for a few minutes, paying particular attention to the anticipated pressure point(s). If the pressure point discomfort continues, go to the next largest size, repeating steps three, four and five.
back to topOne way to confirm your evaluation of proper fit is to try on helmets that are one size larger and one size smaller than the one you think is right. Keep in mind that people gravitate towards larger sizes.
Another way, is to wear the helmet around the store for a few minutes. This will allow any pressure points to show up.
WARNING: No helmet can protect the user from all foreseeable impacts. For maximum protection, a helmet must fit securely and should provide adequate peripheral vision. The chin strap must be securely fastened.
Return Home