

Home of K-fab

|
|
|
|
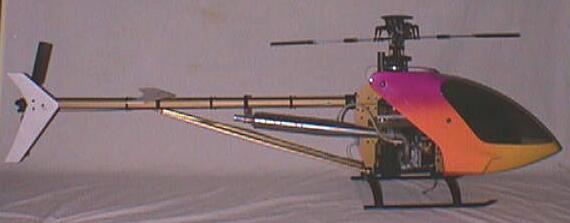 Anyone that's been around me and my R/C helicopters knows that I refer to my Gold Futura (seen here) as "Old Reliable". It's an original version of the Futura complete with gold frame and hexagon tail boom. I've had it for over seven years now and it's still flying flying great. It's seen a lot of flights, three engines, many crashes - including two complete rebuilds (never did find the tail rotor from the roll attempt) and it's even been flown inside the Seattle King Dome! It traveled all over the country with me during my 1999 Stadium Racing tour and has provided a lot of fun and relaxation over the years. Each time it goes into the ground, I update what ever's been destroyed with the latest parts off of the Futura SE - the upgraded 3-D competition version of the Futura It's about 85% SE now, but retains the old gold anodized aluminum scheme, complete with hexagon tail boom, and is still my most solid flyer.
Well, the time has come for The Old Gold to go through another change.
R/C engines have always fascinated me. Little working engines with incredible attention to detail, precision machine work and amazing power output for the displacement. I like just looking at them in the display cases at the hobby shops, they're neat little packages. Then one day (about 16 years ago), I saw one that looked a bit different. It had a funky looking head, some odd tubes that went up to the head from the cases and weird carb that was mounted to a long tube that attached to the head (instead of being mounted just in front of the cylinder on the crank). There it was - an O.S. Max FS-40. A FOUR STROKE R/C ENGINE! I was amazed. Itty bitty valves, a tiny cam, push rods and rocker arms. Just amazing. I thought that was the neatest thing I'd seen in a long time.
Never forgetting the little FS-40, I always thought that a four stroke in a heli would be fun. Problem was that nobody made one specifically for a heli. There were a few conversion kits that took airplane four strokes and adapted them to a heli, but they were pretty unreliable, touchy and not much fun. Then, about five years ago, or so, YS came out with one developed specifically for helicopters. It has an integrated fuel pump, a pressurized air chamber that uses crank case pressure to feed the carb (in essence, a simple supercharger) and a larger surface head for better cooling. It quickly caught on and developed a reputation of being a good flying high power, quiet, fuel efficient and reliable heli engine. It sounded like the perfect power plant for my BK-117 fuselage.
 <-- No, this isn't crash damage. I had to strip the Futura down to the frames in preparation for the conversion. Pretty amazing this pile of parts, nuts and bolts really flies, eh?
I've had a YS .91ACH Four Stroke heli motor for a couple years now. It was in the X-Cell mechanics that were in my BK-117 fuselage for a while, but I had managed to lean it out to an untimely death, so it was pulled, put on a shelf and forgotten. About six months ago, I came across it sitting in a drawer. The old Nova Rossi in my gold Futura was on it's last leg. It had years of use and was very tired and was ready for replacement. (I think it's the only Nova Rossi in our heli club that's been reliable and run consistently - guess I got lucky!) I was thinking about putting an O.S. Max, like I had in the SE, in the Futura but after finding the YS, I got a wild hair. I sent the YS off to get it repaired and started doing my homework to see if the Futura could be set up to accept it. The time had come to pull apart the Futura and start the engine swapping.
There are two hurdles to overcome when installing a four stroke into a heli. First, most two stroke engines need a engine to rotor ratio of about 9:1 or so. Four strokes want a ratio that's closer to 7:1. So, I had to find out if I could get the correct gearing for the Futura. Fortunately, Robbe (the maker of the Futura) offers many different ratios, so I was able to get the right gears. Next, I had to fit the engine into the Futura's frame. The YS is about an inch longer from the front of the cases to the back of the carb than the Nova Rossi. It wouldn't clear the lower frame rail of the Futura. Lucky for me, I have a mill.
The first thing was to replace the standard Futura bearing strips (9.60:1 ratio) to the Futura SE's strips (9.29:1 ratio). This changes the the main pulley from 48 to 42 teeth, the pinion from 10 to 15 teeth and the main gear from 50 to 73 teeth. To make this fit, the back of the side frames are machined out for pulley clearance. Then I had to change the clutch bell pulley from 22 teeth to 27. This gives me a final ratio of 7.57:1 - just right.
 The output shaft of the YS is about a quarter inch shorter than the previous engine, so to get everything to fit, I had to modify the clutch mounting. The drive collet had to be shortened, the starter adapter had to be made thinner and the back of the clutch housing had to be shortened too. A bonus to this was that it raised the engine in the frame about a quarter of an inch. To get the correct tension on the belt, I had to machine down the faces of the engine mounting bracket too. A couple check fits and skims with the mill and engine bolted right. Now I had to figure out how to brace the bottom of the frames.
The standard Futura/Futura SE lower frame brace is just a rail that goes from the front to the rear of the frame panels and is what the landing gear attaches to. The two stroke engines have about a quarter inch of clearance between the head and the rail. But, the YS's carb is on the back of the engine, (you can see the carb and the air chamber just to the right of the carb) so the back side of the engine sticks down close to an inch lower and naturally, this put it right through the lower frame brace. Time for some machine work!
 As you can see in the photo in the right, I got around my clearance problems by machining out a new lower frame rail that widened out where the clearance problem was. This allows the engine to fit through the frame but still keeps the integrity of the lower part of the Futura for the needed strength. Also, being that the four strokes make more torque that their two stroke counterparts, I kept the frame rail cross section taller than the stock rail and added some cross bracing. It should help keep the stiffness of the frame up to specs. The only mess up that I made was that I forgot to cut the length of the new rail down to the correct measurement before I machined out the webbing. So, when I did the test fit, I discovered that it was about 3/8" too long. No big deal, just another quick trip back to the mill.
Reassembly is straight forward - put it together just like it came apart. And, being that I've gotten really good at reassembling Futuras (gee, don't know why - I'm sure it wouldn't have anything to do with the ground!), it's gone together quite quickly. Hopefully, I'll get to do some test flights in the next few days. Naturally, the weather's decided to turn nasty with amazing timing. I'll update when I have more. - that was on 10/15/00
 |
 |
 |
Well, I know that I finished the project back in October, but I've had some problems. First, I wasn't able to fly through the winter, and then when I did get a chance to fly I didn't have the heli with me (was in Arizona for all of Feb.) When I finally get to start working on it again, with the help of a couple people in the club that know four strokes, we couldn't get it running! After some research, it's been decided that the fuel regulator and pump were out of adjustment and that the pump diaphragm needs replacing. I'm still waiting on the parts....
(9/20/01)
Long time, no update....
The saga of the Four Stroke Futura carries on!
After about a month of waiting on parts for the engine, I finally received the diaphragm, plunger and spring for the pump, installed them and went out for testing.
It didn't make a difference at all. What a bummer! The heli would come up into a hover, start to over rev, then bog down. Totally inconsistent running is NOT what you need in a heli. To add insult to injury, I was now getting some sort of radio interference too. Once the motor would come up to speed, the heli would start fritzing out. What the????
I pulled the motor out and decided to bench run the engine to get it in tune. In fact, I decided to get some help with the engine while I had it on the bench.
I talked Craig, one of our club members, into helping me out. Craig has quite a bit of experience with the YS four strokes, so I figured he'd be perfect to help. He showed up with his YS 91 airplane motor, a prop and some other "support stuff" and we went to work.
Once again, the engine acted like it had all along. Ran very rich, would then lean out, run rich, make no power, bog - it just didn't do squat! We messed with the high and low speed adjustments, tried different pump settings, different mufflers, even opened up the engine to make sure that the cam timing wasn't off. After about two hours of fiddling, we decided that the motor had to be a lemon. What a bummer! I figured that it was time to either get a new or even switch brands all together - I was thinking Saito.
I set out to find a new YS heli motor. First place I went was Rick's R/C. I ordered a new motor and figured that I'd have to wait a couple days. It wasn't so. I ended up getting a phone call from Ron Lund saying "That motor's not made anymore." DOH! He started asking me why I was looking for that motor and after a long discussion it was decided that I should give YS Performance a call. (YS Performance is the US Service Center for the YS motors)
After a lengthy conversation with Richard of YS Performance, it was decided that I'd send the motor to them and they would go completely through the motor, piece by piece and either repair or replace anything that wasn't in spec. I also insisted that they bench run the motor both before and after they started working on it so they could see exactly what it was doing. Off it went in the mail to get repaired.
About two weeks later I get a phone call: "This is Richard at YS Performance. You have a happy motor now! I've had it running on the bench for the past thirty minutes and it's working perfectly." Turns out that there was a ripped gasket, the cylinder was loose and it needed a new piston too. The main needle and seat were replaced too. Everything else was fine. The motor came home a few days later.
It didn't take long to install the power plant back into the Gold Futura and I headed out to the front yard for testing.It started right up and idled smooth as silk. I walked out to the yard, set the heli down in the grass, stepped back and started increasing the throttle. The motor responded perfectly. It came up smoothly without any hesitation, surging or odd running. A little more throttle and the Futura rose off the ground and settled into a perfect hover. The motor never missed a beat! This was great! IT WORKED!!!
Off to Slim's place I went with my four stroke helicopter. It was time to fly, not hover around the yard.
Let's just say that the motor worked fine... Remember that I stated that I had an odd radio problem earlier? Well, guess what, it came back. Not badly, but enough to reek a bit of havoc. It seems that somewhere in the drive train I had a bearing that was going bad. Once the drive train got up to speed, the bearing would start causing radio interference (rf). This is NOT a good thing! I got the Futura up about 30 feet above the ground, brought up the rotor speed and lost control. It would come back and then I'd loose it again. I was able to "land" it with minimal damage (bend fly bar and wasted blades & some tail rotor damage). Once again, the Four Stroke Futura was down for the count.
The entire heli's been taken apart, any suspect bearing was replaced and all others were cleaned and regreased. I have yet to go out for another test session. Hopefully I'll get a chance in the next week or so. I'll post when I do.
How To Upgrade a Gold Futura to a Gold SE
Return Home