

Home of K-fab

|
|
|
|
The FrankenSkeeter
A Different Breed of Pilot.
Ever wonder what happens to old Pilots that sit in a barn for ever, gets sold on e-bay and end up in some nut's garage?
FRANKENSKEETER! - that's what happens!
It all started last fall. I came a cross a basket case* Pilot (via the Pilot-Odyssey Board) that was for sale on E-bay, just around the corner from me. The idea was to get my paws on it for another P/O member, get it running and then get it on down to Texas for said P/O member. Anyhow, plans didn't work out and the Pilot ended up staying in my possession. Me being me, I just couldn't let it sit there in stock form. I had a plan. I had a vision. I had a shop.
* Basket Case - a Pilot or Odyssey that is received in pieces - as in the motor's in this basket (actually two), parts in this basket, so on and so forth.
When I picked up the Pilot, it was a complete mess. The motor was missing, all sorts of stuff had been removed, body work was scattered here and there. By the time all was said and done, I would end up going to Honda of Troy (yea, the big motocross place) and Scott Plessinger's KTM dealership and the place where the Pilot chassis was to get all the parts. After a day's worth of running, I had all the parts to supposedly put this basket case back together. Time will tell - I'm not into the motor yet!
So Spring time rolls around and it's time to start working in the shop and getting some projects knocked out. Plans were to build a new stadium lite, do a bunch of XR-50 stuff, work on the Moskito some more, and get this basket case out of my hair.
As I started working about the shop, I came to realize that until I got all the stuff for the new lite, I'd just be chasing my tail. I really needed to get this Pilot done and gone too. Then it hit me. I need a project that will be a precursor for the new Lite - I need a project that will let me get my fabrication skills back up to snuff (practice, practice, practice!), allow me to play with a front end design, and learn to do (some more extensive) motor work. This would be perfect! The Pilot needs a complete and total motor rebuild from the crank up (did I say the motor came in two boxes - every piece taken off/apart?). I've wanted to build a Pilot motor - so here's a chance. I wanted to make the front suspension work better, I wanted to make the rear suspension work better - yea, K-fab was in full stride. Time to make a completely new ride - So, pull out the sawzall, welder, tubing and bender and along comes the Frankenskeeter. (I can't take credit for the name - a good friend of mine came up with it)
The goal for this ride is to make it a Woods Machine. I want to get as much travel as possible but keep the overall width of the car as close to stock as possible. I was able to widen each side of the front end by two inches and still keep the front end the same width as the rear end. I ended up with an honest 11" of travel and with a bit more shock location work, I have up to an available 14". In the rear, I went from the stock 6.5", or 7" to 8.5" of movement. I also set it up so that at full compression, I still have almost 3" of ground clearance. Most of the woods areas that we ride in are very rocky, so good ground clearance is a must (the Moskito, in it's stadium setting, sits too low and rocks are killer on the bottom of it!). I also moved the front wheels forward 3" so the wheel base is now 68". Stretching a Pilot makes a huge difference in the handling characteristics. It puts more weight on the front end and helps to combat the dreaded Pilot Push. I'm hoping that my method of gaining wheel base length works - usually they're stretched behind the roll cage so the driver is moved forward - weight bias for the way I've done it won't give me as much front end weight as if I'd done the behind the cage stretch.
Chassis Mods
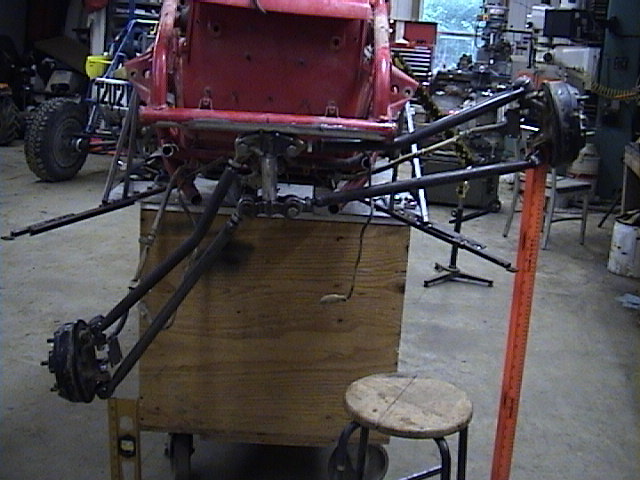
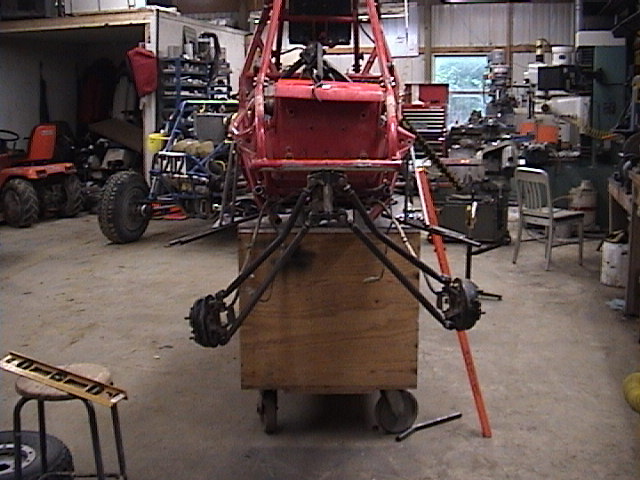
 If you're gonna work on something, you may as well get it into a position to work on it! Getting it up on this table was not the easiest thing in the world - especially by one's self. |
 I've never seen a stock Pilot bumper in decent shape. This one had to be cut off at the upper mounts. |
 Stock front suspension - nice straight tie rod, eh? |
 I wanted to move the location of the front wheels. Forward 3", out 2". To get the spots just right, I built jigs that locate the front spindles and then I'll work from there. |
 The locator jig showing how I held everything in place. |
 Let's see. Don't need these parts. |
 Front hubs, still in the stock location, but no front suspension on the car. |
 Right side view of the jig. |
 Left side view of the jig. |
 Right side in its new place. |
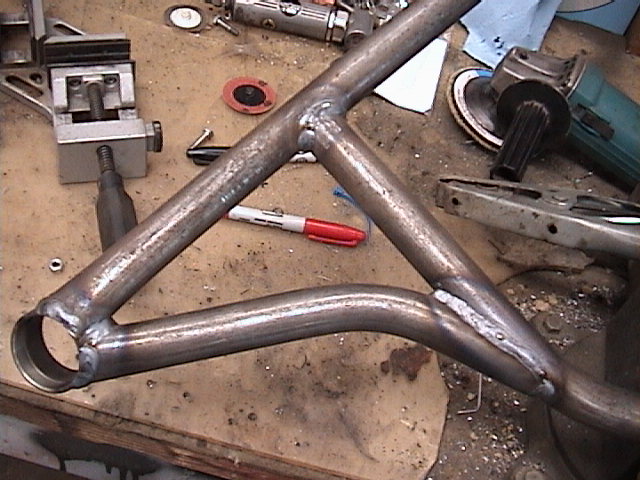
 Front legs of the upper and lower a-arms starting to take place. |
 Another view. |
 Left side close up. |
 Can you say articulation? |
 Can you say 24" of articulation? |
 Full Compression. |
 Full extension. |
 What should be ride height. |
 New lower frame rails. Build to go under and around the stock floor tub. |
 Right side view of the lower front frame rails. |
 Looks like I have good clearance! |
 Full lock left - yea, it seems to work. |
 Lower left a-arm in all it's glory -without shock mount. |
 Yea, it's just a bit different that the stock setup. |
 Time to start on the upper arm. |
 Close up of the ball cup. |
 Another test fitting - rear link of upper arm installed. |
 More test fitting. |
 Top view of the arms. |
 Another view from above. |
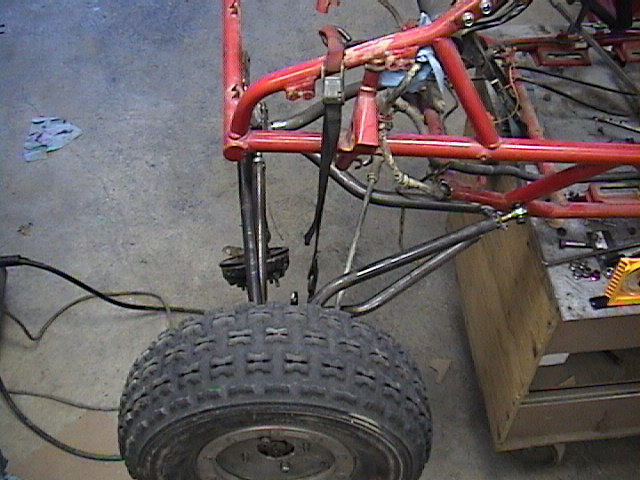
 Front hub installed. It all seems to fit! |
 Rear a-arm mounts. |
 Another view of the rear a-arm mounts. |
 See, the tub fits fine! |
 Another tub view. |
 Test fit of where the shocks may go - this is just a test. |
 Close-up of what might be. |
 Minimal body mods! It all fits under the stock body work quite well. Whew! |
 Another view of the rear mounts. |
 I think it needs a bumper. |
 No, make that I KNOW it needs a bumper - I know how I drive. (: |
 Bump steer time. The steering point for the tie rod has to be right "here". |
 Another view of the front end. |
 What's this? Fox Air Shox? YEA BUDDY!!! |
 I think this will fit right here! |
 Yup, this is the spot. |
 Bump steer installed. |
 Shocking! |
 More shocking pix! |
 The bump steer setup. This was harder to do than the a-arms were. What a pain! |
 This is good - the suspension end holds the front end of the car up. |
 Top view of it all. |
 Another top view. |
 From the front, sitting on the ground. |
 The body work test fit. |
 Front view of the body work test fit. |
 Shocks are a bit high and the bump steer hits the tub floor - gotta make a couple more holes. |
 Rear shocks installed. This was a breeze compared to what I did up front. |
 A couple loops, a brace and an easy increase in suspension travel. |
 Another view of the rear shock mounting system. |
 Painted view of the rear shock mounting system. |
 What it's gonna look like with body work |
 Still need to fit the rear fenders. |
 |
 |
 Close up of the finished front end |
 Front End with paint |
Almost Done Paint! |
 Another view of painted front end |
 One More! |
 Had to modify the front fenders for a bit of clearance |
 Motor Installed |
 Never had a motor or tranny this clean before! |
 Beard Seat and Team Tech 5-Point Harness with Kidney Belt and Quick Release |
|
 |
 |
 |
 |
 |
Tech Time! A little Secret Squirrel info that I'll share.
The six links (four transverse, two drag) on a Pilot are subject to a lot of abuse and often are the victims of rocks, tree stumps, the buddy in front of you that slowed down unexpectedly, etc., etc. Instead of buying new ones or trying to make new ones with heim joints (adjustable links are great, but they do cost a bit), you can fix your old links. It's really pretty easy.
To do the modifications/fixing, you'll need the following tools:
hack saw/band saw
welder
hammer
grinder with sanding disc
1x.063 chromoly tubing (mild can be used, but I prefer the chrome for this application)
two bolts from the susupension - the two front drag link bolts work perfectly
 Here are the four traverse links off the FrankenSkeeter. The bottom one is already done. |
 If the link is bent badly, cut the main portion of the link out. I leave a 1.5" piece of the stock tubing on the end of the rod. I cut the traverse links 13" long. |
 Believe it or not, you can clean up a totally screwed up link like the one on top. It just takes a bit of elbow grease. I used a cut off wheel to remove the angle iron and then used a sanding disc to clean it up the rest of the way. Bevel the end just a hair so it slips into the 1x.063 tubing. (it's a perfect fit) |
 To get my links the correct length, I took the straight link, ran a bolt thru each end and then located where the ends of the tube would end up. Draw a line, tap the cleaned up end into the new tube up to the mark and weld. Now go back, stick the other end in and tap it into place - I used the two bolts to make it all align. You can hit the end that's not been welded in with a hammer and get the twist alignment right. When the bolts both go thru easily, everything's straight and read to finish welding up. |
 You can make even stronger links out of the straight traverse links. I cut them in two, and then pounded the two ends into a 13" long 1x.063 tube. Once the ends hit, you're done. Check twist alignment, fix if needed and weld. Make sure you dip each end in water as soon as your done - otherwise you'll melt the gromment. |
 Here are all six links - four traverse, two drag, done. The drag links are tough, they oval near the ends. Use 11.0" long tubing on them. I did them the same way I did the front traverse links - I kept the entire tube length, just cut them in two and drove them into the chromoly tubing |
For the most part, this covers the fabrication part of the car. Now I'm going to start focusing my attention on the powerplant. As I mentioned, the motor came in two boxes - every part that can be removed was. The only thing that the people who took it apart weren't able to remove was the drive clutch from the crank. I get the feeling that it's going to require a lot of effort getting the stock clutch off, but that's all right, I'm not worried about it too much. I have a new Power-Bloc clutch for it already.
Motor Mods
The motor is gonna be a new beast when I'm done with it too. I'm wanting to build a nice torque producing powerplant. I don't need hyper power on top - I want a long, wide power band that will grunt through the rough stuff, but still run out and get it on top. I have three different port maps that I want to check out very carefully. I'll choose the one that appears the best (or mix and match the three to come up with something completely different). The clutch will be changed out for a Power-Bloc, an ATV Racing Torque Pipe and special muffler (I want this thing to be quiet!) will be installed, a TMX 39mm Pro Series Mikuni carb and modified stock airbox will replace the stock stuff too. As I get into the motor I'll start posting more stuff here.
Let's open it up and see what we have.
 Can't get the clutch off? BEAT IT TO DEATH! |
 Now add a little heat and.. |
 POP! It's off. |
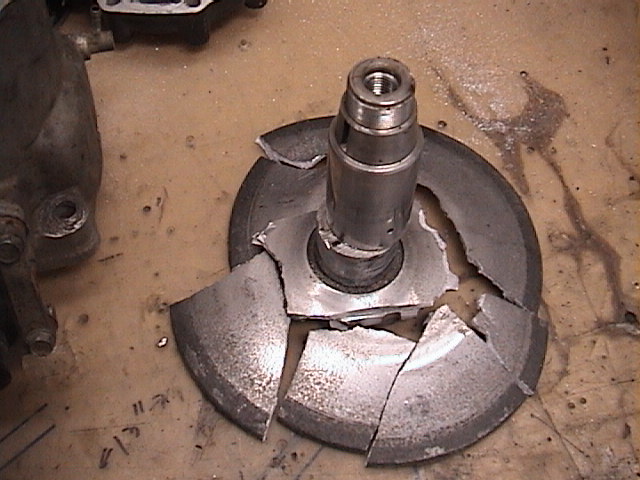 I don't think this is any good anymore. |
 Lower rod bearing meltdown. Not pretty. |
 Another view. Still ugly. |
 See, not a bearing in sight. |
 Wonder where the lower bearings went? |
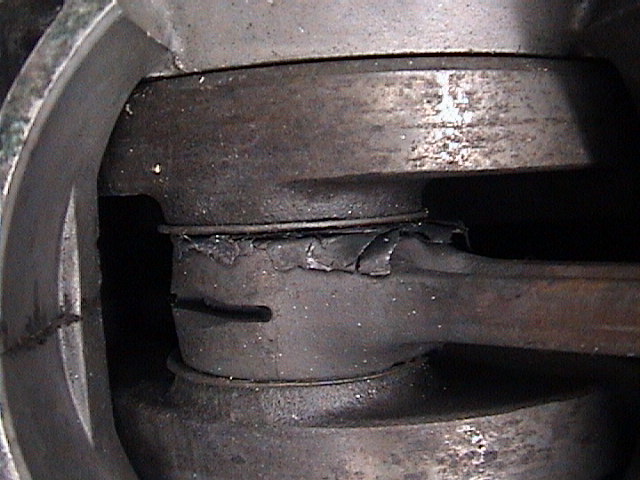
 I hope I can save this head. |
 Close up of the Wiseco that was in it. Not good. |
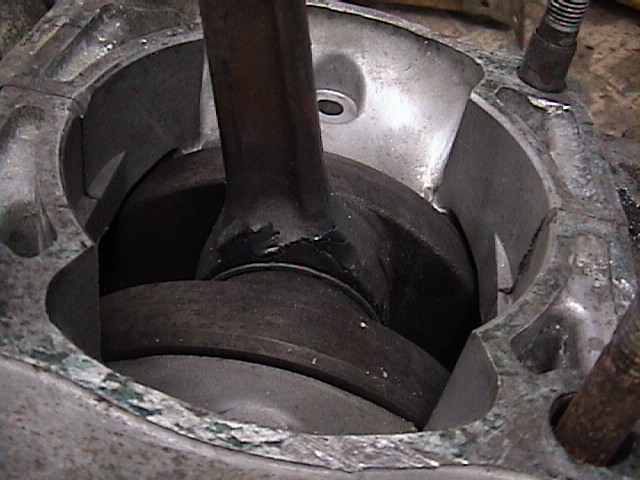
 Let's see how the home made case separator works. |
 Not too good! DOH! |
 Lower rod end pushed the cases out. It's fixable. |
 More of the same. |
Let the Porting Begin!
I got the porting mapped out on the cylinder today and was able to get the exhaust port done. Next comes the small, hard to do stuff.
 Exhaust port layout. |
 Close up of the layout. |
 Finished exhaust port from the inside of the cylinder. |
 Stock exhaust port. |
 Finished exhaust port |
These are next. Getting them mirror imaged and keeping the roof angles of the transfer ports the same is gonna be a challenge. I'm up for it.
 Intake Ports. |
 More of the intake ports. |
 And even more. |
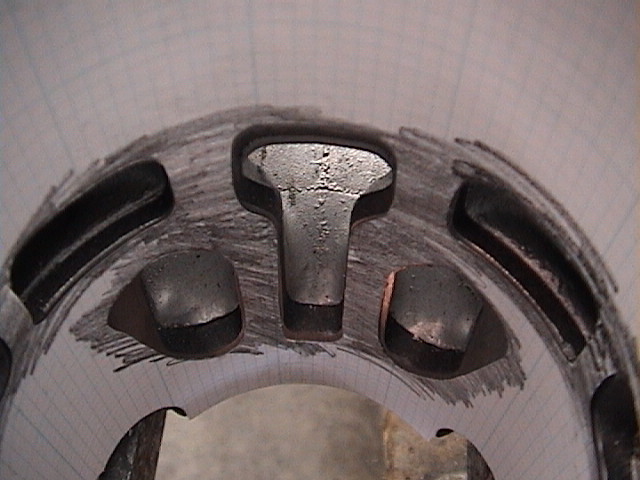
 Transfer Ports. |
 Reed cage intake area. |
Unfortunately I don't have anymore pictures to go along with the motor aspect of this project. I did the majority of the rebuild out in Phoenix at PCP Off Road (Don Pease is a friend of mine - he used to be ATV Racing's motor man). Don showed me how do do cranks and also supervised as I rebuilt the bottom end of the FrankenSkeeter. I've never been this far into one before, so it was nice to have an expert looking over my shoulder. (Hey dumb ass - that seal was supposed to go inside the cases a long time ago.)
To put the motor's rebuild in a nutshell, here's the skinny:
New rod - CR500. Bolt in, stronger, better bearings
Bore Tech Carbide Processed Jug - I can't say enough good about Bill's product. I've been running the Carbide process in ALL my motors for years now - it's the best there is. Period.
PCP Off Road head work
ATV Racing torque pipe
Pro-Series TMX41 carb
POOAAirbox modifications
Cleaned, painted and detailed everything.
Everything went back together very nicely. I had a bit of a deck height problem with the piston (had to remove .030" off the bottom of the cylinder because the DORK that pulled it apart used a pry bar and screwed up the bottom of it), so I'm having to run two head gaskets to keep my compression down to pump gas range (160 psi), but other than that and some jetting work, the motor seems to be nice and strong.
The Results?
The FrankenSkeeter's going to get its first shakedown this weekend at the Hatfield-McCoy riding area in West Virginia. Hands down the best woods riding around. Killer trails, exceptionally well maintained and run. I'll post back after the weekend and give a ride report.
(4/5/23)
Twenty years after the fact but here's an update.
The Frankenskeeter ended up working far better than expected. It turned out to be a killer woods weapon.
The suspension mods were impressive. The completely new front end being spot on. It handled like a dream, the 'Pilot Push' was gone, it went where you pointed and the long travel suspension was ideal for a wood setting.
The engine was probably the best engine work I've ever done - from bikes to jet skis (real Jet Skis - Kawasaki JS440 & JS550 stand up, not that sit down PWC crap), I'd done a lot of porting. The homework I'd done designing the port work and such proved to be damned near perfect. The engine had really impressive bottom end, an extremely broad power band and up top it sang a beautiful song. It was very controllable and pretty much "perfect".
The Frankeskeeter still lives. It was purchased by a POOA member from me probably somewhere in 2004. Buck ripped around in the Appalachian mountains with it for a few years. I'd heard over the years of it still being around and in the past two to three years was informed that someone had purchased it and was reviving the ripping ride.
Return Home
original finish date 10/9/03, updated 4/5/23