

Home of K-fab

|
|
|
|
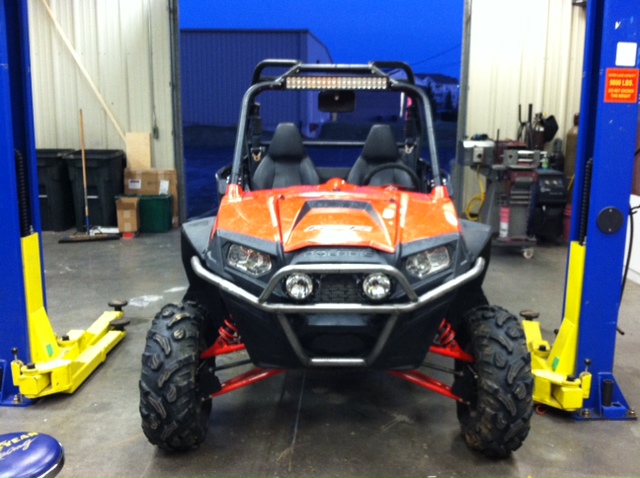
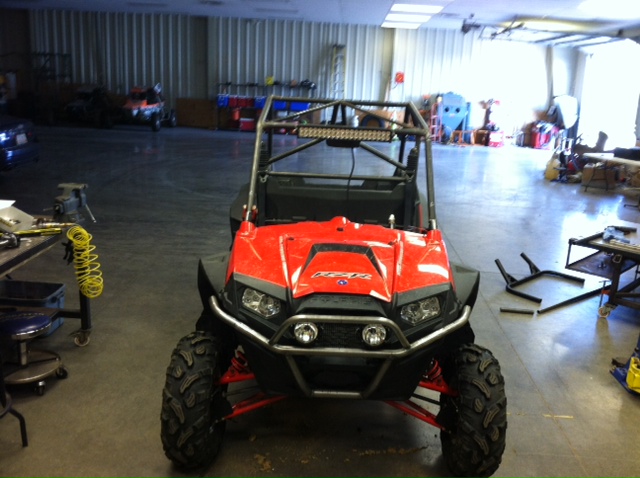
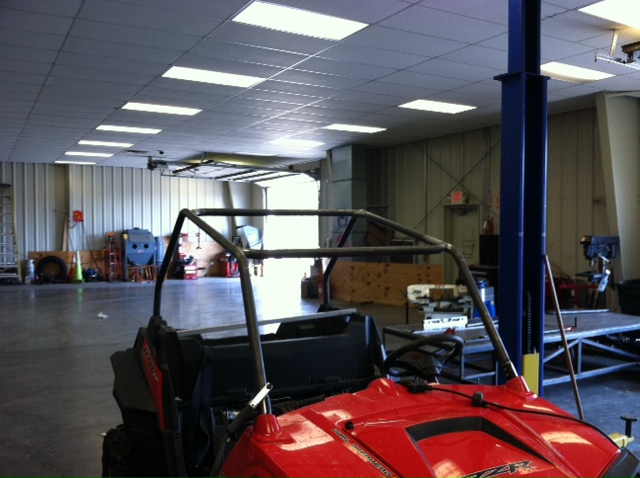
The RZR XP 900
March 6th, 2012
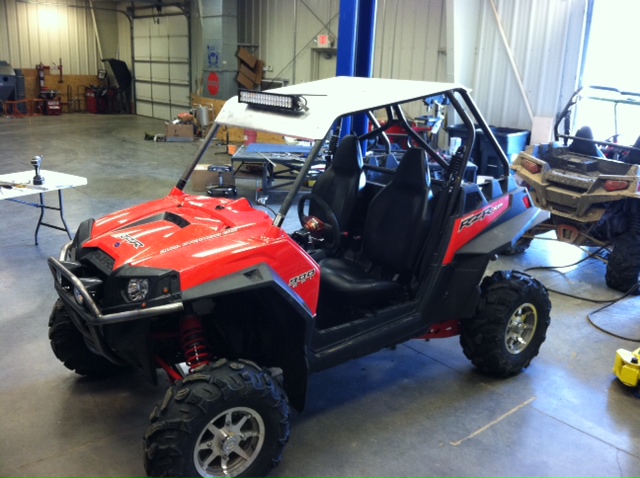
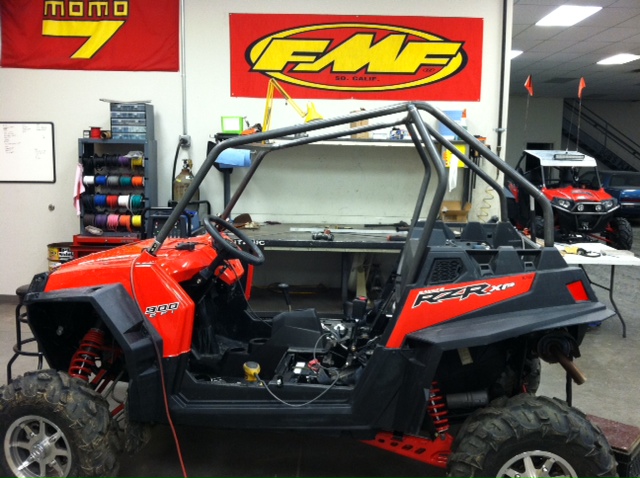
I purchased a pair of 2011 XP's this past weekend. I've made the jump into the SxS world and figured that I've chosen one of the better rides right out of the box. I looked pretty hard at the Canned Ham Cowmander, but when it came down to it, the XP is more my style of ride.

So, being that I can't leave anything alone I pulled my first XP outta my truck this morning and started the mods.
I'm looking forward to this project.
I unfortunately live in Ohio (I WANT OUT!!!), I'll probably not do a lot to the machines as far as suspension and/or adding hp. My main play areas will be forests and such - tighter terrain that's not friendly about faster/bigger rides. Once I get moved out west (Scottsdale in two years), I'll probably go about setting the two XP's up more for desert and running at the Dunes. A set of paddles and some shock mods will be easy changes.
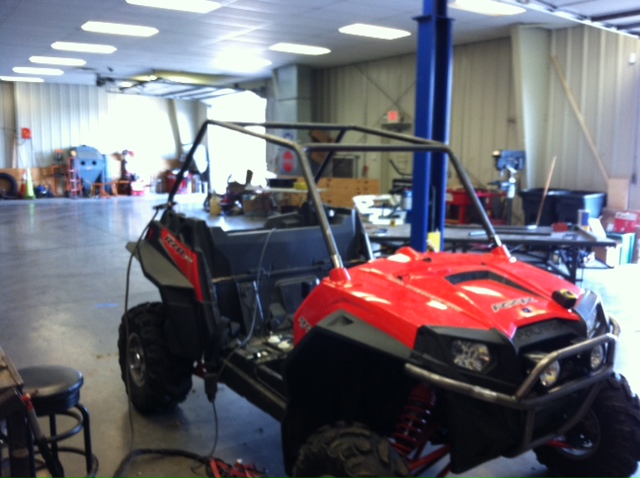
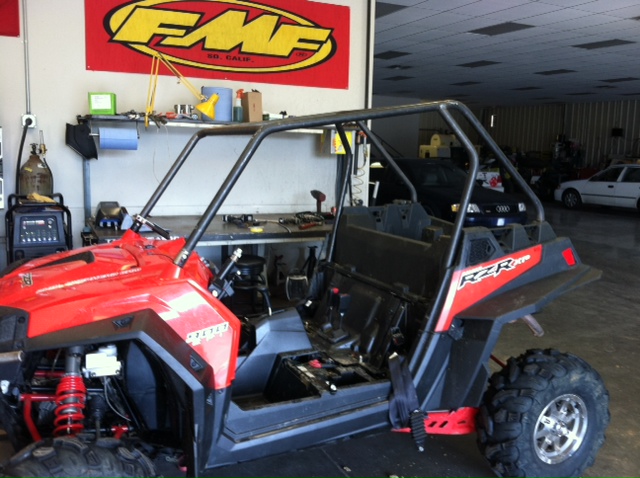
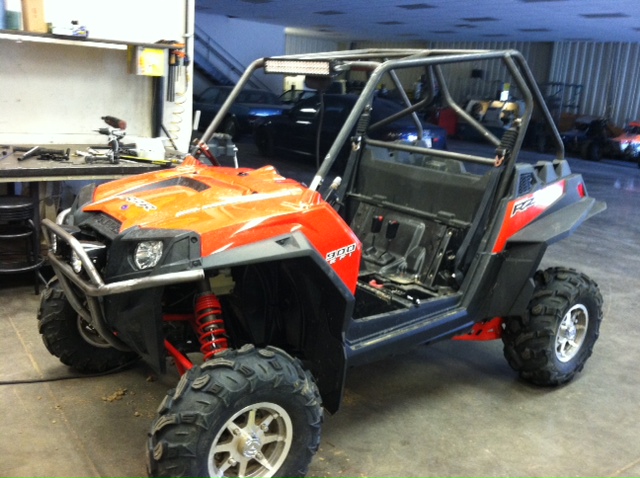
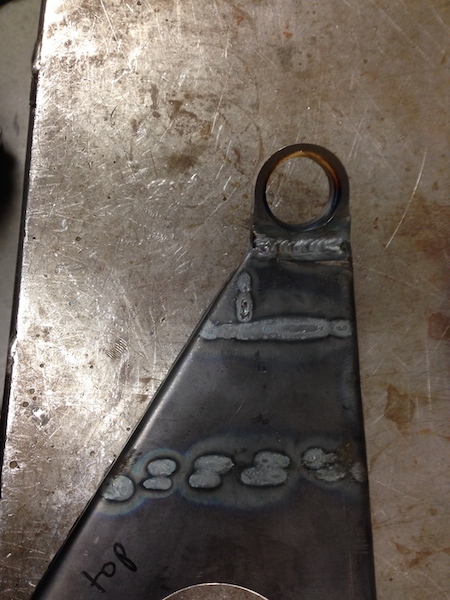
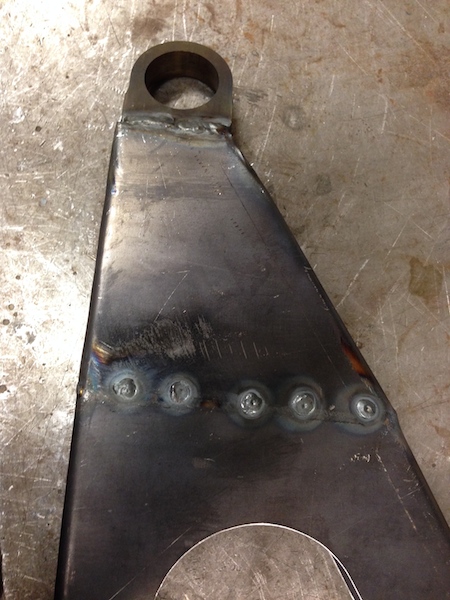
First thing was to get a set of doors installed. (and of course I forgot to snap a pic...) I'm impressed with just how nice the doors that Pro-Armor makes are. I also threw on the slam latches - nice units! The Pro-Armor stuff fits really well, the fabrication is top notch and, well, as a fabricator, I have to say I'm impressed.
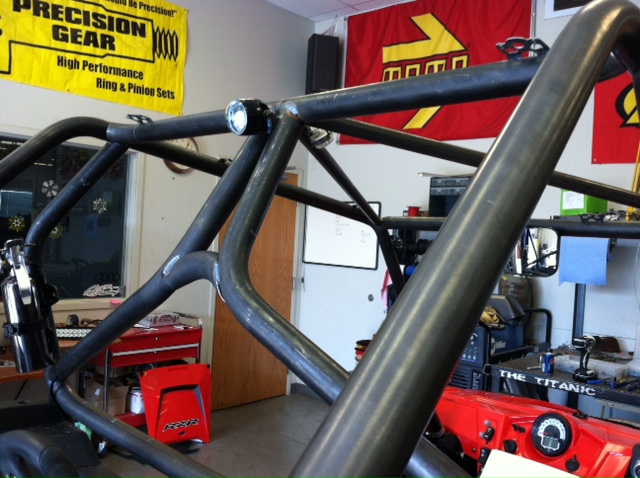
I'll eventually end up completely redoing the cage, but for now I'll just fab up a good set of bumpers, make some skid plates and do a roof.
As I messed with the doors, I had the realization that I have a bunch of stuff that was going to go into a Class 10 based pre-runner is now going to end up here in my XP.
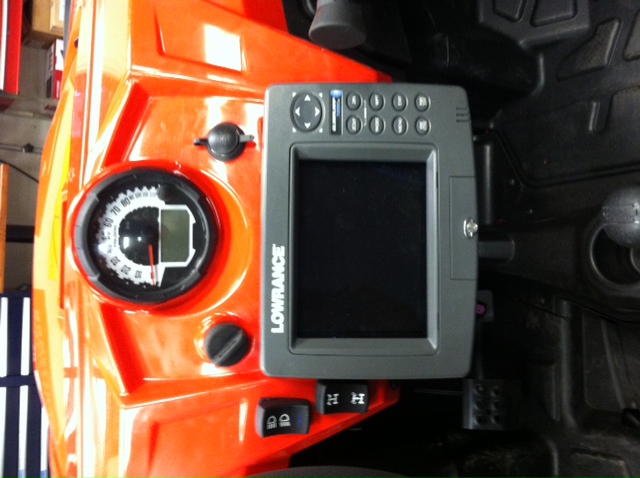
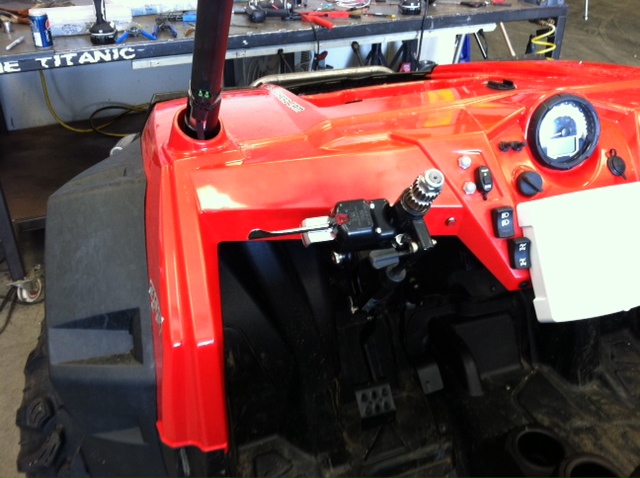
I have a Lowrance GPS system - nice big screen. It's a little old (four years or so), but it's never been used and will work just fine.
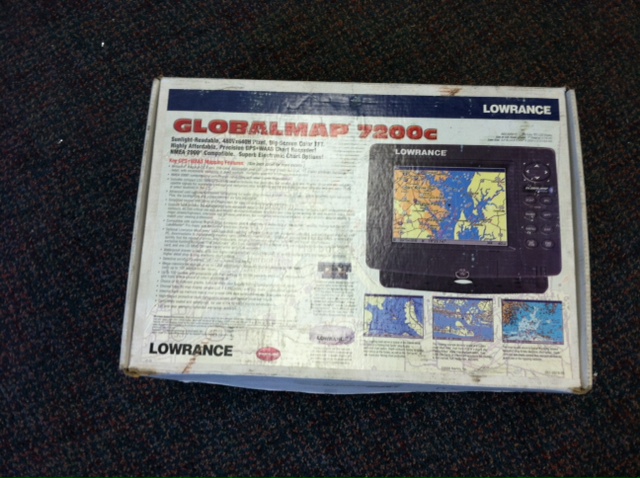
Not sure exactly where I'm gonna mount it - probably in the dash below the speedo. That's going to require a bit of fab and mod to the dash, but I like this sort of challenge.
I need to order a couple of sets of Team-Tech harnesses.
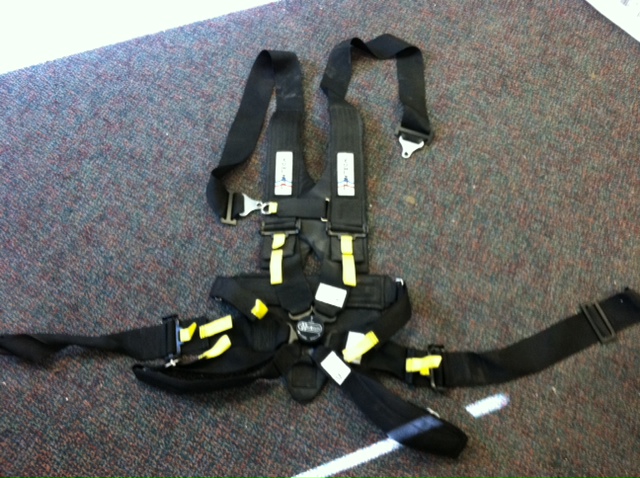
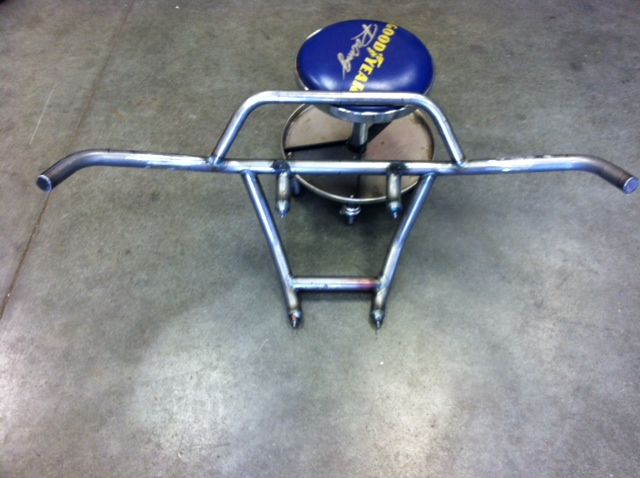
I think for the RZR I'll just go with a standard buckle five point. The one in the pic is called a "Jet Fighter" setup and it goes in my street car when it goes to the track (just for fun, not racing).
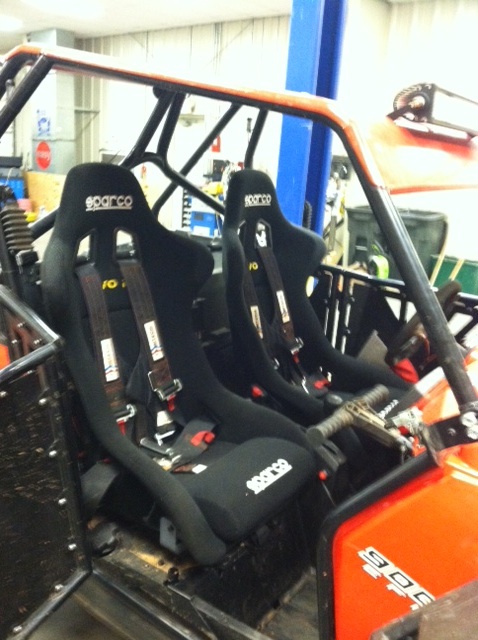
I also want to figure out how to use the OEM seat mounting system and adapt the pair of Sparco Evo 2 seats that were to go in the now defunct pre-runner.
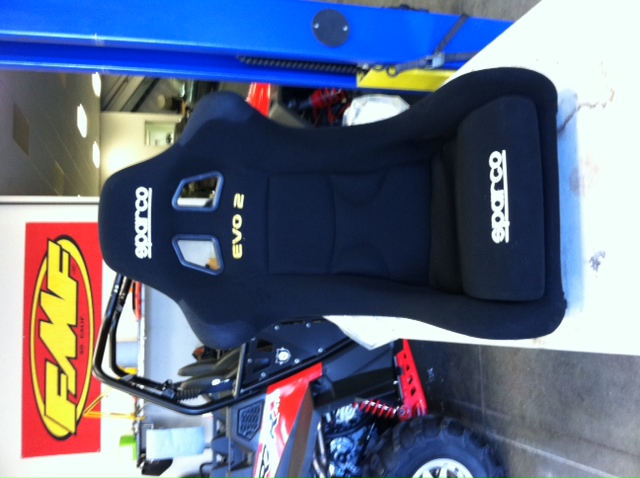
I run these in my Class 10 car and in my stadium lite (see avatar) and really like them.
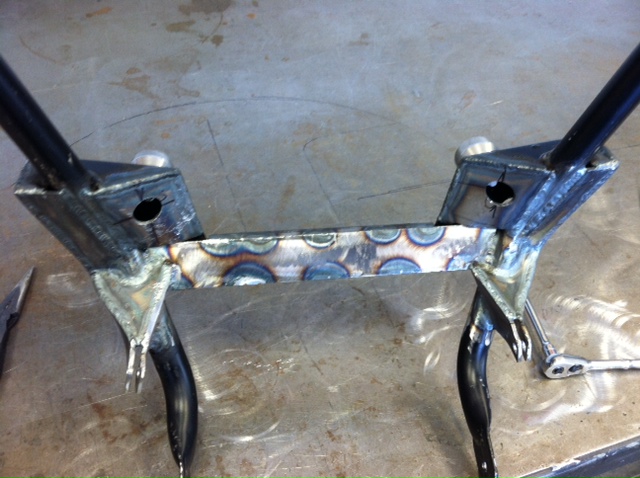
I sort of messed around with the OEM seat base and I think with a bit of work I can fab up a bracket that moves the Sparco adjuster rails inward so they'll line up with the notches that the OEM base uses to attach to the seat. I'll be a happy camper if I can pull it off - they have to fit like OEM or they're not going in.
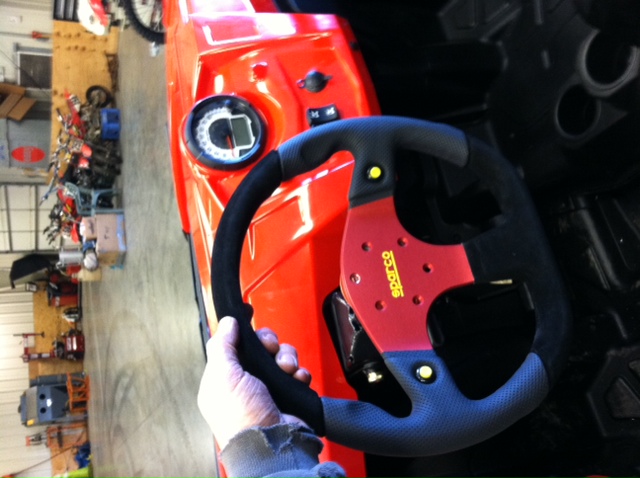
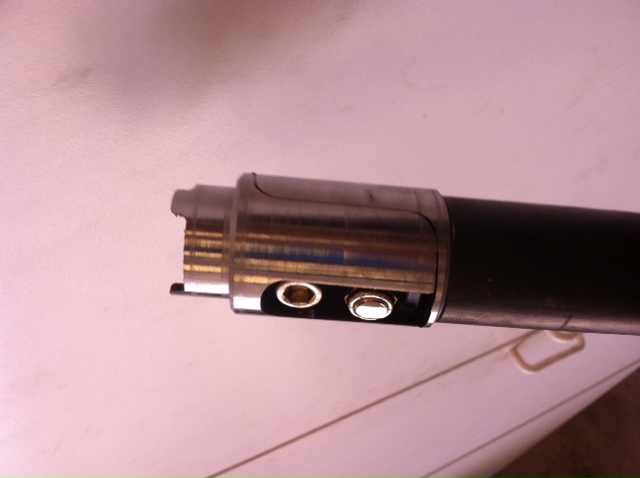
While rummaging through my pre-runner's stash, I came across a quick release and a nice Sparco steering wheel. Yeah, that needs to be used!
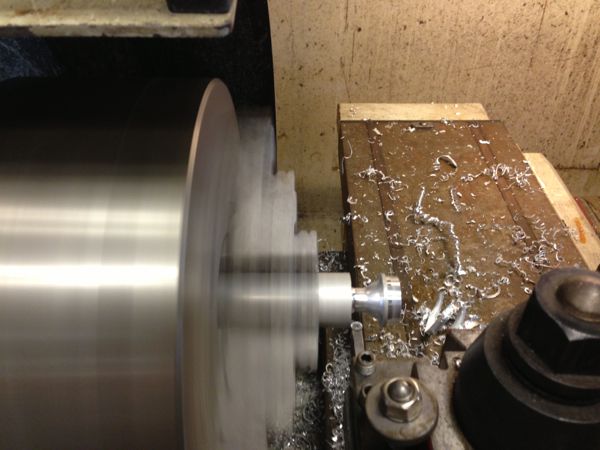
I pulled the steering wheel off and started studying. Push the center aluminum fitting out of the plastic wheel and then start making an adapter.
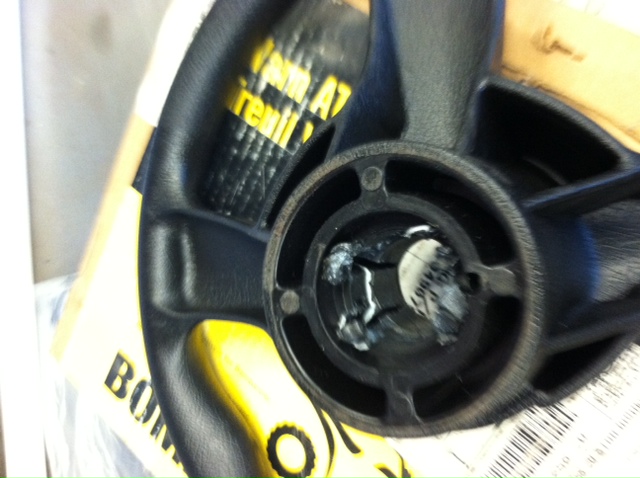
I turned down the cast wheel center and machined the inside of the quick release weld on spline. Next I pushed the two pieces together - they have about .003" of tolerance and the fit is nice, tight and solid. Just to make sure that they two pieces can't rotate on each other, I'll put a pair of pins between the two, parallel to the steering shaft. That won't let anything twist at all.


A little more machining and I have a quick release adapter that fits the OEM RZR steering shaft.

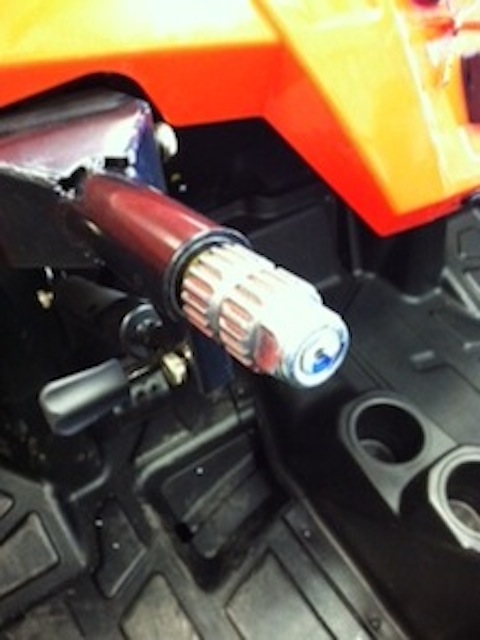
The quick release hub fits perfectly.
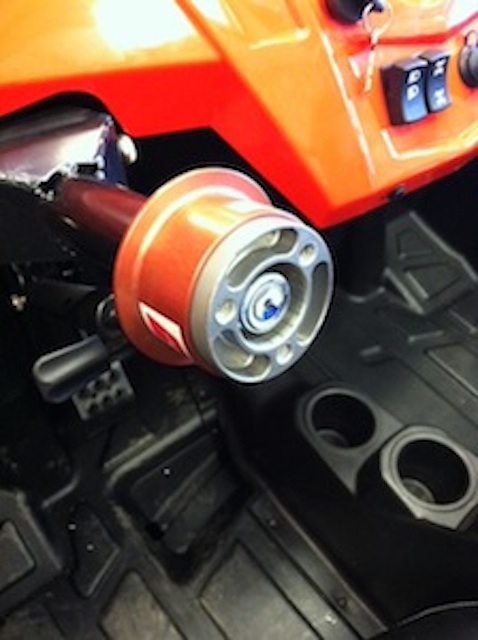
Here's a test positioning of the steering wheel on the column.
Tomorrow I'll machine an adapter to mount the six hole pattern of the steering wheel to the three hole pattern of the quick release.
March 12th, 2012
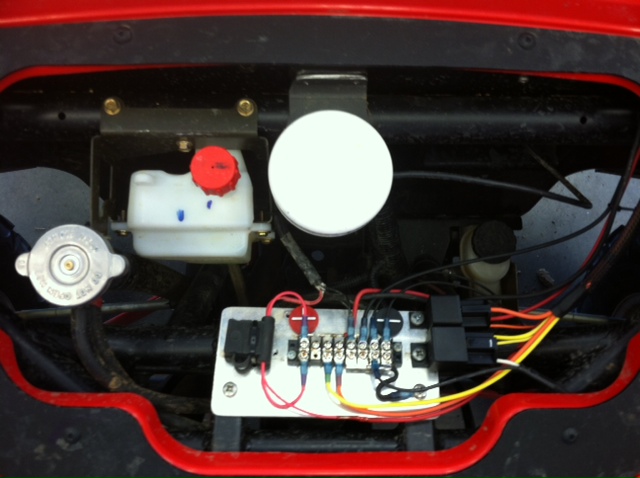
GPS and the power bus bar for electronics are installed.
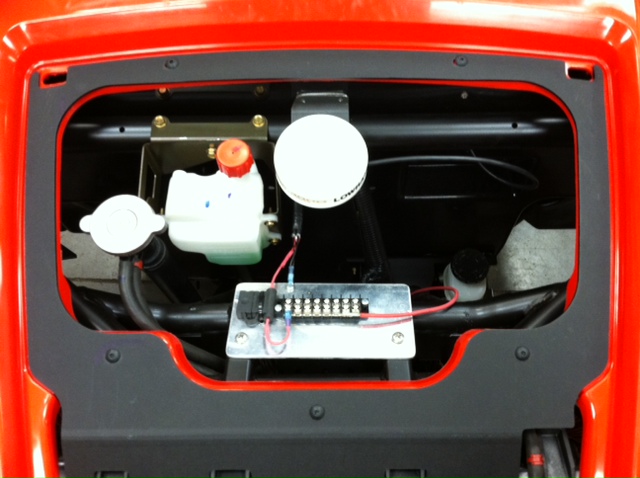
I've ordered a pair of: fire extinguishers Redart 1" x 30' Super Straps 20 HID LED light bars & mounts Team Tech harnesses and a winch mount for one.
Most of it should be here by the end of the week.
Next will come bumpers and a new cage - but I'm gonna make that stuff.
Still not sure what to do about the seats. I'd like to put the Sparcos in, but it's gonna take some engineering to make them work like I'd want. Right now the stockers aren't that bad.
March 20th, 2012
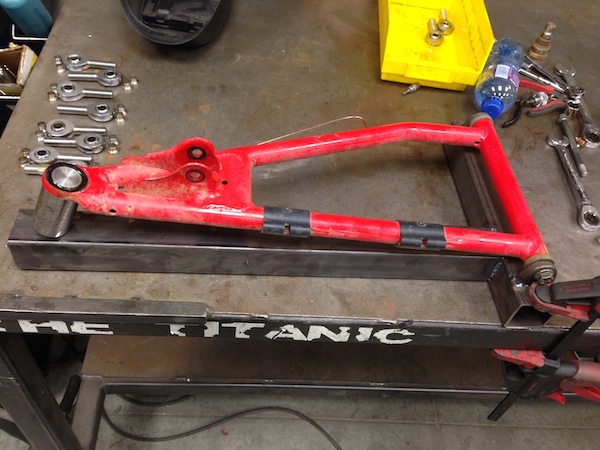
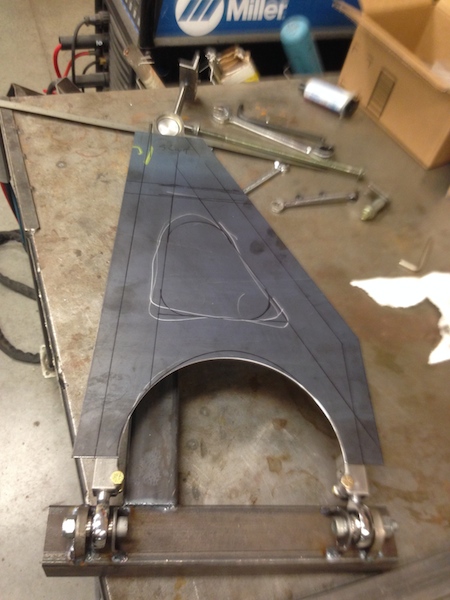
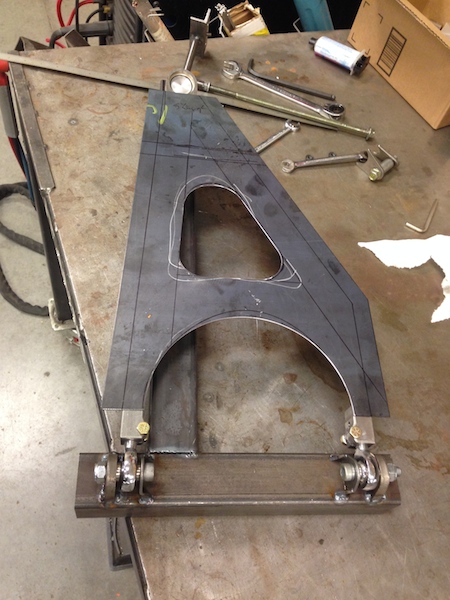
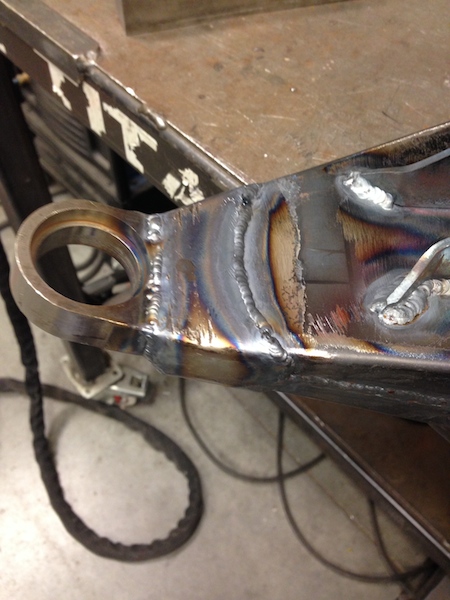
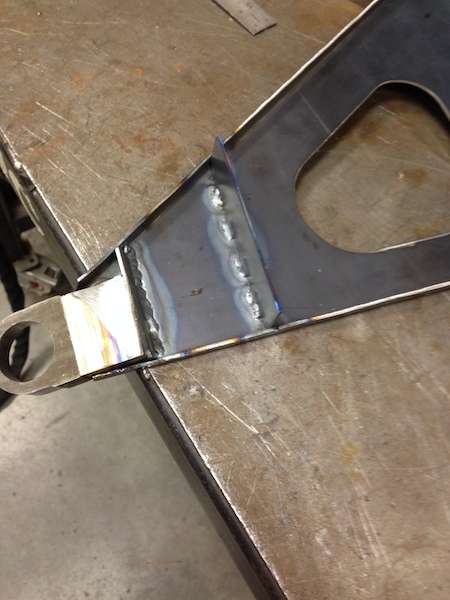
Washed it after Sunday's fun and then started on a front bumper:
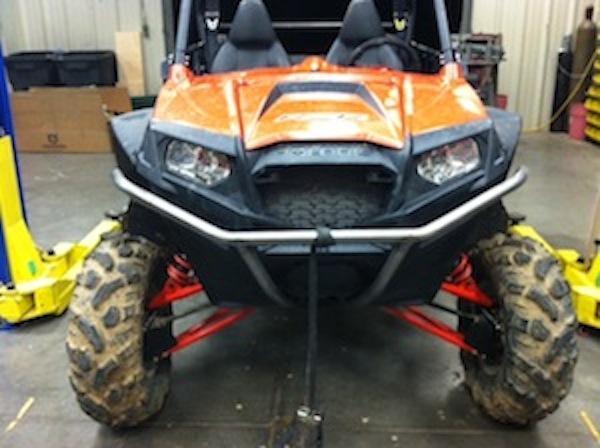


Been busy the last two days. I finished the bumper and got my lights and rear view mirror mounted up. I still need to wire the bumper lights.
The bumper is 1.5" x .083 1018 mild (cause that's what I had handy - would like it to have been .049 - let the bumper crumple, not the car) and it's fully TIG welded because I need the practice (and I suck except for four or five really pretty, short runs).
I used the four mounting points on the front radiator guard tubes as my locating and mount points. Instead of trying to tab it out, why not use what's already there?
I do realize this isn't the strongest part of the chassis, but for this first try, it'll do.
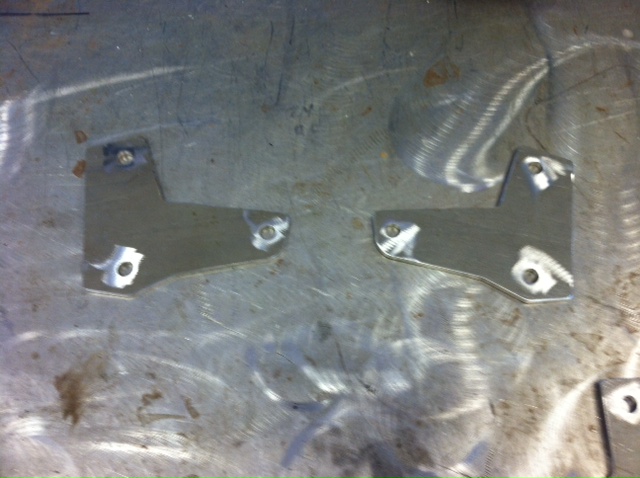
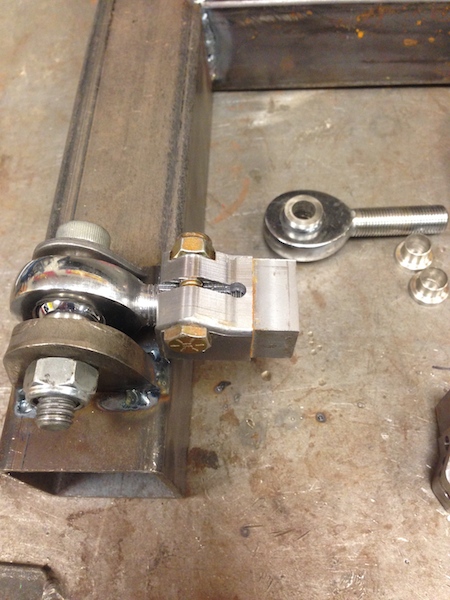
Since the tubing is 1.5" o.d. it doesn't fit well into the pockets down in the bottom front cover - I needed a way to adapt the tubing so I machined up a set of adapters:

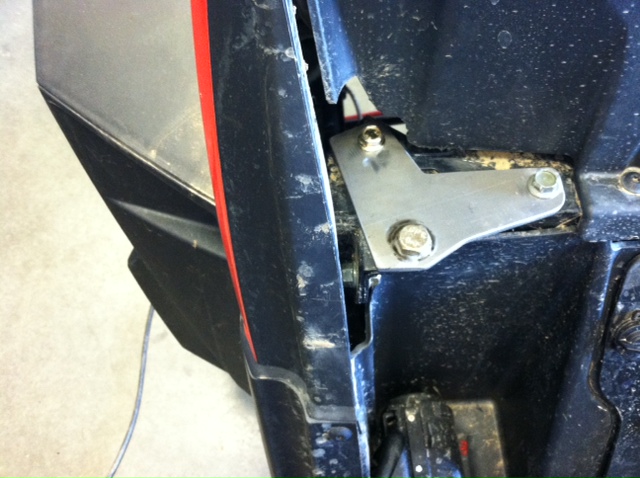
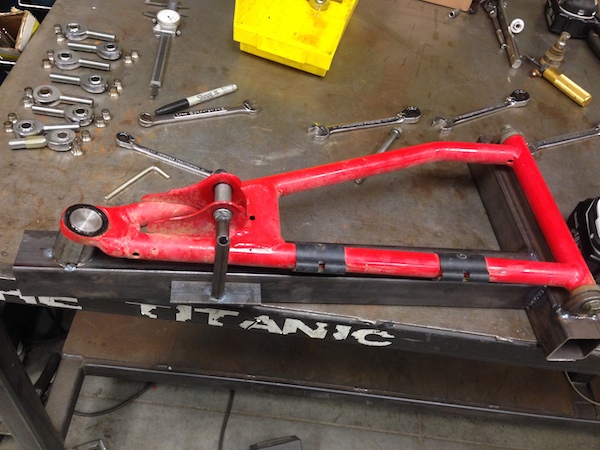
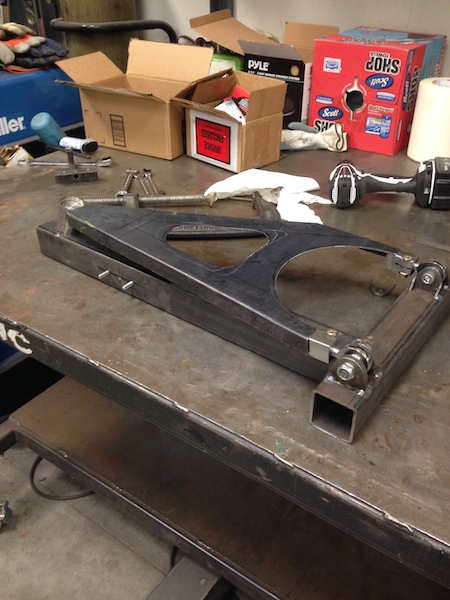
Here's how they fit on the front:
The upper mounts:

All of the legs and adapters in place:
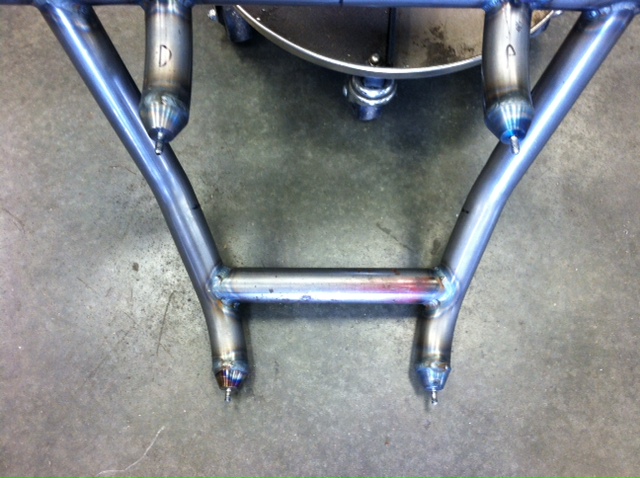
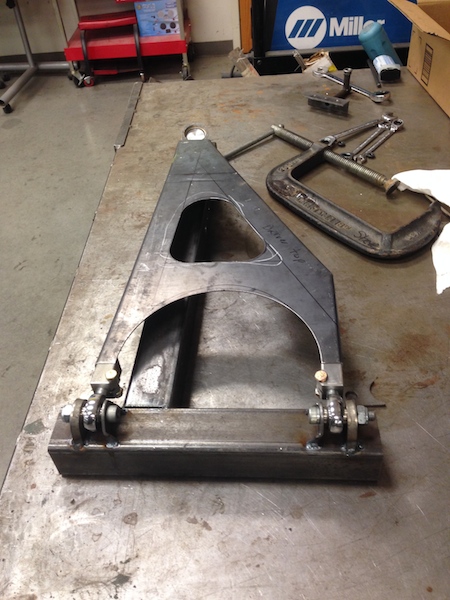
The finished piece:
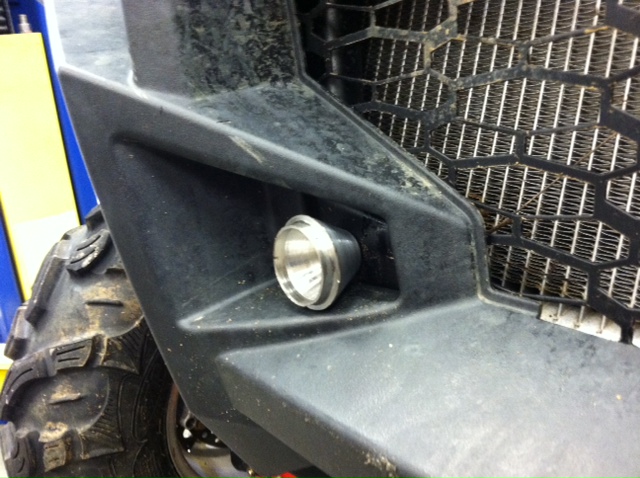
Bumper mounted with a set of Baja Designs Fuego's - great lights.

I also got my 20" LED light bar and rear view mirror from TQS installed.
I'm waiting on my winch mounting plate to show up and then I may put a skid plate on the front of the bumper if there's room w/o any interference.
I also made up a couple of these little gadgets:
It holds my Super Strap (great things!). I've been using this sort of pocket for a while now - have them all over the Deztaz for holding drive belts, the Super Strap and a couple other items.
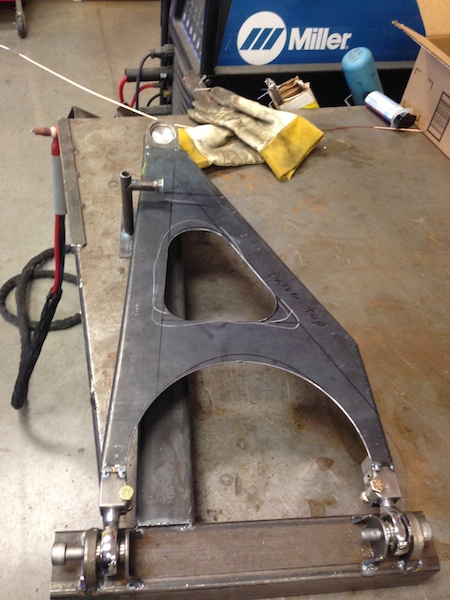
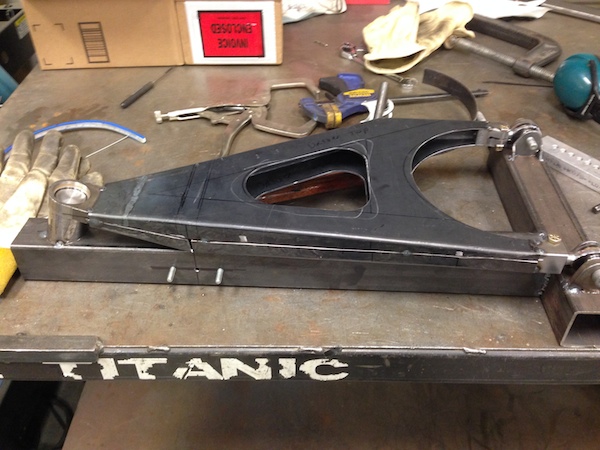
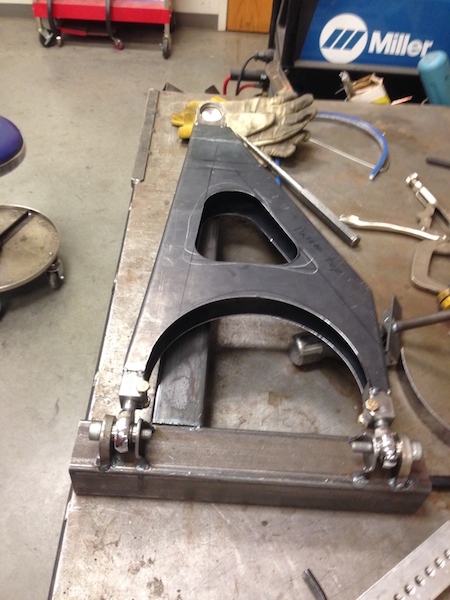
In the works are machining a few little billet things, making a couple of stronger rear link sets, figuring out a rear bumper and starting to think about what my cage will look like. I've seen a couple here on the sight that I really like. I'm not sure if I'll tie it into the rear bumper or not.
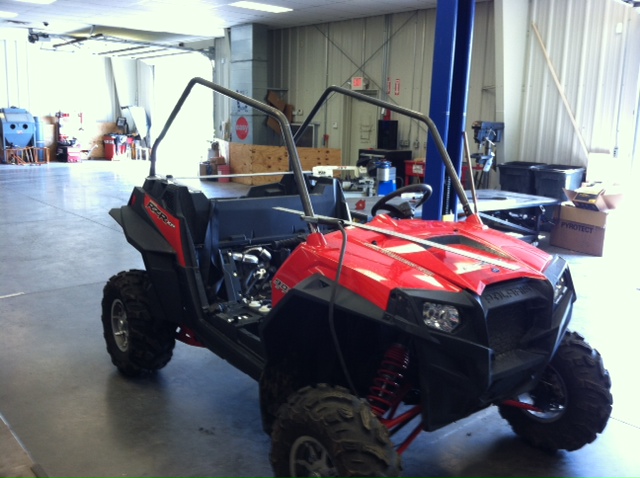
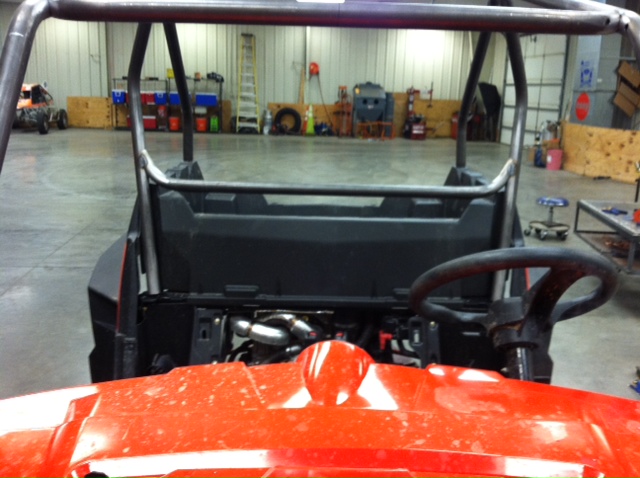
Got the lights all wired in and then proceeded to remove the cage, causing me to cut the upper light bar off. Eh, I'd sort of planned on it, so no biggie.
I've not done a cage in a very long time. I have a pile of scrap 1.5 x .095 chromoly sitting on my floor now too. Damn!
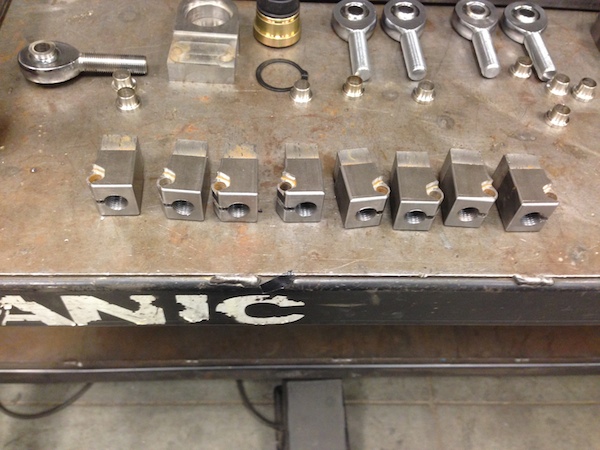
Yesterday I cut the Camburg clamps out of the stock cage and went about machining them to fit 1.5" tubing instead of the 1.75 that's on the ride. I'm not forking out a bunch of $$ for a 1.75" die for my bender (Ercolina Super Bender), nor am I gonna buy a bunch more tubing. I already have the 1.5" x 4" radius tooling and a bunch of tubing.
Once I get the cages powder coated, the 1.5" tubing shouldn't be that noticeable - especially since bumpers are 1.5" too.
They machined nicely.
Started out doing a front hoop and then was going to do a rear hoop and add the side rail. Nah, that sucks and didn't work out right.
Oh, that tube's too short.
Crap, that one over bent.
Arrrgh!!
Drop back, eat a little lunch and start over.
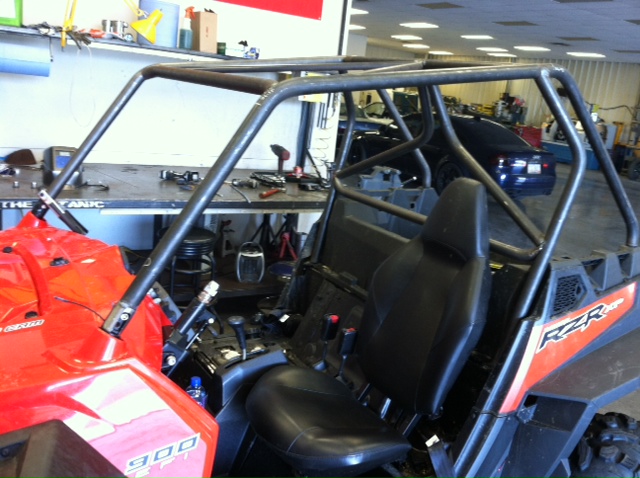
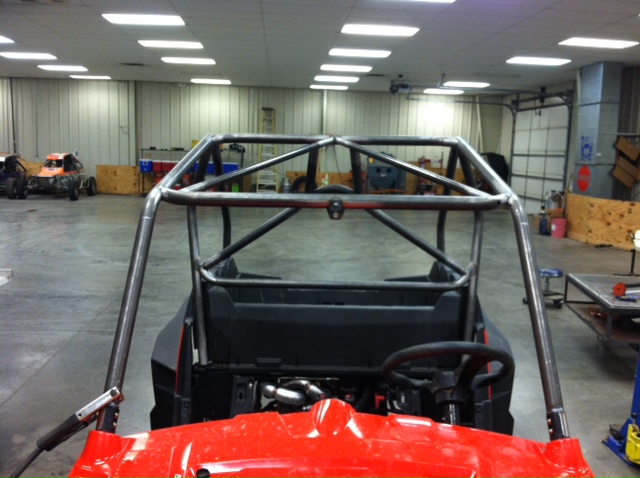
Now the cage is two main rails with cross bracing. Thus far, just the front and rear cross braces. I still need to do the B pillars, lower cross braces, diagonals and such.
I like what's happening now.
March 21st, 2012
Got a lot done today and I'm quite happy with the results.
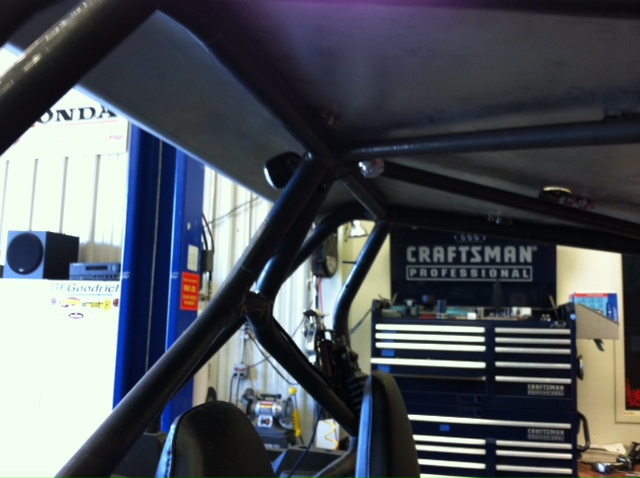
I've tacked everything and will pull the cage off the XP to fully weld it up. Once again, I'm having fun TIG welding everything - and I'm starting to get more pretty beads.
B-pillars installed:
Rear cross brace tubes installed:
I will add a cross brace between the two "elbows" in the cross bracing.
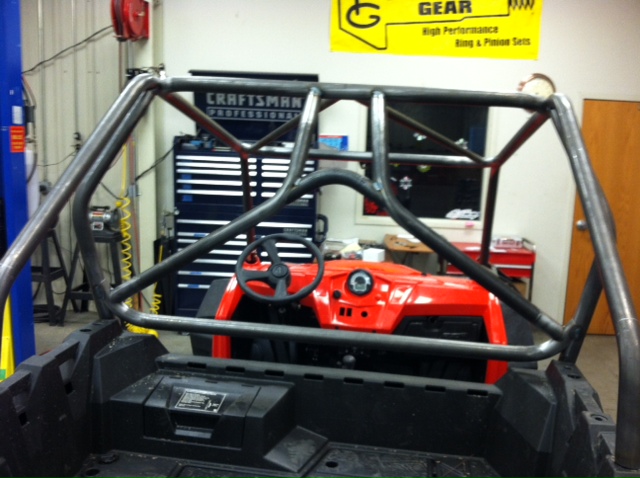
Gussets for the B-pillars:
Gusset in place:
Front shot:
Light bar, mirror and seat belts in:
Back shot:
I should be able to finish this up tomorrow, then I'll start on the second cage for my other car.
March 27, 2012
Been busy!
I've done a bunch of electrical work - the XP now has functioning blinkers on it. This will make being street legal just that much better.
Tonight I got the two way radio and intercom system installed - no pix yet
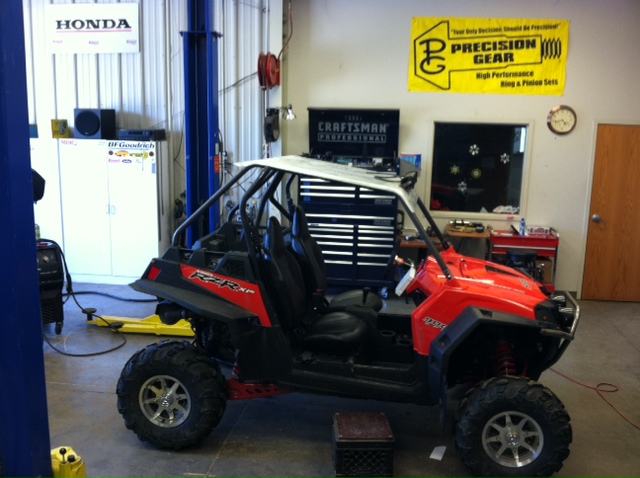
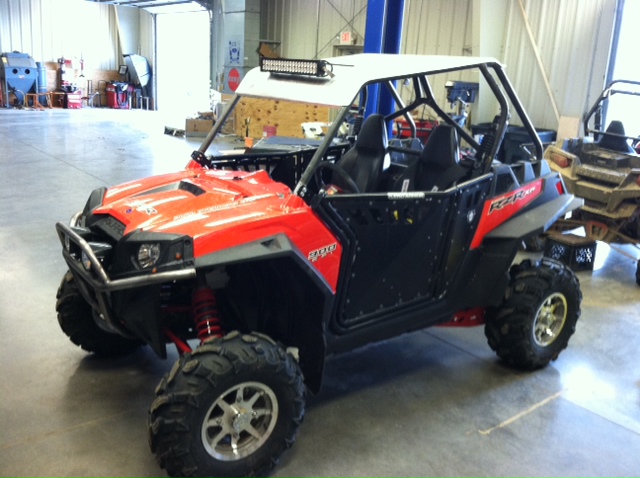
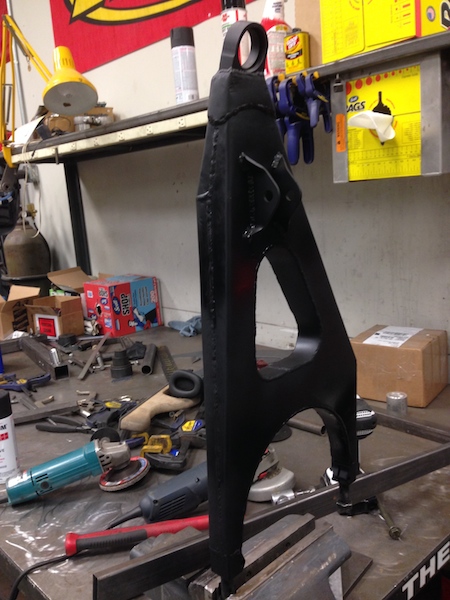
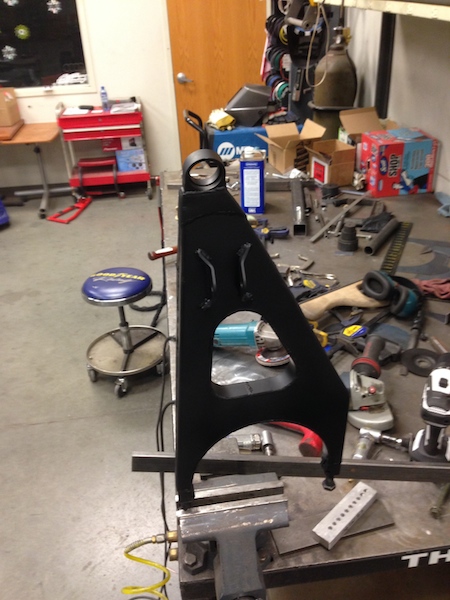
The cage and roof are done and ready to go to powder. I'm going to do the bumper and cage in a dark charcoal or graphite and then match the roof to the body in red.
This is probably one of the best results projects I've done. It fits PERFECTLY - all the bolts line up exactly right, there are no gaps and it all just came out really nice.
I added a few "fun features" - may as well, as since I'm building it and not having to pay for it to be done.
There's a dome light and a rear facing bed/behind the ride light.
There's a fire extinguisher:

I got the shoulder strap location pieces in place - this will keep the straps in the correct orientation to the seat and they won't float around on the bar. - you can see them on the lower cross bar.
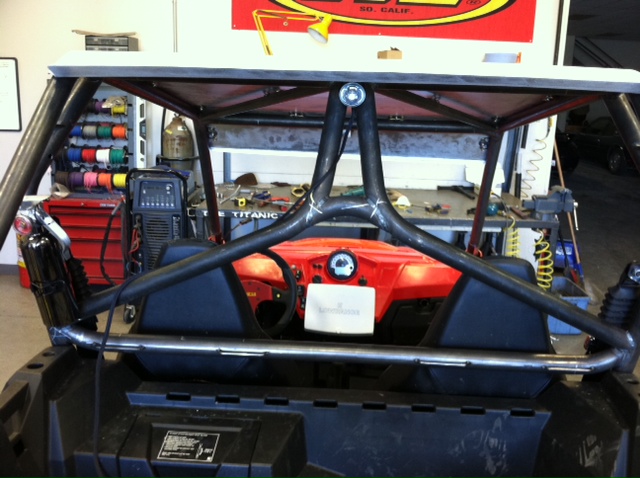

The roof was actually quite a bit of fun. Getting the 4" radius bends in it was a challenge - wrapped it around a nitrogen bottle. It's .095" 3003 aluminum. I think I may have gone a tad overboard with the Dzus fasteners - there are 14 of the things. But there's no roof rattle!
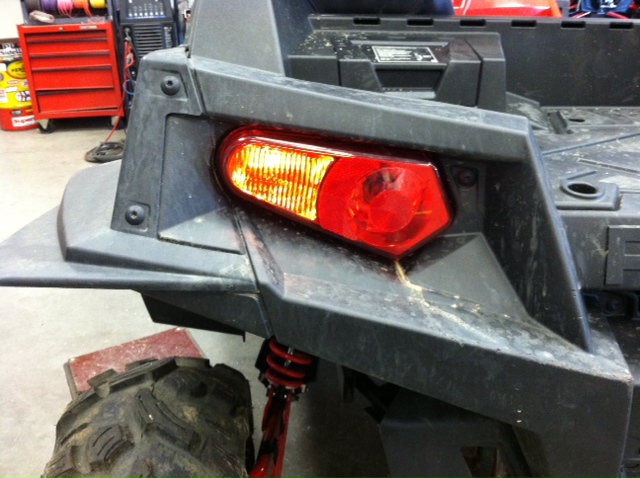
Look closely at the corner of the XP by the head light - you can see the two little amber blinkers. The are surprisingly bright.
March 30, 2012
XP #1 is done other than paint and maybe a small aluminum containment box around the intercom & 2-way radio setup. PCI offers a bolt in system that places the two piece below the center section of the dash, but I already have the GPS mounted in the dash area. That left me pondering where to put the electronics. They fortunately fit right between the seats against the fire wall (above the removable panel). As of now, they're just bolted in the mount to the wall and the wires are exposed. I want to do an aluminum box to surround it all, but that's gonna take a bit of work.
Got the winch installed too. I've had a complete winch kit for a Bombardier quad sitting in the closet for years and other than a mounting plate, it was everything I needed. I ordered a plate a week ago and got it a couple days ago. It bolted right in, the winch bolted right to it and now I can drag things (like a stuck XP) around.
I'm waiting on my Team Tech 5-point harnesses to show up too.
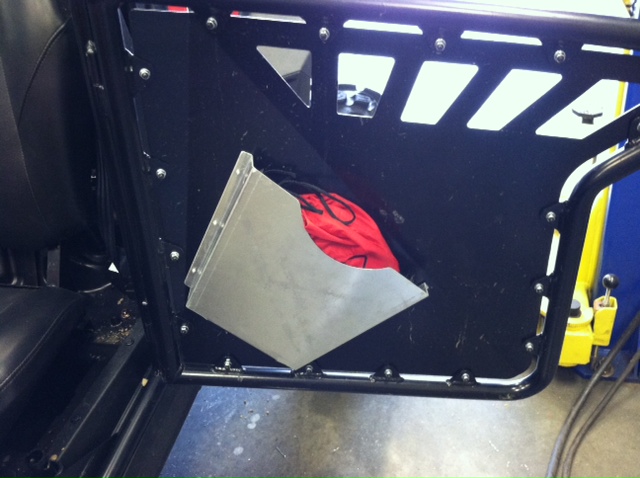
Made two belts holders (one for each XP) and got them installed in the doors. Easy access when needed, like the tow strap on the driver's door, and they don't get in the way.
I also used a quarter turn fastener to secure the shock/belt tool in the belt holder.

Other than running a couple wires through the cage, getting the cage, roof and bumper painted and not having the whips in yet, XP#1 is done.
I'm stuck on what way I want to go with paint... Originally I was thinking I'd go with a graphite or dark gray for the bumper and cage and then match the roof to the body's red. Now I'm thinking I should paint them to match the Dez. Since it's all run under my Yellow Dog Racing logo, I'm thinking the Dez would be The Big Dog and two XPs would be Pup 1 and Pup 2. :p
March 31, 2012
Started on XP#2's cage yesterday after lunch.
Main hoops in place:
The rear down tubes of the main hoops just stub into those two holes in the back of the bed.
Cross bars in place:
I have the passenger side B-pillar tacked in place and was working on getting the driver's side fitted, but after about 30 minutes of fighting with the darned thing I realized it was time to call it a day. It never ceases to amaze me how one side can work perfectly and the other can fight to the bitter end.
I'm trying to pay even better attention to detail and such on this cage. It had been a couple of years since I'd done any fabrication like this so the first one was sort of "getting back into the swing of things". This one I'm stepping up and trying to make just that much better. I'm doing things like sanding the welding areas clean, really trying to pay attention to my tube blends and fittings and such. (and I get the feeling this cage will end up on XP1 - mine, if you will - XP2 is the spare ride.) I did manage to forget to drill a hole in one of the main bars where the cross bars fit in - I wanted to run wires through the A-pillar. Oh well...
Here are pix of the stubs that I used on the ends of the rear down tubes:
The hole is tapped 1/4-20, but can be opened up to 1/2" if needed.
B-pillars installed:

Side view of the B-pillars: (Arizona Whips lighted flags came in yesterday! - see 'em on XP1 in the background)
Lower cross brace:
Rear braces and roof braces:
Back view of the rear main hoop:
April 7: XP#1 got OEM power steering installed today! Man this is sweet!
It's easy enough to install - probably the hardest part of it all is getting the splines aligned with the u-joints and then holding everything while you get the first of the four nuts that hold the whole thing in place back on.
I plugged the wire harness that comes with the system into the EPS and then started trying to figure out where in the XP's harness these plugs go. Hmmm.... these two in the car look really similar to the pair that I just plugged in on the harness. The harness shown in the photo in the instructions looks NOTHING like this harness???
Oh, wait - the plugs in the car's harness plug right into the EPS. SWEET. Fired the car up and check the steering - this is nice! Easy, smooth and works great. Hard to beat OEM for plug-n-play.
I got my Team-Tech harnesses installed too.
#2's cage is done except for the harness location bars on the back of the lower cross tube.
Up next for #2 is a bumper that mounts to the frame (or braces the stock rad mount brackets) and the electrical stuff - GPS, power steering, lights, radio & intercom, five points and the street running gear - signals and horn.
April 9: 5-point harnesses installed and you can see where I put the radio and intercom. - box for electronics is on the to do list. Originally I was going to make it out of aluminum, but that little project went ary. Now I plan on making it out of carbon fiber (been a while since I've played with cf).

I also moved the turn signals on the rear of XP1 into the tail lights (which I did on XP2 from the start - photo below).
Power steering is installed in #2 now. So simple to do it's stupid (once you've done it once...) And this time I knew to just toss the spare cable into the spare wire drawer in the electrical tool box.
Got the GPS display module installed into the dash this afternoon - still need to make the backing/mounting plate for it.
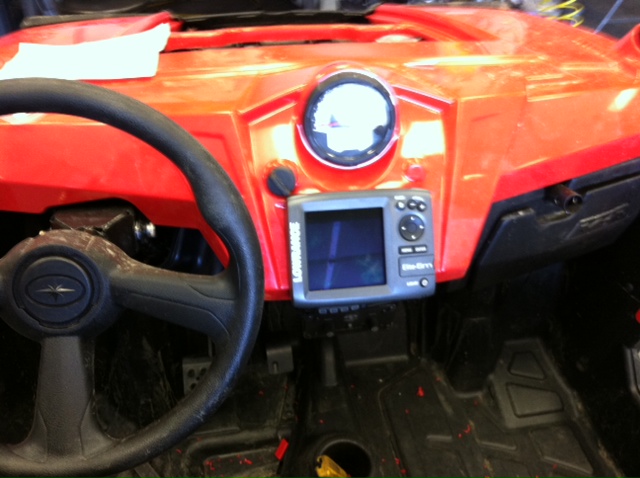
I like the little skull reflection in the instrument pod!
Once I get the rest of the electronics, harnesses and such installed in #2 I'll get into the machining phase of this fun stuff. Billet aluminum parts will be found... (and I can anodize so they'll be pretty too!)
April 16, 2012
Been working on getting all the electronics installed and wired - nothing much to post pix of. Harnesses are installed in #2 now.
One of the things I've been told is that the front clip that holds the front facia/bumper/lights on is wimpy and that if you breath on it too hard it'll bend. So, to combat this issue I went in and boxed the middle section (bumper upper mounting points) and tied it into the front of the frame. It may not be as strong as doing a full, new section but it should be strong enough to keep the clip from attacking the radiator when the front bumper gets used.
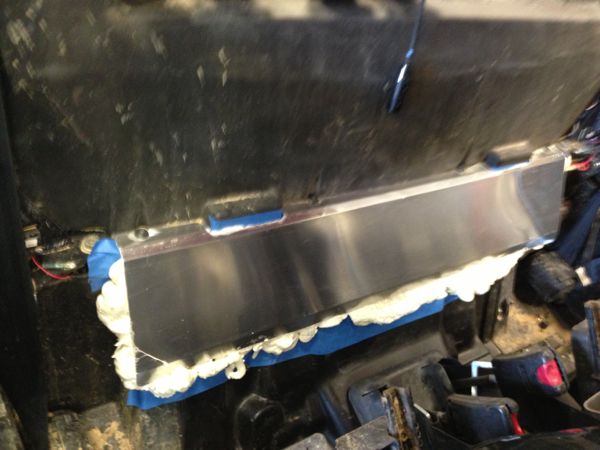
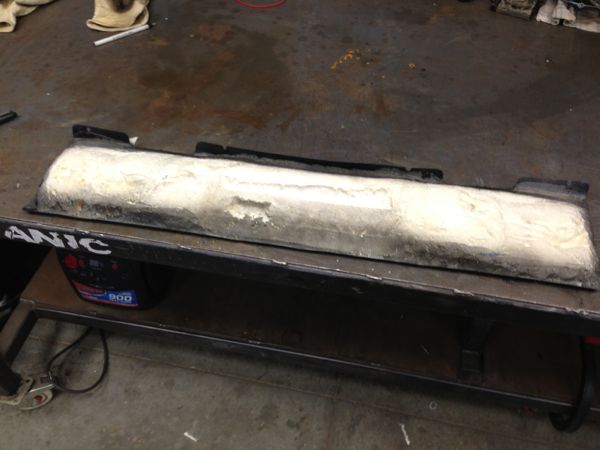
I started on a bumper for #2 and have run into some issues. I bought two sticks of 1018 mild DOM - 1.5x.065. Don't ya know, my bender doesn't bend it; it kinks it on the inner radius and flattens out the outer radius. Not good! I need to make a couple bends that are only about 20 degrees and even just a small bend produces the kink/flat issue. Crap. I made a couple phone calls to see what I could do and it turns out that the 4" radius I have is too small. The guys at ATV Racing have a 4.5" radius die set that they use and they have had issues with kinking - and have had success too. I may see if I can borrow their set before I decide to move up to .085" wall. Crap. I want the bumper to be the weak throw away after use piece. The whole idea of a bumper is to take the hit and not put it into the chassis.
I have a couple of ideas I want to try to combat the kinking issue. First one is filling the tube with wet sand and packing it in as tightly as possible (hence using it wet). If that doesn't work, I'll try some Plaster of Paris - it'll crumble as it bends, but hopefully hold enough of the shape. It'll be easy to remove too. Just not sure yet.
I see it's only 5 months since I've posted anything in this thread. Eh, better late than never. (guess I need to say this about my web site - not updated it in over a year!)
Not really much to report for the first few months - they've been used and enjoyed.
August 22, 2012
Up to now, the only stuff I've done in the XP has been trail riding. Mainly at Big Rock near Maysville, KY and The Dirty Turtle, down near Sparta, KY. Trails, hills and the likes - very little high speed running.
I've not really had a chance to get an opinion of the suspension. I know it could be a bit more supple for the rocky stuff, but since I don't have seat time in anything else, my base line is very narrow.
The Dirty Turtle has a neat little mx track that I was able to run around, but the bad stock suspension (it kicks!) and my girlfriend's not used to off roading neck kept me off of it for the most part.
The XP handles well, seems to have decent power and is a blast to run around in. I love the power steering, am not really excited about the seats - which are going to get changed out.
I went to Durhamtown Plantation a couple of weeks back and finally got to strut the XP's stuff - Overall I'm impressed, but my God, the lack of shock rebound of these things is horrid. I'm seeing what everyone's complaining about now. Want to get a good look at the ground in front of you? Hit a jump!
The chassis' weight and the slow response (relative to the engines I've been used to) of the power plant doesn't let you get the nose up like I prefer - so the car's already launching nose low. Throw in a weird rear spring with no rebound damping and the back end just likes to fly high - sometimes uncomfortably high.
Trail running - the XP seemed pretty sure footed and about the only issues I had was when I'd get into a set of the whooped out trails where they're not fast enough to hit hard and fly, but not slow enough to just roll - sort of that in-between jump off, land, jump, land... The lack of rebound damping made for a couple nose low landings that had the chassis all out of shape for the next upcoming launch.
Cornering seems pretty good, but there's a huge amount of chassis roll that seems to set and then get out of balance if you touch the brakes - wants to nose in pretty badly at times in corners.
I really want a brake bias lever. Not being able to control which end is doing the braking to set the chassis is frustrating for me - I use the bias bar in my desert and stadium cars almost as much as I do the brake pedal.
I had a great time getting to know the machine at DP - the new GP track is a blast. With the suspension valved/set right, I bet I can knock off an easy 5 seconds per lap.
One fun thing on the GP track was the guy in the WildCat. I've heard all about these WildCat's being bad assed - the guy couldn't get away from me. I expected the Cat to walk me fairly badly, but I was probably 2-3 second/lap quicker. (and I had a passenger, he didn't - so weight was in his favor too)
He was a decent driver, and I have to say, watching the Cat through the corners and over the jumps as I was chasing him, the Cat does handle very well - stays nice and flat in corners and landings seemed very smooth. He was nose low a lot too, though. Overall, the Cat was pretty cool, but I'm happy w/my XP.
Pup 2 managed to snap an axle. The guy driving it wasn't doing anything aggressive, just heading back to camp, up a long, easy grade hill. He suddenly found himself in one wheel drive. Exactly 100 miles and 8.8 hours of use on this one. Fortunately Polaris is covering it under warranty. I also have a set of SummerBrothers' axles on order now. Everything I've read says that as long as you're sticking with stock hp, the CVs become the next weakest link and I'm not doing things that are CV abusive (rock crawling, extreme slow technical stuff), so I'm not worried about them - yet.
Allegedly SummerBrothers is making a full half shaft (cv's, axle - complete bolt in setup) and is supposed to be releasing them soon (and then I've heard that they've been talking about doing this for a couple of years). If I don't see a full half shaft from them, I'll probably just order the axles and install them in the stock CVs. - personally, I'd like to have at least one full half shaft always on hand so I don't have to do a camp-site axle rebuild. It's so much easier to just pull the old pieces out and replace with a fully new axle.
I'm planning on ordering the EXIT Shocks/Zbroz Racing III kit today and when I get some seat time in the RZR I'll report back on what I find. It may be a while, as I've not had a good place to test around SW Ohio.
August 24, 2012
Yesterday I finally got my Sparco seats installed in Pup1.
After a weekend at Durhamtown, especially playing on the new GP track, I came to the realization of a few things about the XP: Suspension isn't valved/sprung correctly. There's NO rebound damping in the rear end and the EXIT Shocks/Zbro's Stage III kit should solve that problem.
Also, I'm used to real seats in an off road vehicle. I've been a fan of Sparco's for a long time. Since I had a pair left over from the now defunct pre-runner that I was going to build, I may as well use them. After a few minutes of playing on the GP track, I'd managed to push the stock seat back from fairly far forward to all the way back - and is was tight against the seat base. The stock seats really just don't cut it for aggressive fun.
The biggest thing I wanted to do was keep the stock mounting setup and it ended up being fairly simple to do. I had to fabricate new adapters between the seat bodies and the slider mechanisms. The sliders got attached to the OEM seat base plate - just had to drill holes in the corners of the seat bases and remove the long rail piece that sticks up from the flat section of the base (where the stock seat bolts in place) so it's still one lever to remove the seats - but the belts on the other hand require being pulled too, so it's not quite as convenient as stock. The support, comfort and a happy butt and back make it more than worth the effort.

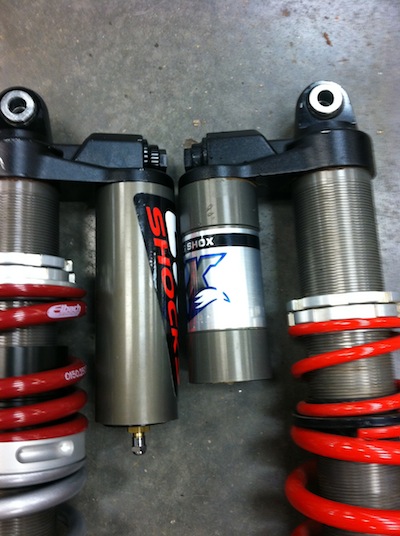
A couple of weeks ago, the Exit/Z-Bros Stage III kit came in. Nice stuff. New main springs, new tenders on the rears (no tenders on front), new bottom out bumper for the rears, adjustable cross over collars, machined spacers to make standard 2" springs fit the shock bodies, new shim stacks, some stickers a gallon of shock fluid and a couple of build spec sheets came in a box via the Big Brown Truck.

I got the kit installed. It's pretty straight forward.
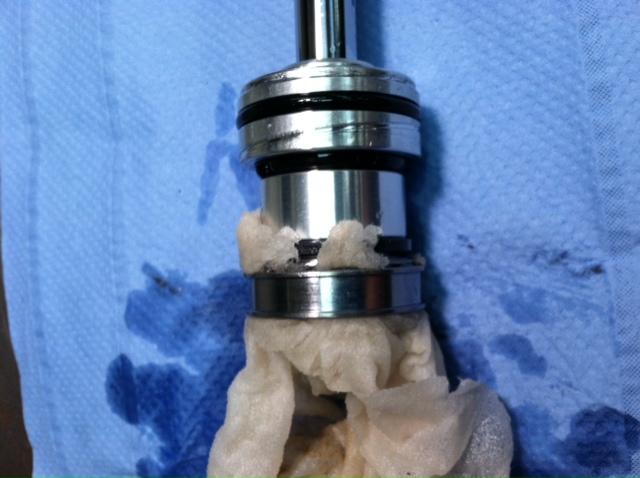
Of course I had to modify a couple components. The res is shorter than Mike Hallock (of Exit shocks - and the originator of Custom Axis) likes. I happened to have a couple that were an inch longer. Tada! A little lathe work and the long res's threaded right in place.
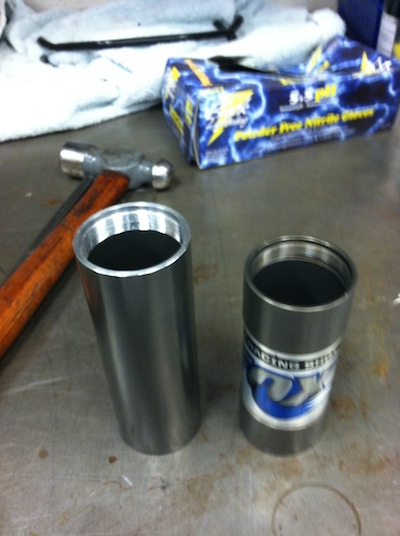
The other issue is that the Fox shox on the XP have some funky rubber button that seals the res. You use a syringe to fill the res. Nah, that's not gonna happen. Another trip to the lathe and I had shrader valves in place. Nothing better!

There is one question I asked the Tech guy about and his answer has me baffled a bit. I asked him where to set the compression screw - how many clicks out from seated. He responded 18. Okay, 18 it is. The problem with this is that 18 clicks out and you're fully open! Really? Guess I'll take a screw driver with me when I test.
I ran around the parking lot and over a few little bumps around my shop. All feels pretty good. Soft, supple, the cross over's really help body roll and make the rear feel more planted. Cool!
Yesterday, it's off I go to the Dirty Turtle time. I load up and head out. 1.75 hrs I'm at the place. The track's looking prime for testing too. - nobody was around!
I take the XP out to the track and over the first jump it lands and feels really harsh. The front end seems to be really low - like it's being pushed down. Weird. Around right hand corners the car seems to handle pretty well. Around left handers there's something really odd going on. And why did the seat back just punch me in the head over that last little bump?
I'm not attacking anything, just trying to get a little blip of the throttle type of feel it out.
Around the right hander before the whoops and it feels pretty planted, so I roll on a little and hit the first whoop. Now with the stock suspension I could sort of pound through these things - not pretty, but it wasn't nasty. This time it's HORRID! Hey, why'd the seat punch me in the back of the helmet again? WHOA! Why's it beating me senseless and now I'm turning sideways??? WTF? I slowly make it back to the truck and the ride is really harsh.
I get out, check for something broken and can't find squat.
Okay, let's try this once again - just a little drop off. OUCH.. Then I realize the rear IS trying to push the nose down and that the right rear seems to be stuck at near full extension. Huh? I get out, push down and the only thing moving on that corner is the sidewalls. I had a locked up shock.
I let the nitrogen out of the res to see if there was oil or something or if that would let the shock relax. Nah, it just made my finger cold.
10 minutes out of the truck and I'm packing and heading back. Crap.
Another 1.75 hours, and 175 miles of round trip later I'm back at the shop.
The shock's off and coming apart.
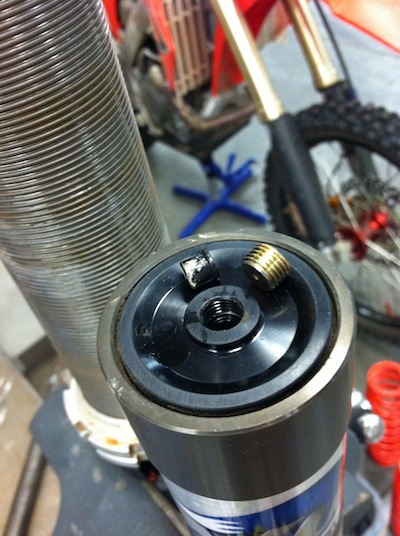
Off comes the res cap - no oil in there. Good.
Out comes the compression damping assembly and there in the intake port is this piece of paper towel. Huh? It's completely clogged off the port. Okay, that may have caused it - no oil can flow. Wow, amazing - this little piece of paper towel (that I've figured got caught on the edge of the top of the shock ass'y when I was cleaning out the shock body) ruined my day, locked up my shock and rained on my parade.
I decide to take a quick peek through the hole that leads from the compression damping ass'y to the shock body. What's this? That looks like more paper towel!
Looks like the rest of the shock's coming apart.
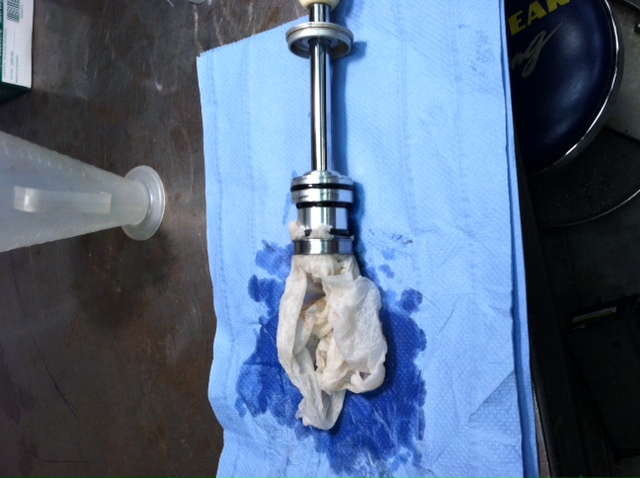
I got the bearing cap loose, but man it wanted to fight. I yanked, tugged and with the persuasion of a dead blow hammer the bearing cap and seal ass'y came out, followed by a gush of oil, the piston ass'y and, of all things, a paper towel stuck through the piston and shim stacks!
The idiot who did the shock rebuild (that would be me...) left not one, but two paper towels in the bottom of the shock body when installing the shaft/piston setup and I'm impressed with the results! I was doing both shocks at the same time - probably set this one down, tended to the other one and just forgot that I'd stuffed paper towels down to clean it out, sop up the old oil and such. Bone head move.
Who goes out testing and leaves the tuning/testing tools back at his shop? That would be the same idiot who left towels in the shock! - ME! Arrgghh. Yesterday could have gone better... Oh well!
The shock's rebuilt now - sans paper towels - and I'm ready to go test again.
If what the front end seemed to be trying to tell me is true, and the back end works like the front end seems to, I think I'm going to be happy.
October 13, 2012
Got the bumper for #2 done a couple of weeks ago, picked it up from powder this week and installed. I'm pleased. I need to figure out what I want to do for lights - thinking some nice LED's would work. (saw some here on the forum a while ago that perked my interest.)
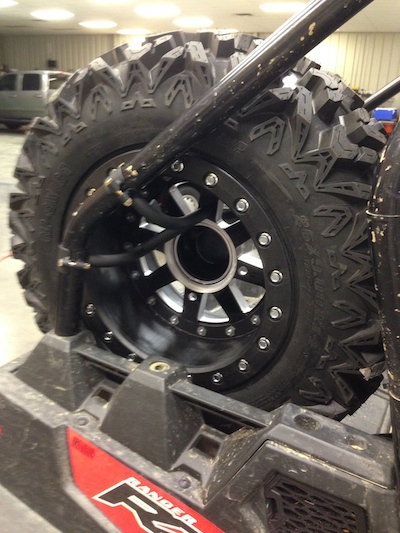
I put a set of 9x14 Hiper wheels w/Sedona Buzzsaws (26x9 R14) sneakers on #1. Same size on all four corners - the front end actually now bites and doesn't push like it did. I've never seen double bead locks before - pretty cool. I've never torn an inside bead off a wheel, but with this setup, I'll definitely not worry about it now. I need to make a spare wheel mount now and get tools to change the tire stowed away.
Today I'm not in Ohio (YES!!!), I'm sitting in Pahrump, NV and I FINALLY got to take the XP out and test the new Exit/Z-Bro's Stage III setup - WOW. I'm impressed.
I ran down a long fire road - smooth, wide, great WFO drifting. Speedo said 70, GPS said 66, either way, another 15 mph would have been fun on this road. Clutching will be next... I'm not fond of the way it's tuned.
Off the fire road was a trail that was decently rough - not brutal, but you had to keep an eye out for large rocks and a few washouts. Just guessing but I'll say that I was able to run probably 10-15 mph faster than with a stock setup - the chassis is so much more stable and predictable. It slides with minimal steering input and a throttle chop - great for setting up for corners. Initial ride is supple - much smoother than stock. The searching/disconnected feeling the chassis had when you ran through rough stuff with the stock stuff is gone. It felt very planted.
I also ran down a killer power line road. It had great dips and rises and stutter bumps. I was impressed with how fast I was able to run down this road too.
I hit a few G-outs and the front end seems a tad harsh - blows through the travel a bit quickly. I added five clicks of compression damping when I got back to the pits (and the shock temps were 185+). I also want to add a quarter inch of pre-load to the front. I'd like the front to sit up a little higher than it is now. I'm not complaining - just realizing that I still need to tune it a bit more. I did slam through one bottoming on the right front - it made a solid clunk and I could feel it pretty well, but nothing damaging bad. Still, it makes me think that I'll probably have to make a set of a-arms.
The rear end is plush and stays very well planted. I never blew through the rear travel - did bottom it out a couple of times, but there's nothing wrong with that - you want to use all the travel. The bottomings never were harsh or stiff, just good, solid stops. The rear kick is all but gone too! I wouldn't mind adding just a hair more rebound damping, but I probably won't mess with going back into the shock to do it. Ride height and spring rates feel really good. I added three clicks of compressing damping, just to see if it feels any better and to attempt to balance the chassis a bit with the six click change up front.
The only time that I got out of shape was in a set of square edged rollers down the power line road - the type that come out of a ditch type crossing/dip - where the back end gets kicked. A little nose low into the next ridge, then the rear end slam and kick. It never got me nervous, just bounced a bit. Still, I was able to keep the XP nice and straight.
I also need to drop the tire pressure down from 12.5 to around 9 or so. That will help with big hits and probably give me a bit more traction.
vOverall, I'm stoked with the Exit/Z-Bro's kit. Mike Hallock's done one Hell of a job getting the suspension dialed in on the XP. Everything about it is better than stock and it's a lot less $$ than four new shocks. Why not use a damn good shock (the Fox's that come on the XP) and just make it work right instead of tossing them and putting something else in it's place?I'm going to try to get out at night and I'll throw the Go-Pro on. Should be fun!
March 29, 2013
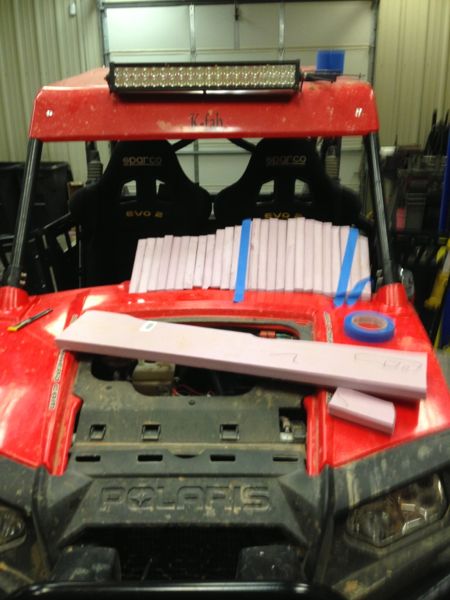
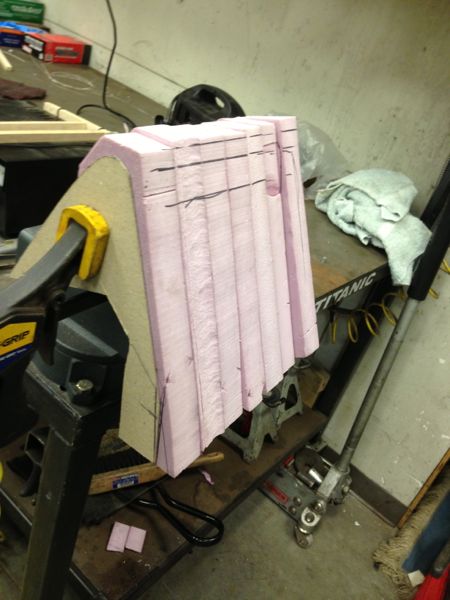
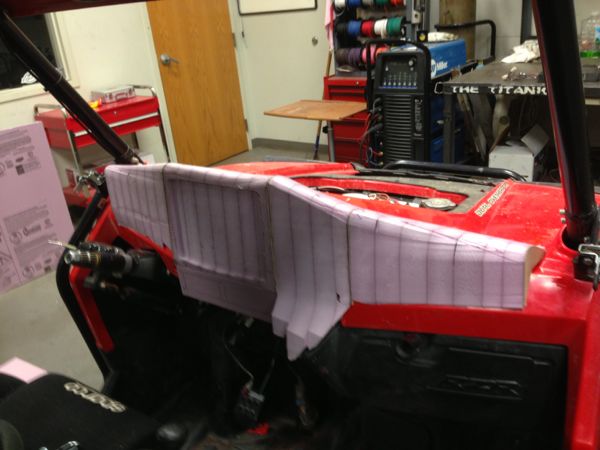
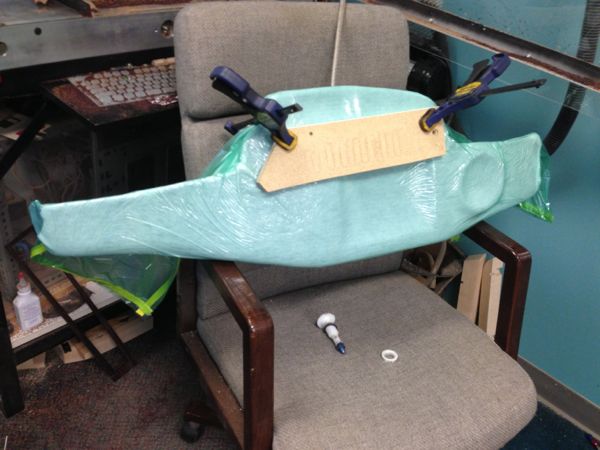
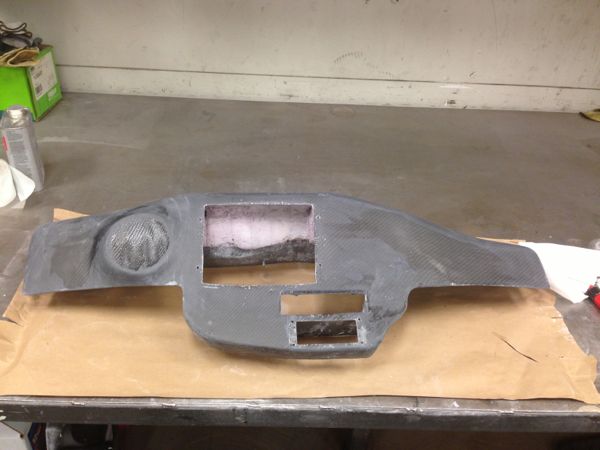
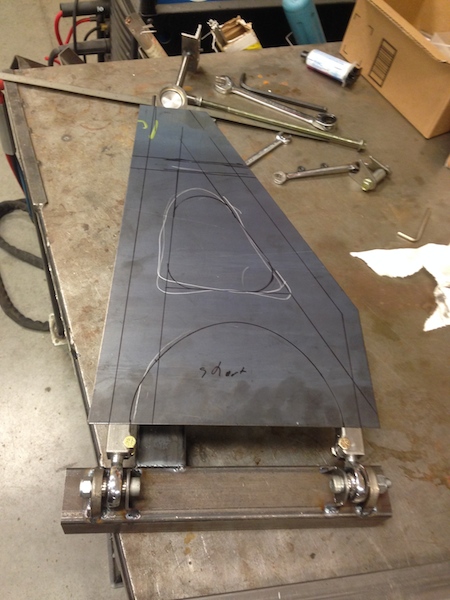
Been working on a dash board for the XP.
Out at Ocotillo, bdk made a comment about making a dash for a RZR. It perked my attention. My GPS wasn't in a good place (it eats my knee) and I wanted to move some components so I can reach them (radio & intercom). So I've been at it with pink foam insulation, cardboard, a wire cutter and Super 77 spray adhesive.
I'd like to do an aluminum dash, but what I want is way past my present skills.
I've always wanted to dick around with a hot wire foam cutter (knew about them from model airplanes - they make wings with them).
Add current, make wire hot, cut foam. Simple enough, right? So off to the internet and a Google search and I see that they're using battery chargers and crap like that. I have a bunch of guitar strings sitting around and a jump box handy. Clip box to ends of wire, hit switch, hot wire! Cool!
I made a small wooden bow to support the wire and discovered that the wire stretches pretty badly - so I put in a spring to keep tension. Works pretty good. I soon discovered that the jump box didn't give me enough control over the heat, so I pulled out a power supply I have and started dialing in the system. Works pretty cool! I'm still burning wires - don't think guitar strings are heat rated...
Anyhow, I laid up a bunch of pieces on the dash, fitting each one to the existing dash planes (second time around - first six pix were round one where I didn't fit it to the dash surfaces closely) and then made end caps out of cardboard with the shape I wanted - these are guides for the hot wire. I'm pretty impressed with just how easy it is and the results. Made four sections and they almost clip in place the fit works so well.
I'll stick a layer of the thin (1/4" or so) pink insulation foam over the dash after I get it shaped a bit more and then lay glass over the top of of all the foam. Vacuum bag the setup and tada, a dash board! (I hope)...


April 2, 2013
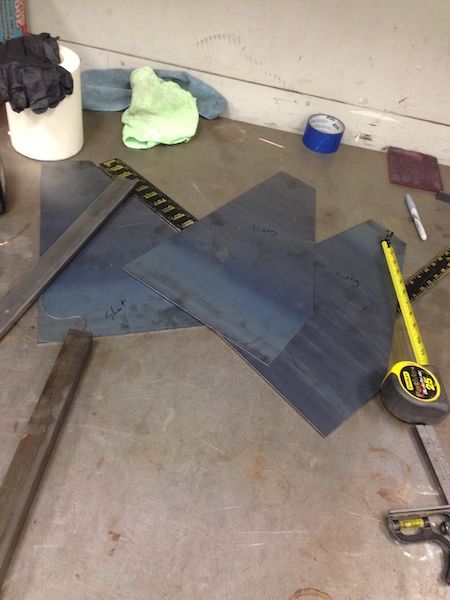
Still at it. Hope to lay up some fabric tomorrow or Thursday. I have a bunch of sanding to do tomorrow.
I've revamped a few things, stubbed in, removed, cut, filled, sworn, smiled... Sheesh, it's like a soap opera!
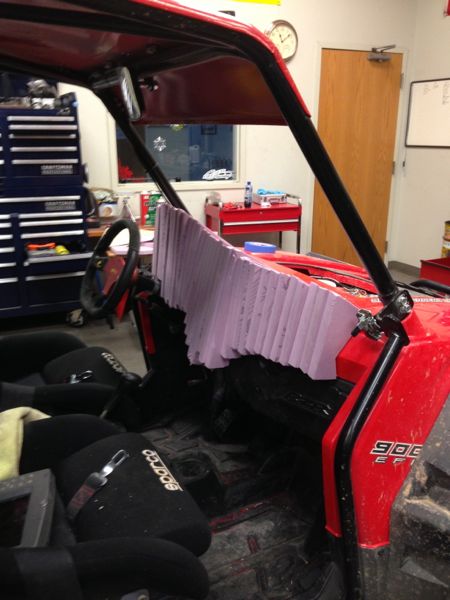
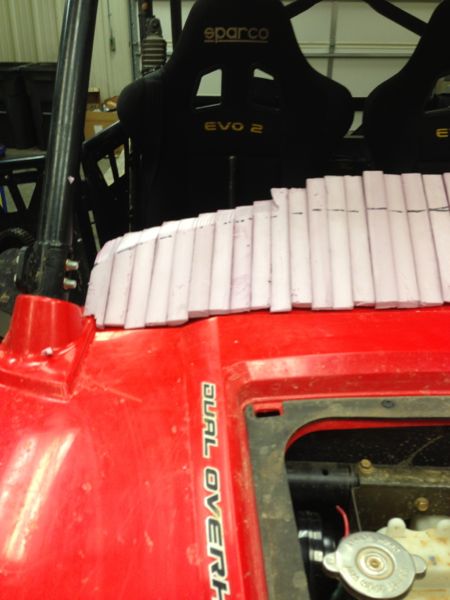
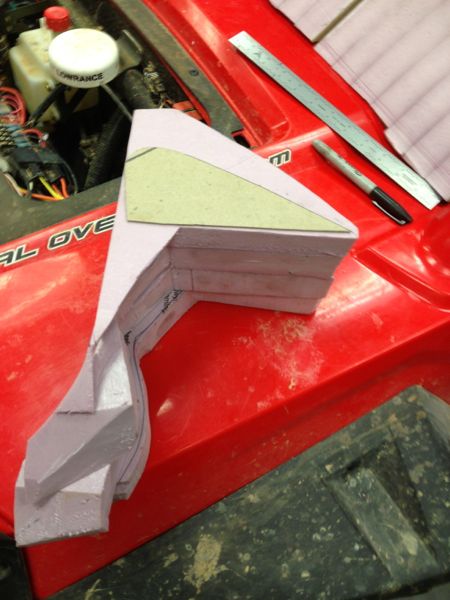
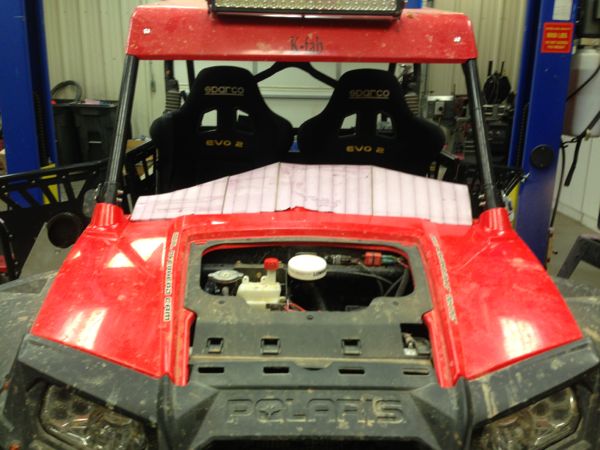
Got the main shape figured out and rough sanded in:
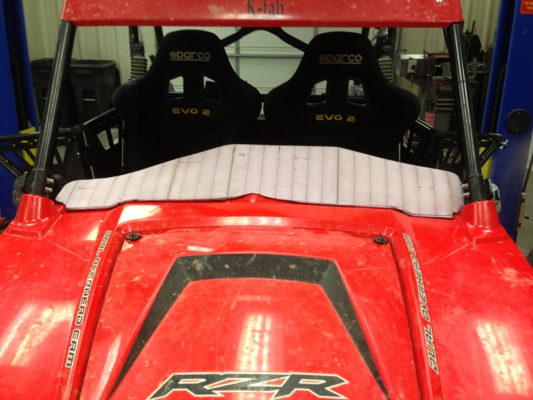
The cardboard ribs are odd - they're a bitch to sand! They're hard feeling under the sanding block, but the darned things flex and just sort of tear, smear. 60 grit 2" sanding disc on an air grinder does a good job of knocking them down and then I block sand the foam to the rib. My world is pink dust...
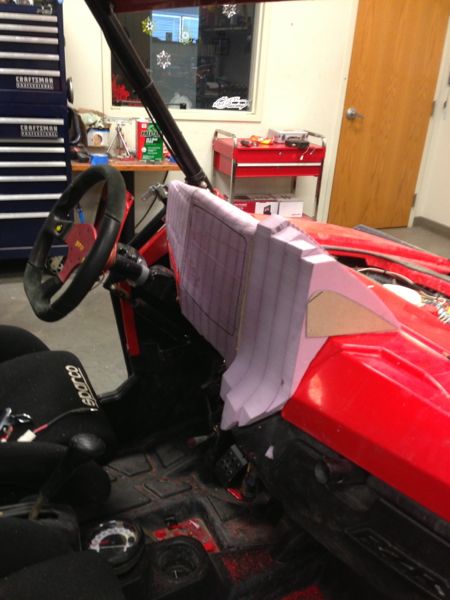
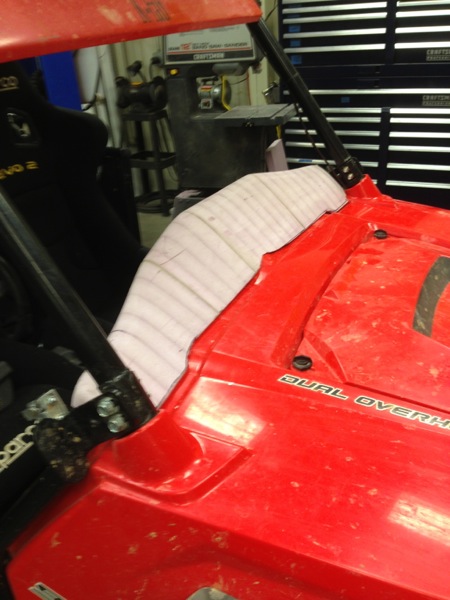
I finally have a dash layout figured out. My original drop down section under the GPS area wasn't large enough - didn't drop down far enough to accept the radio/intercom mount. I kept worrying that I would hit my knee on it if I went lower, but then I checked the original dash's position and realized I'm way farther forward than it was.
So cut, stub, fill and now the dash goes down farther and it's given me a good place for the OEM switches, key, 12v outlet and mic mount. I'll put the aftermarket light switches over on the left side of the steering column. Sharpie marks are where the controls go.
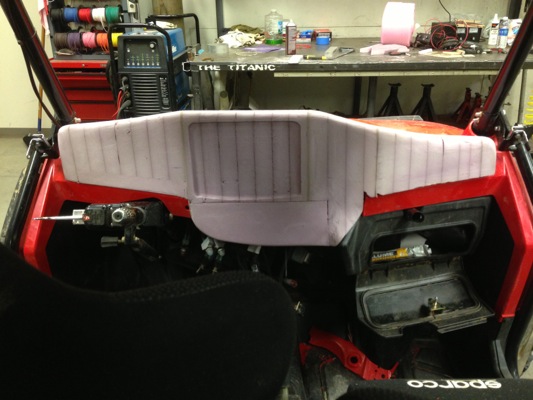
The radio/intercom mount along with the GPS backing plate are sunken into the foam and will get covered with fabric. Makes the whole thing nice and stout for the component mounting. I tied the two braces that come off the front cross brace and hold the OEM dash in place to the radio/intercom bracket. Makes the bottom and middle of my pink monstrosity nice and secure.
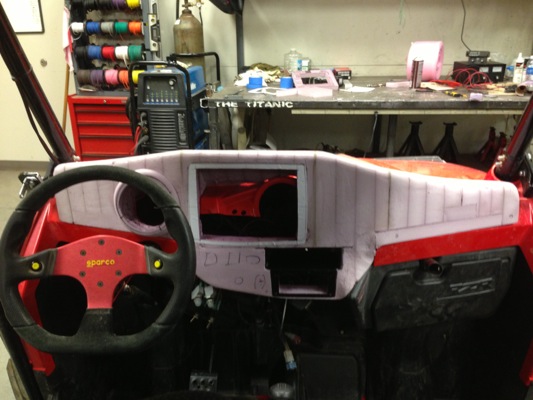
My original speedo ring is seen here - no imagination, just a ring that tapered to make the speedo flat to my view, not angled like the dash. This morning I knocked it off and redid the blending - made it come out more and have a little bit of swoop.

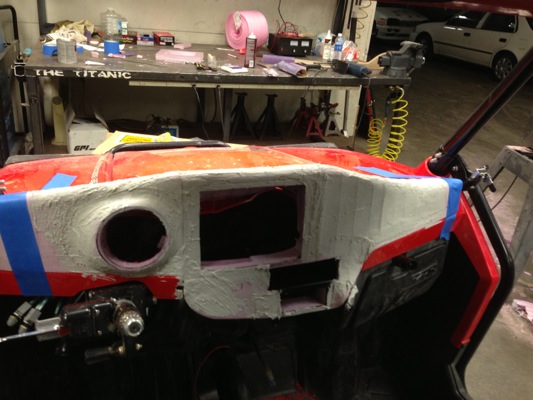
Here's the dash in it's first layer of Bondo. Notice the difference in the shape of the speedo mount...
April 3, 2013
I've discovered something today: I hate sanding!
Three more skim/fill in the divots/low spots with Bondo and sand, sand sand in between layers.
I hate sanding!
Didn't realize that the radio hole looks really whacked and not in line in that pic. It really is all parallel - different face angles make it look funky in the pic.

It's ready for the next step and tomorrow I'll be covering it in three layers of 2x2 twill, 5.7 oz. carbon fiber. The 2x2 drapes really nicely so I'm hoping to get it around the ends and around the blends/recesses with ease.
Originally I was going to make a plug, pull a mold, make a dash, but the farther I get into it, the more I'm realizing this is a one shot deal - I'm just gonna wrap the foam and be done. Cut access holes through the foam where needed, leave the rest in place. It will help absorb any hits or bumps, make the dash stiffer and help hold the components in better. I'll wrap around to the back side and and mount to what's left of the OEM dash with nuts & bolts that go through both pieces. The radio tray is tied to the chassis, so a couple bolts out at the ends and then along the leading edge should put everything in nice and snug.
More tomorrow!
April 4, 2013Mad Scientist time!
All three layers of carbon cut out and edge taped.
The peel ply, batting and vacuum bagging stuff is ready to go also.
Time to mix up epoxy and start making a mess!
The finished project in the bag, under vacuum. Tomorrow morning I'll open it up and see just what I have. I'm hoping that I got the edges all tucked in like they're supposed to be. If not, I'll cut away anything that's not right, sand it flat and put one layer of carbon over it all - this time no bagging - just Super 77 to stick it down, CA glue to the edges to hold them in place and then spray it with the final coat of clear.
The radio/intercom mount wanted to push out of the front of the foam, so a couple of clamps and a flat piece across it should (fingers crossed) hold it in place.
Waiting until tomorrow is gonna kill me!
April 5, 2013Unwrapping of the dash board:

I discovered issues with the back layers - they didn't fold over well. The vacuum bag didn't suck down enough (too much air space) and it also displaced the radio/intercom mount from the front of the foam - ended up with bumpy places. It also had a few air pockets. Crap.
First test fit after cutting out the front holes. The edges were not against the oem dash very well at all. Major gaps. Time for more cutting, sanding, removing of bad stuff.
I worked quite a while fitting the dash back to the car and then taped off the car. I ran a strip of fiberglass cloth tape along the front edge and down the corners. Next I put a bolt through the front edge and put in a washer and nut (held in place with a short bolt) in the ends. This will allow me to bolt the dash to the plastic and the radio part's all held in with braces coming off the chassis. Should make for a really solid mount.
After getting the glass and mounting hardware in place, I threw down a layer of glass filled Bondo along the front edge, over the hardware and down the ends. Next I pressed the dash in place, forcing the Bondo to squeeze out, making a perfect seal between the dash and plastic. Four songs later (15 minutes), I was able to let go of dash and it stayed perfectly in place. (and so did my finger, that was coated in the Bondo... man that stuff sticks!)
While it was still sticky, I filled in some more of the gaps and reworked the lower edge on the passenger's side. I'll get the driver's side later, when I fill in the face and get it all leveled out again.
I'm going to do one more carbon layer wrapping (material on order) - more cosmetic than anything else. It will wrap around the back sides of the dash, over the fiberglass tape and the three mounting nuts/bolts.
I was pretty frustrated this morning - it's nice to head in and see that a carbon molding project's worked out. This time, not so much. As I worked away making it fit, I was able to make it fit even better and get my edges blending better too.
The dash in place with it's blending and filling layer in.

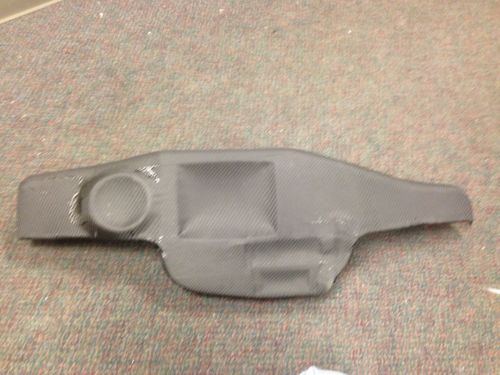
And tonight my dash is finished. This has been one heck of a project!
Last week I had to order another piece of carbon to cover the dash after I'd reworked it. This time I was able to pull the fabric tight over the dash and get the edges sealed and stuck to the back side. I also reinforced the mounting areas and the lower portion a little more. No more flex.
To get my radius blending around the radio, I cut a plug out of the pink foam with a ball end mill and then slopped in the filler material around the radius cuts. Next I pushed the plug into the radio opening and let it all dry. I was pretty tickled with how well it worked.
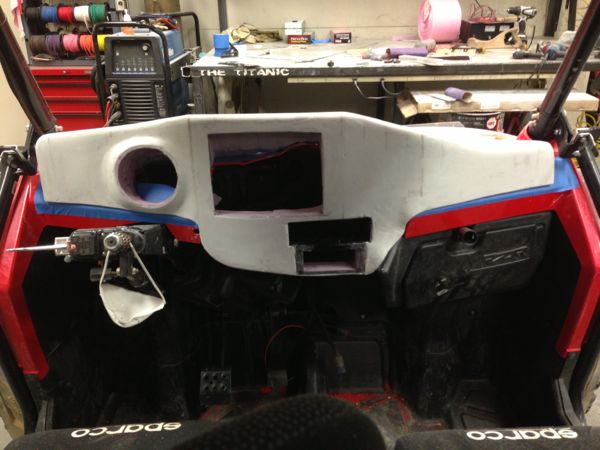
The dash in it's final sanding stage:
Test fit of the dash after the first layer of clear coat:

Machining out the holes for the controls:
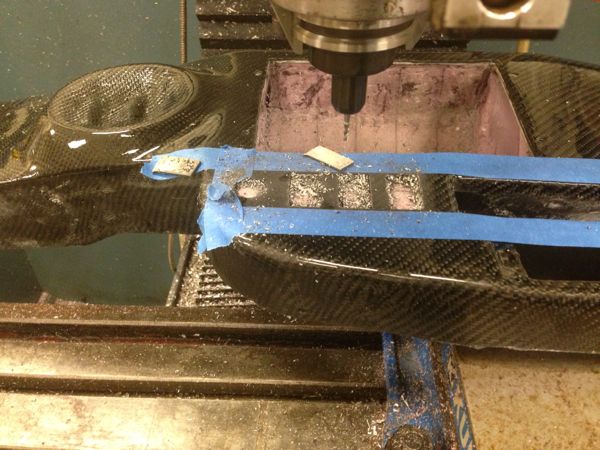

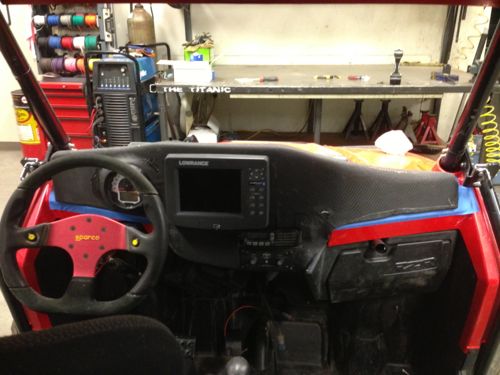
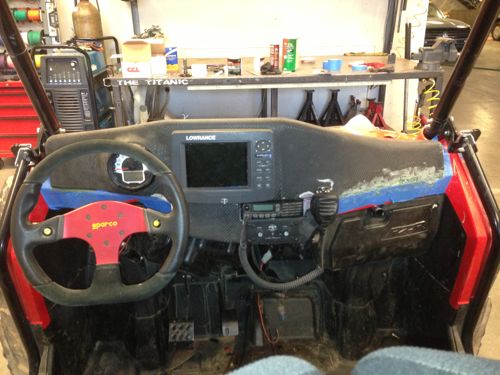
Dash installed!
I ordered a second light switch and wired it in to run the front HID lights and the LED light bar on the roof. Works perfectly:

Front edge fitment (and the new half windshield):
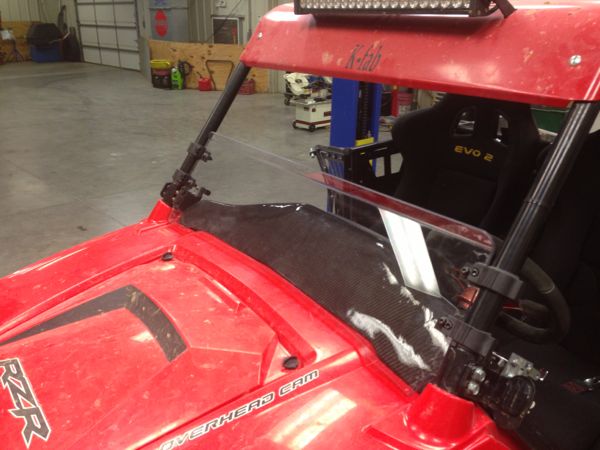
Finally done!
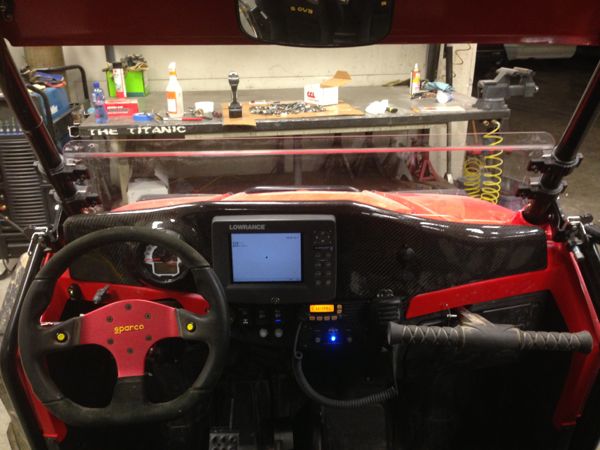
There are flaws in this project. I sanded through in a couple spots and had to fill them (you can see two of them in the picture with the close up of the GPS and switches), there were a few bubbles in the fabric, edges weren't perfect, but hey, this is the first time I've ever attempted a project like this. I've learned how to work with foam, how to make a hot wire cutter, mold and form, and got more seat time working with carbon fiber. It's been a great learning venture.
Overall I'm tickled with the results. And if someone wants to be a nay-sayer about it, I say, Go for it! If you can make one better, then I'll be happy for you. Share what you learn as you do it too.
Now I need to get out and enjoy this darned XP!
July 4, 2013
Well, it's happened. I suddenly started having heat in the cab issues a couple of weekends ago while running around Mid-Ohio (race course) using my XP as a pit vehicle.
I started feeling a lot of heat behind the passenger's seat and discovered that the removable panel right behind the seat (and right in front of the header) was melted and the gap between the top of the panel and the lip it fits against was getting larger. Guess I'm gonna have to combat heat issues.
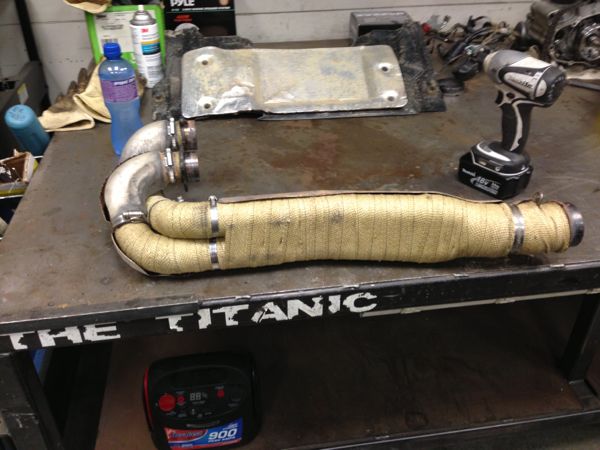
One of the best ways to help insulate from heat is to wrap the exhaust header. This has a couple of good secondary aspects beside fighting heat. It lowers the amount of sound that makes it out through the bodies of the headers (and I want this thing to be as quiet as possible - it's stock and too loud), and wrapping the pipes also helps with hp a tad - nothing really noticeable, but there is a small gain.
So out came the passenger's seat, off came the melted panel, and off came the header pipes.
First thing was to get the heat shields removed. Man, what a biatch! Polaris uses these little stainless steel clamps that are folded over the strap. You have to get under the tangs on each side, bend them up and then wrestle the little boogers off. 8 clips later, the pipe's naked and ready for a quick bath with a Scotchbrite pad.
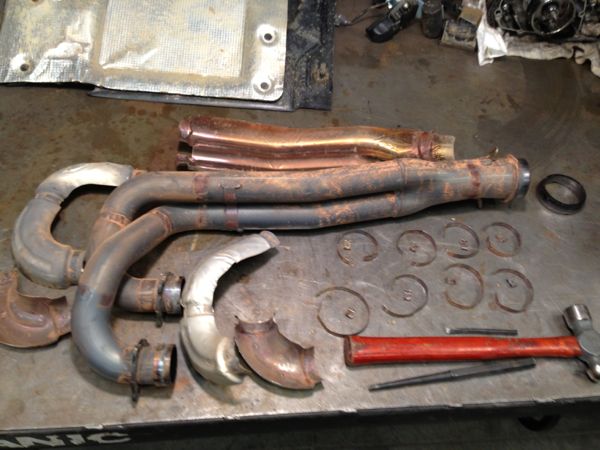
Next step is to wrap the header with exhaust tape - I was able to find 2" wide (perfect for this application) at our local auto parts store.
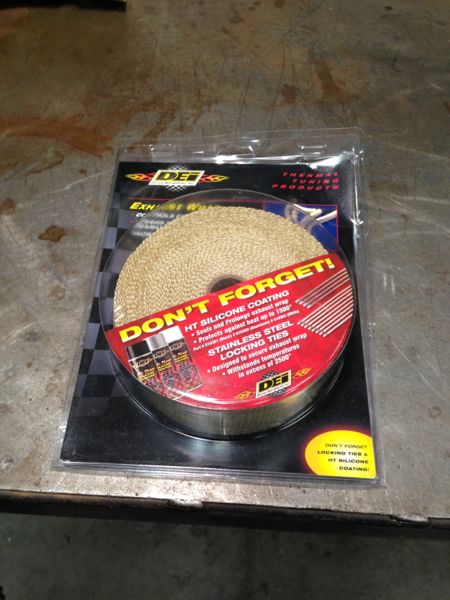
The key to getting this stuff in place is to get it wet, so you can pull it as tight as possible with each wrap. If you don't wet it, it will slip, slide and you can't get it pulled tightly. The stuff doesn't stretch, but it will move around and blend pretty well.
I started out at the flange end of the shorter pipe (just realized that the header's two different lengths - that's not good, they should be exactly the same length for optimum tuning!). I first put 1.5 wraps down away from the flange and then work two full turns towards the flange, pulling everything as tight as possible. Once I get the two turns around the flange, I worked down the tube, trying to overlap at least 1/2 the width of the 2" tape with each loop. This helps lock the beginning end in place. I also used a zip-tie to hold the end snug while I worked down the header pipe to the first pipe support. Once there, I ran two more wraps around the end, coming back up the pipe just a tad. Fold the end over on itself, tuck it in and then use a piece of safety wire to hold it in place. I ran a loop of safety wire around the starting end too and removed the zip tie.
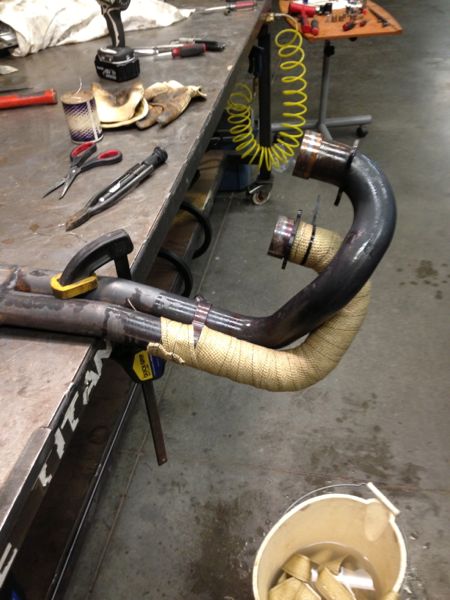
Next I did the same thing to the longer header pipe. Same technique to start the wrapping and work down the tube to the first support.
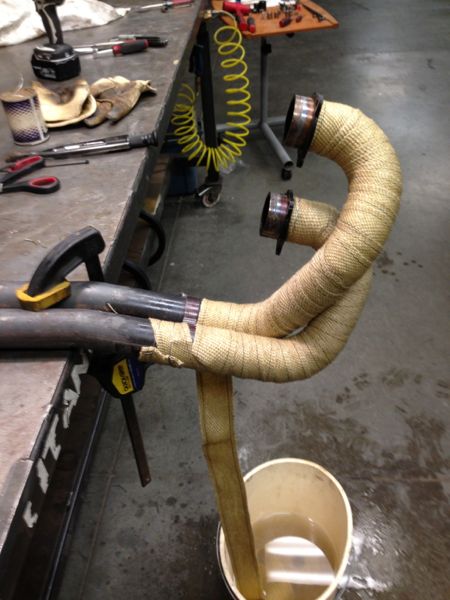
This time, when I got to the first support, I just kept wrapping, surrounding both header tubes. I ran this all the way down to the end of the header, did one loop around the end, starting at one of the spring loops, then wrapped back one more time and then terminated the wrapping with the fold over end thing mentioned above. More safety wire and my wrapping was done.

After it was wrapped, I put the heat shields back in place. I had to open them up a bit where they fit over the tubing, but that's pretty simple. Instead of trying to reinstall the OEM bands, I just went with good stainless steel hose clamps. I've done this before and they work just fine.
It took me about 3 hrs from pulling the pipe to having it ready to install again. I just sort of cruised along this afternoon on this project. Nice and steady, no rush, no fuss. Things seem to go much better with this approach.
I've not started the XP up yet - want the wrap to dry on it's own. The only downside to wrapping a pipe, besides being itchy from the darned fiber glass hairs, is that for the next thirty minutes or so, the tape smells like ass! My God the stuff stinks until it's taken a set and gone through a few heat cycles.
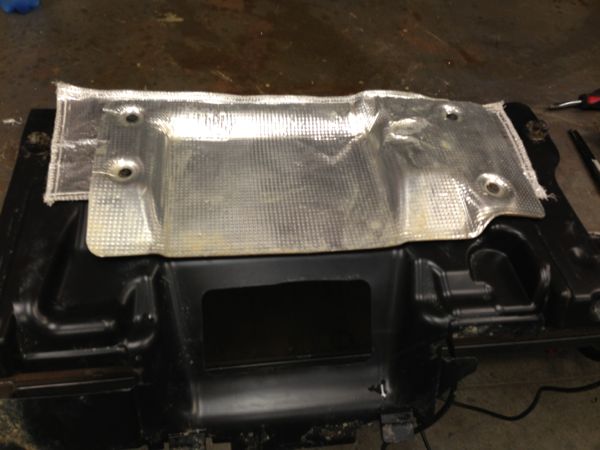
The next thing on the list was what to do with the melted panel. It already has a heat shield on it, but it was a little melted and it didn't go all the way to the top of the panel - and the panel doesn't reach the top of the hole it's supposed to fill anymore either.
I took a heat gun to the panel and melted the melted spot back into place the best I could - heat both sides up until it's glossy and starting to droop, set it on the table and hit it with a hammer lightly - the droop came out fairly well.
Since I wanted to fill in the gap, I decided to put one of those insulation blankets (found next to the fiberglass header tape) on the back side of the melted panel, under the OEM heat shield. Can't hurt, right? It's held in, for installation purposes, with Super 77 spray adhesive (one of my favorite things to use to stick things together with - the stuff is great!). I got the blanket in place and then put the OEM heat shield back in place.

The blanket sticks out a little farther on both ends, but doesn't quite go down the panel as far as the OEM piece. The stock heat shield is held in with four push pins - I just removed them cut holes through the blanket, pushed the pins through and put the heat shield back on.
There's still a little bit of a gap, so to try to seal it off, and to try to keep as much heat and, hopefully sound, out of the cabin, I decided to put a cover panel over the seam. It's just a piece of .030" aluminum sheeting that's been folded and cut to fit across the lip behind the seats - there are four screws that hold it in.

Once I got that fitted, it was time for more insulation. I decide that I'd use that Great Stuff expanding insulation foam behind the panel, to fill the gaps. Using painters tape, I covered the plastic anywhere that the foam insulation would touch. The stuff is STICKY beyond belief and if I wanted to have any chance of pulling the panel loose, I was going to have to use something that would come off the plastic easily. Blue painter's tape fits the bill perfectly!
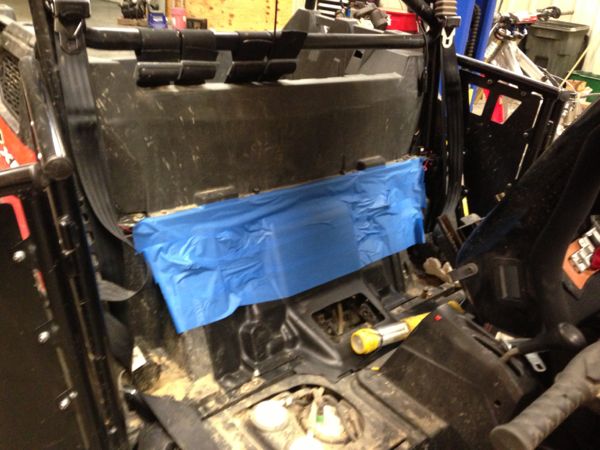
I filled the back side of the panel and stuck it in place.
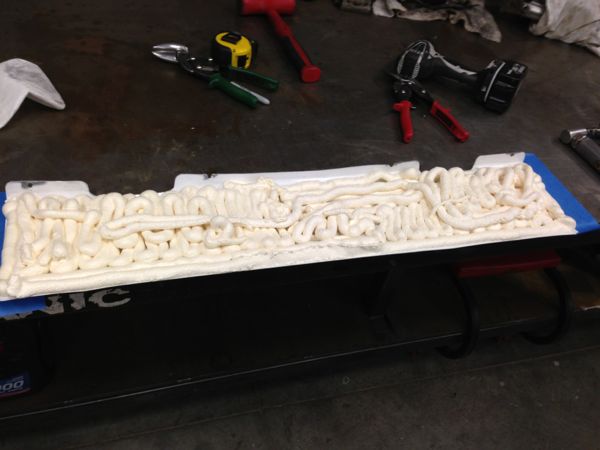
I was able to let the foam dry to the point of being able to pull the panel and tape. After it dried enough to pull the tape, I trimmed the edges down and painted it black.
Seems like it's gonna work. It fits nice and snugly.

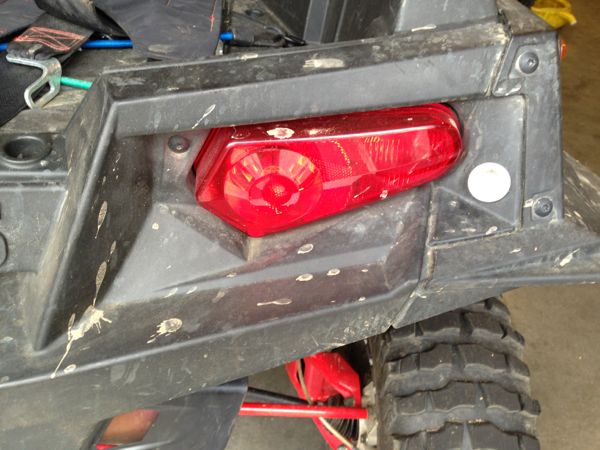
I also changed out my tail lights from the incandescent bulbs to LED bulbs (I've recently been doing this in ALL my vehicles - cool lighting!).
I also finally figured out a good plug for my horn - my steering wheel has to buttons on it and I've had a hard time finding a coil cord and way to run it that works. Now there's a little plug glued into my dash. Simple and sweet. Sometimes it just takes a while to figure out how to do it.

What's next? Who knows? I will tackle the suspension components someday - probably this winter...
July 5, 2013
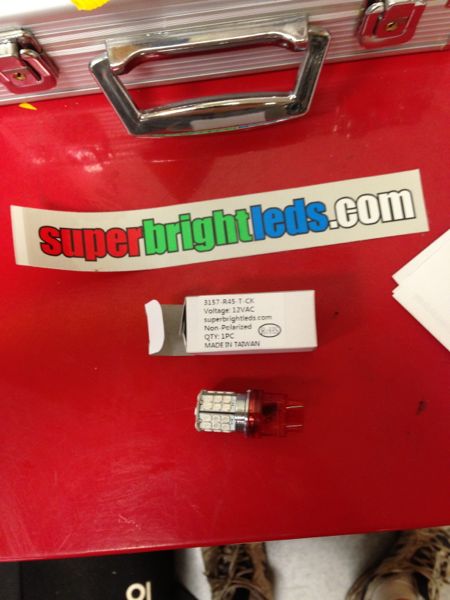
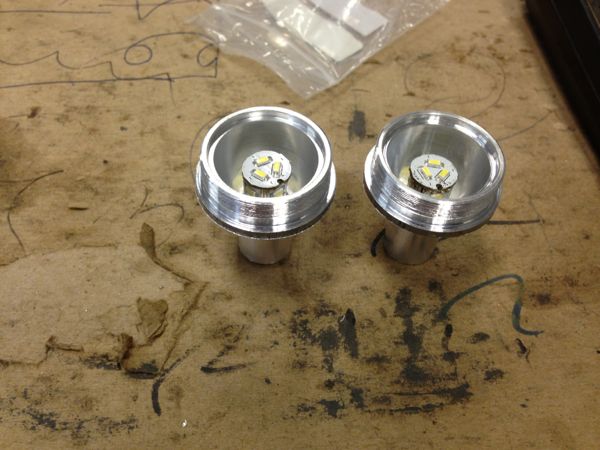
Today I made reverse lights.
Since I have full intentions of getting the XP licensed for the street as soon as I get out west, I figured that the more regulations that I can meet, the easier it will be. It struck me that the XP's don't have reverse lights, so I went about solving this little issue.
I've recently been playing with LED bulbs and had a set of really bright white bulbs handy - perfect for reverse lights. Off to the lathe I went for the afternoon. I'm pleased with the results.
I started out with a 1.25" diameter piece of 6061 aluminum, two LED bulbs and my imagination.
First I figured out the reflector part and cut a test body. A second body later and I had that pretty much dialed in. I made two "production run" pieces after the second test piece.
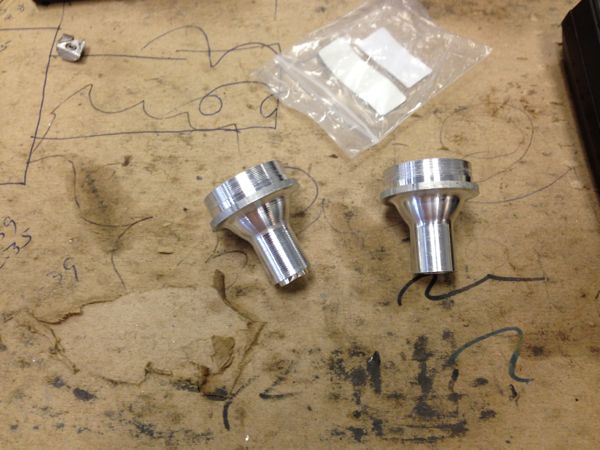
After getting the body dialed in, I worked on the retainer ring. The lights will go through the body panel, so I used the ring that holds the lens in place as the nut that holds the whole body in in place. I ended up with about .010" worth of interference, with is exactly what I wanted - the interference will help keep the ring screwed on tightly and keep the body from vibrating around.
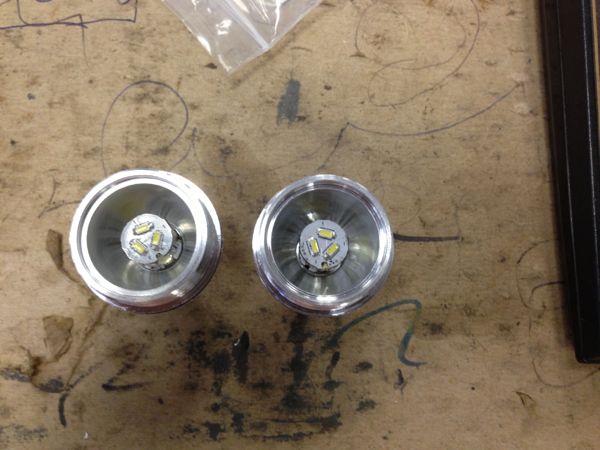
I cut the lenses out of some clear acrylic that I had floating around.
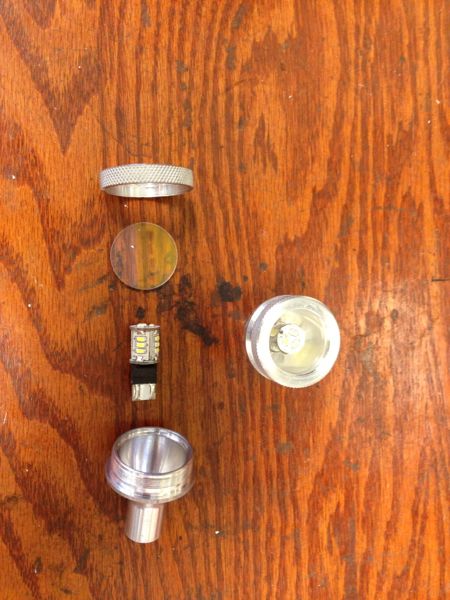
I soldered leads directly onto the board, shrink wrapped it and pulled it into it's recess in the light's body. Flipped it over and filled the cavity where the leads came out with some of the Permatex 1 minute epoxy - this stuff is great! It's about as close to being a 1 minute working time as anything I've ever met. It flows really well for about 30 seconds and then starts gelling. By 1 minute, the stuff is set - still rubbery, but definitely set.
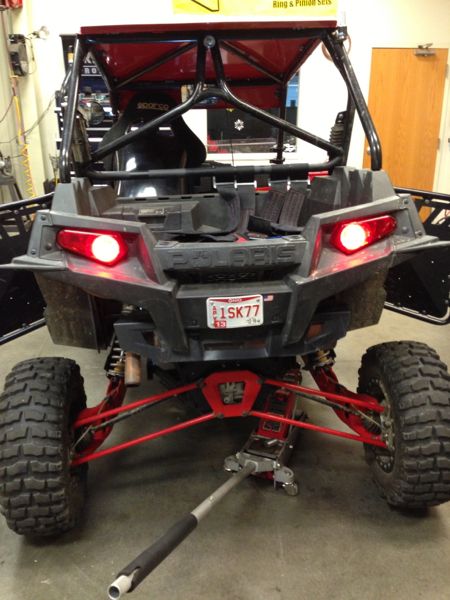
The little things are remarkably bright!
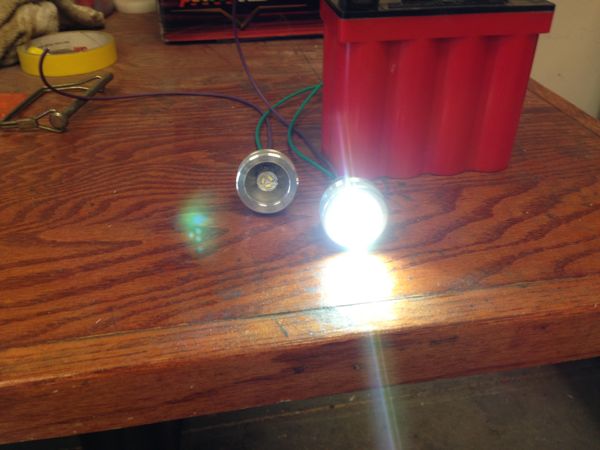
I put them in the corners on the outside of the tail lights - they don't really point straight backwards, but they'll do the job just fine.

I got the idea for reverse lights when I realized there was a switch that tells the dash that the XP is in reverse. If there's a switch, then I can tap off that and run a small relay to kick in the reverse lights. Seems pretty straight forward and simple, right?
Of course not!
There's a switch all right - the gear selector switch on the passenger side of the transmission, right by the selector lever. But it's not a normal switch. It's a resistance switch! Crap! The switch has a bank of resistors in it and as it goes from park to high, it clicks in a changing resistance. This varied output line returns back to the ECU - which then decodes the input by measuring the resistance and then sends the appropriate signal to the speedo, telling the dash what gear to display.
So, now I have to figure out how to take this signal and use it to trigger a relay. I'm gonna have to dig out my ancient Dump Shack electronics books and read up on voltage trigger circuits.
Man, it's never simple anymore!
August 4, 2013
Got my reverse lights wired and running - McMaster-Carr sells a nice little magnetic switch that I was able to attach to the shifter. Stuck it in reverse, drilled a couple of holes and tada - a switch that activates when I'm in reverse.
--------
Took my girlfriend and both the XP's out to Big Rock in Maysville, KY.
She followed and I lead and we had a blast! - she's getting the feeling for it now.
After about an hour, we head back to the pits, so she can ride with me.
We hop in#1 and don't you know, 5 miles down the road and poof - flat left rear.
Crap!
Limp back to camp, hop in #2 and head out.
On this outing, we find one NASTY hillside - was pretty steep, but not terrible to go down. I made a comment to her that I sure wouldn't want to try to go up it, though. The darned trail ends in a T and it's really off camber - very tricky and I was really worried about rolling it.
As I get to the T, The back end felt funky - the driver's rear felt like it was, of all things, flat. I took a look and sure enough, all the air that used to be inside it was now outside.
CRAP!
We turned right at the T (because when I initiated a left turn I felt the left rear come off the ground and it scared the crap outta me.) Followed the trail a couple hundred yards and it just stopped.
CRAP!
So we turn around (15.6 point turn - narrow trail on steep hill) and head the other way. Another couple hundred yards and it just stops too!
CRAP!
We headed back to the "intersection" and turned up the hill - the front end was LIGHT too - scary light. The climb back up was the most intense drive I've had yet - and I gotta say I'm IMPRESSED with what these things will go up - even with a flat.
30 minutes later we were back at the pits, loaded and ready to head home. It was a good day.
Man these things are fun! WOO HOO! :)
July 11, 2013
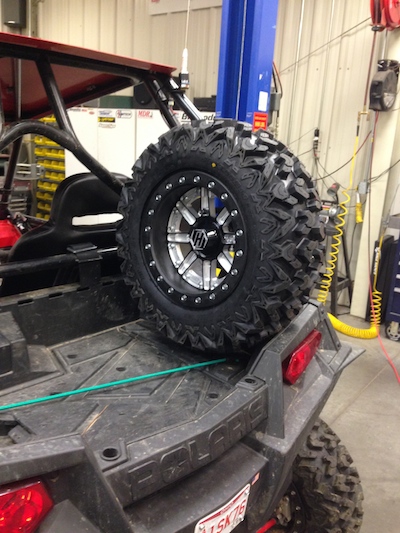
Made a spare tire mount for #2 today:
November 13, 2013
I've always said that I didn't want to up the hp of my RZR for the fear of lack of reliability. After being on the RZRforum for a while, I discover that Polaris is making an H.O. kit - stock parts, stock reliability (I hope...). I've been down that quest for high hp and have gone through the headaches of twenty minutes of play followed by two hours of work. Not fun. I want to turn the key, hear it start and go.
So a few months ago I was in my local dealership, getting some stuff and started playing twenty questions with the guys behind the counter and, well, a kit was ordered and a few days later it came home with me.

I'd planned on putting it in during the winter, as I don't ride much at all when it's cold - despise the cold, can't wait to move to AZ...
It snowed two days ago and that's all I needed to prod me into putting the H.O. kit in my ride.
There are a couple other things that I've wanted to do to my XP also - fix the horribly designed front end - the clip moves if you sneeze at it, the a-arms are in single shear for each mounting point, not double shear. One of my upper a-arms has wallowed out the mounting hole and moves about .125". Poor design, cheap metal. I can fix it.
So yesterday morning, the transformation began!
Started out by removing my cage. I've wanted to modify it a bit, as I don't like having the wires, antenna and intercom lines zip tied to the bars - I'd like to have them run inside the tubes. I'll get that done when I put it back together.

Next I removed the back body work. This is the first time I've pulled any of the body panels off the XP and it's sure not what I expected to find. Not really sure what I was expecting, but...

It took me about 6 hours to get the mod done. It's really pretty straight forward if you've ever been inside a four banger engine. I did manage to screw up and put the intake cam in the exhaust's place and couldn't figure out why things weren't lining up like they were supposed to at first, but I got that figured out as soon as I started trying to get the cams and crank timed.
Thank goodness Polaris uses the same shims found in Honda's motocross bikes. I had a HotCams set and was able to shim the engine w/o any issues at all. There's a feeling that I've gotten from the time I was a kid, oh so many years ago, that's never left - that moment of truth after you've been into an engine and put it back together - the moment that it roars back to life. This little engine never hesitated, it just cranked right over and set to a nice idle purr. Perfect! I finished off the engine work by installing the weight arms that come with the kit too. It'll be interesting to see how these change the clutch action. I'm not sure what I think of the exhaust that comes with the H.O. kit. It's a nice piece, well made, fits perfectly, but I believe it's going to be on the loud side for my taste. I'll have to see after I get the XP reflashed and then put it next to a stocker.
Now that the back end's been tended too, I'll move up front. The body work has to come off and my dash needs to be modified a tad so it's integrated onto the front body and comes off with it. Right now, the dash has to come off first (which is a biatch).
Once I get the plastic removed I'll be addressing three main things:
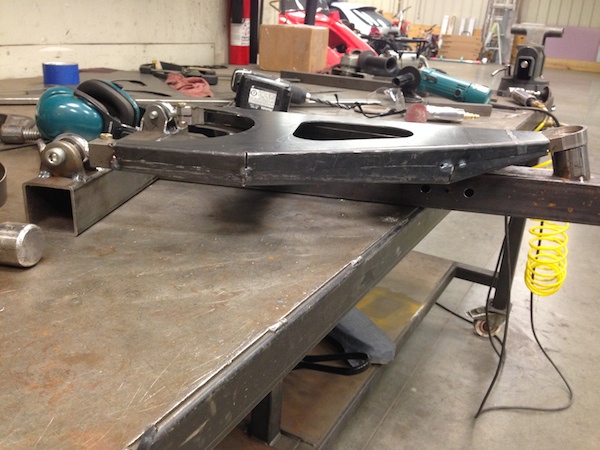
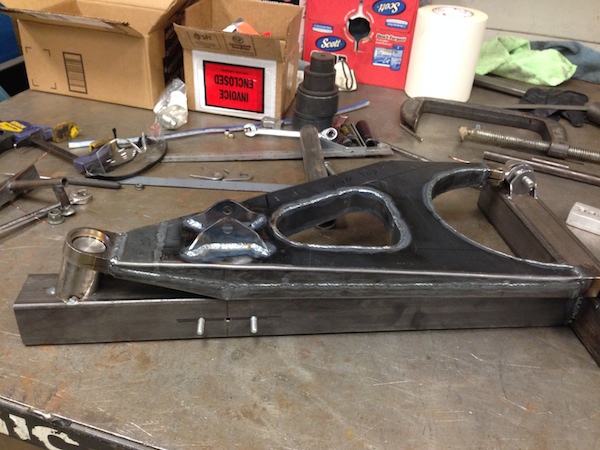
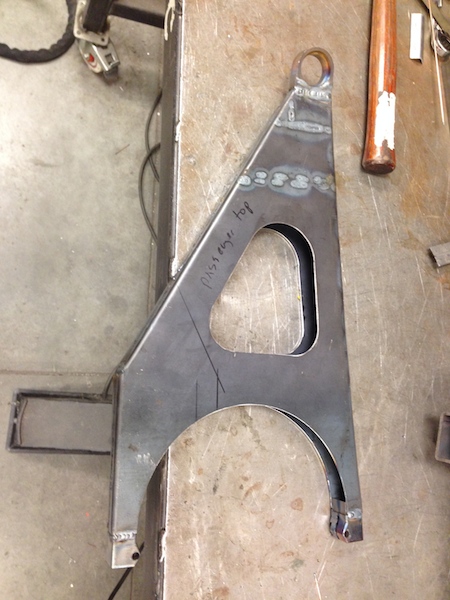
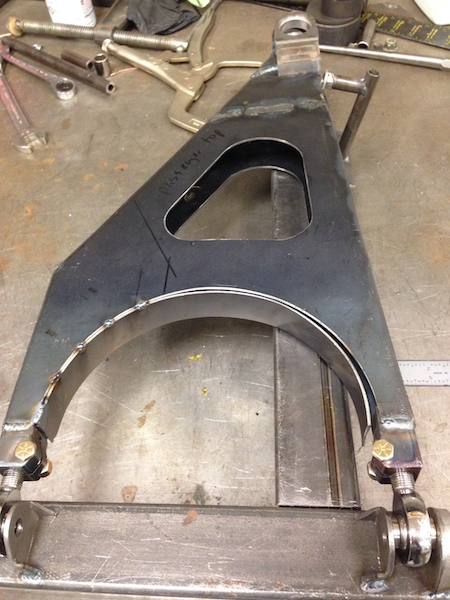
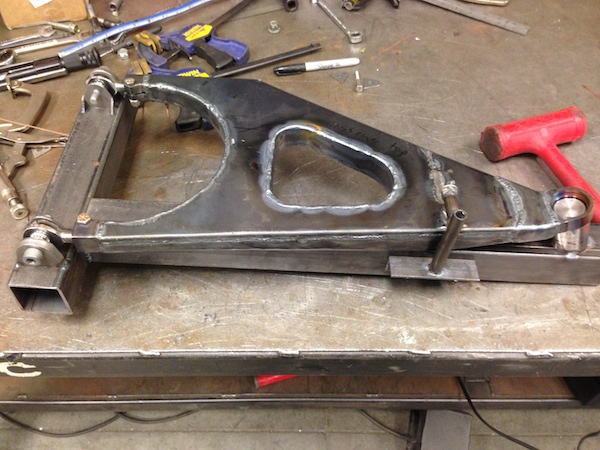
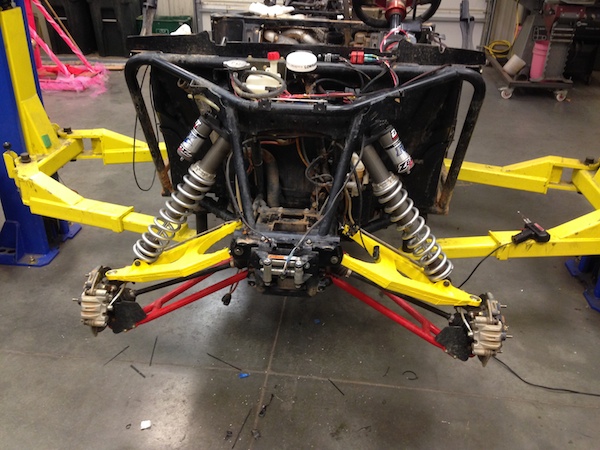
1) Boxed arms with double shear mounting. I want to use the XP a-arms as a practice run for a project I have planned in about a year (let's just say 280-300 hp, 1300 lbs and lots of travel).
I already have a set of EPI ball joints sitting in a box, so I'll use these when I make the arms. The arms will be mounted with heims or uni-balls, I think. I like the bushing setup, but I like PTFE lined balls better.
B) Brace the front clip. The darned thing folds too easily. I'll also redo the a-arm mounts so that there are four tabs instead of the two over the long spread. I'd like to be able to remove/service an a-arm w/o having to remove the front bodywork and bumper too. That long bolt is ridiculous.
III) I want to figure out how to duct the hot air from the back of the radiator out from under the fenders instead of having it flow under the dash and into the passenger compartment. I've done a little testing with tape and cardboard and it's impressive how much heat is passed into the cab instead of out into the world around the body. I'm thinking either thin aluminum sheeting or fiberglass panels.
I hope to get the front end pulled apart tomorrow.
When I start reassembly I'll be rerouting some of the wire harnesses I added on and integrating them into the stock harnesses. The rear blinkers and reverse lights will look so much cleaner doing this and I'm gonna find that darned splice that turns the rear running lights on when you turn the key on. I want my lights to be active via switch, not the key. I'll wire in the whips to turn on with the lights also. The communications lines (intercom and antenna) will be rerouted also.
Side note that's not part of this mod: XP's come with Champion spark plugs.
Champions???? Oh Hell No!
I tossed in a set of platinum NGK plugs and was immediately impressed.
I'd been having longer cranking starts, mis-starts (catches, turns over, dies) and such. Was thinking a tune up was due and kind of surprised it needed one already. Just the plug switch has eliminated ALL the issues it was showing.
It starts almost as soon as the engine cranks over, isn't touchy right off the bat when you slowly roll into the throttle (was common before plug change), idles smoother.
Yeah, the NGK's are the way to go. Champions??? Really?
November 14, 2013
I've started on the front end now.
Pulled the plastic off, along with my dashboard - thank goodness the dash didn't have to be removed from the front body clip! I thought it was going to be required.
Then I removed the front clip and radiator and started assessing the area - yeah, it's going to need some bracing. Not sure what Polaris is thinking with this design, but it's not the greatest.
I've checked out a few of the available weld in kits and can't decide if I want to just order one or make one. I need to do a little more research and figure out just what needs bracing and where the system can twist when hit.
So to start, It's a-arm mounts first.
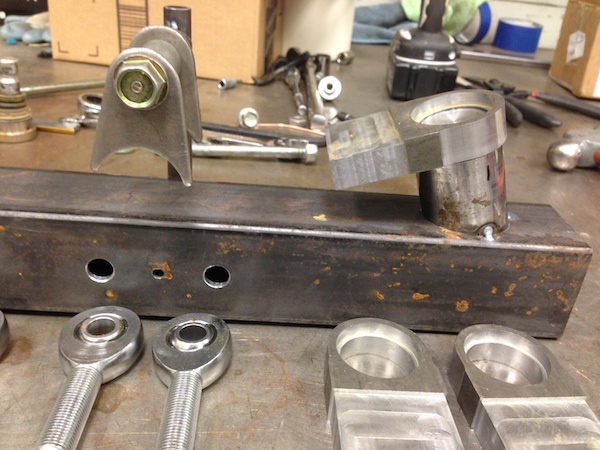
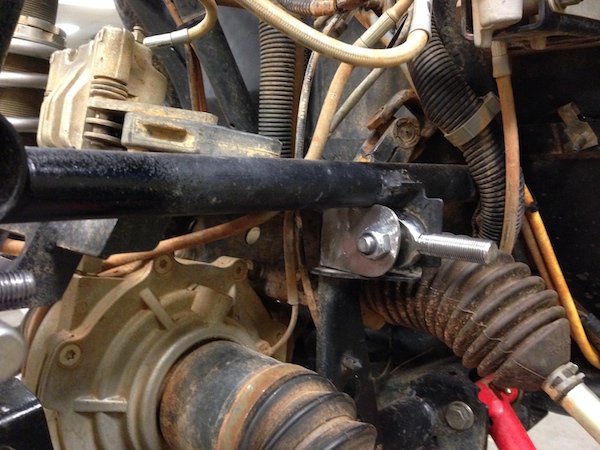
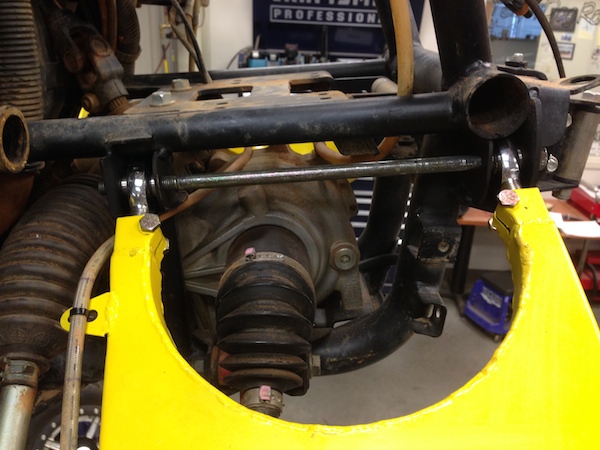
I've noticed that both the upper arms are loose, even with the bolts tight. The upper tabs are just flat out cheesy. The holes in all four of them are ovaled. I'll put in back up plates - drill out the hole to 12mm, make a shouldered spacer that fits in the hole and is welded to the plate. You end up with a jigged spacer that makes the tab about .200" thick.
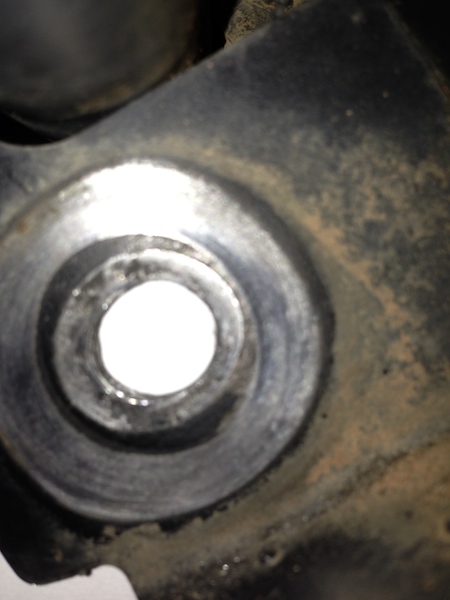
They need to be thicker plate and in DOUBLE SHEAR!!! What this stupid long bolt/tube setup is supposed to do is beyond me. It's a pain in the ass to remove, it doesn't do squat as far as being a mount. Stupid design.
The tube in one end of the a-arm was bent. Two tabs per mount, two mounts, two bolts - yeah, that's the ticket and that's the first thing I'm going to tackle.
So I'll be installing heim joints instead. Two of them per arm, each in double shear. I happened to have a set of 7/16", so that's what's gonna get used. After a little time in front of the lathe, I had 16 spacers that adapt the 10mm bolt to the heim and also give me a .125" shoulder on each side for clearance.
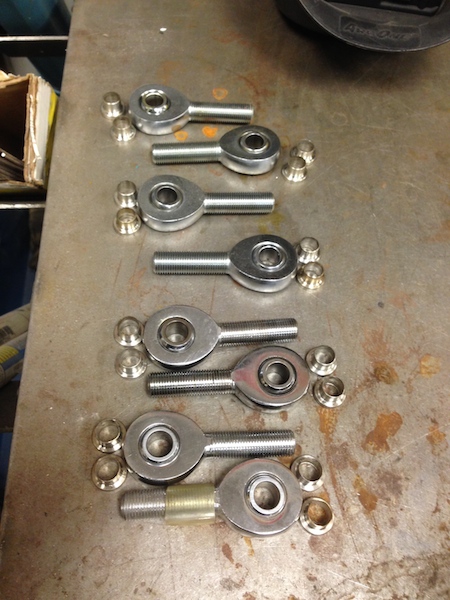
After getting the spacers done, it was time to tackle the jig for the upper a-arms. It'll be a mirror image piece. I got the end tabs in place and will get the inner tabs mounted up for the heim joints to be installed. Once I get the arms built, I'll install them and then fit the inner mounting tabs to the frame. This keeps everything nice and square and tight. I'll probably box in the tabs and may connect the two inner tabs together with some plate. We'll see as I get along with it.
Tomorrow I'll get the jig finished and then start working on designing the a-arms. They'll be boxed, I'll make billet adapters that will hold the heim joints in the ends of the boxes and I have a thought for the ball joint mounts too. It's design on the fly, so who knows what I'll end up with!
November 15, 2013
Got the jig finished today and started making parts.
The ball cup and the shock locating mounts will transfer to the other side when I start on the right arm. I'll be able to use these two points to locate the tabs that the a-arm attach to.
I will have to cut the ball cup locator off and weld it on to the other side, but that's easy enough.
The shock locating mount bolts onto the side, perfectly located in the center of the main tube, so all I do is flip it over and the location's spot on.
Here's the jig with the heims in place between the double shear tabs, a ball cup on it's locator and then all the stuff that will end up making the arms.

I still have to make the ends that the heims will thread into. They'll end up having a pinch bolt on them instead of a jamb nut.
I found some 14 gauge 1018 (around .070" thick). The arms should be fairly light, but compared to stock? Maybe not, but definitely stronger.
I noticed that the upper left a-arm's bent just a hair at brace under the shock mount... Glad I'm making new stuff!
More to come later.
November 19, 2013
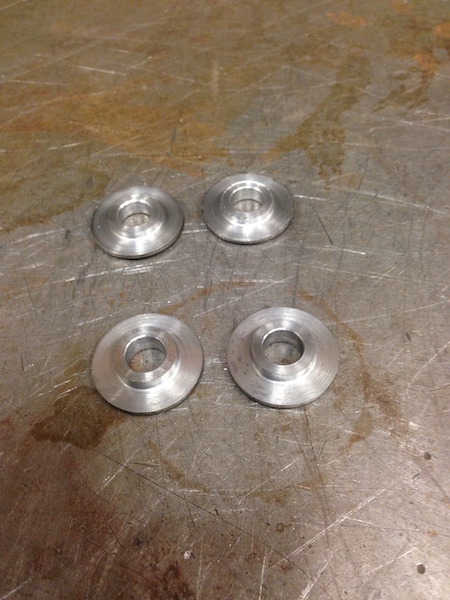
Spent the first part of the day in front of the mill, making heim adapters. These little pieces will be what the heims are attached to the a-arms with. The body pinches the heim so no jamb nut is needed. There are five sets - ALWAYS make a spare set when doing this sort of stuff, as it never fails if you don't you'll need one. If you do, you'll have a spare that just gets dusty. I'd rather have a spare. I was feeling creative today so I made both left and right hand pieces. - ah, that attention to detail aspect that I enjoy so.
I also put in a recess that the 1/4-20 nyloc nut fits in so it only requires one wrench to loosen/tighten. I've been incorporating nut captures in my stuff for a while now - makes life easy and gives that "factory" effect.
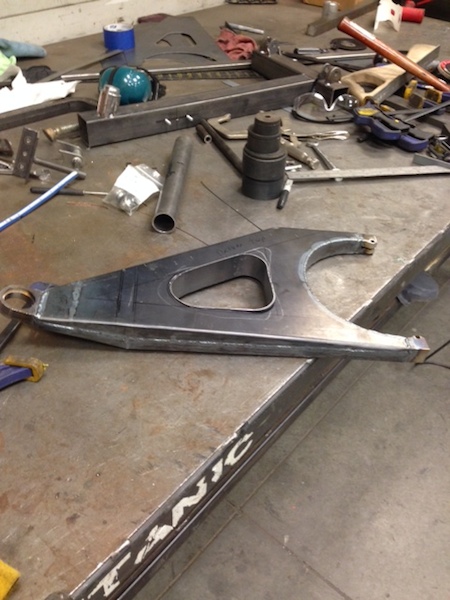
After a bunch of measuring (more than twice - as if it's just twice, it won't be correct and I don't have a metal stretcher...), and drawing I came up with a shape that I think works. It's pretty much the same profile as the stock XP arms, but without the offset to the pivot points.
Once I was sure it was correct, it was back to the shear along with a lot of jumping (my shear's only good for .040" and I'm hacking through .070" - ouch...)
Here's the first profile cut. I'll cap the space between the two curves and also do the same for the space between the plates in the drawing of the through hole you see in the picture.
Tomorrow I'll cut the window out of the arms and bend the edges over to form the edges.
I'll get the edges formed, trim them so everything fits like I want it to and then I get to show off just how poorly I TIG weld.
The edges of the arms will be capped and I have to figure out how I'll put the shock mounts on.
Like I said from the beginning, this is a design and build on the fly. I'm making it up as I go and so far, I like what I see.
November 20, 2013
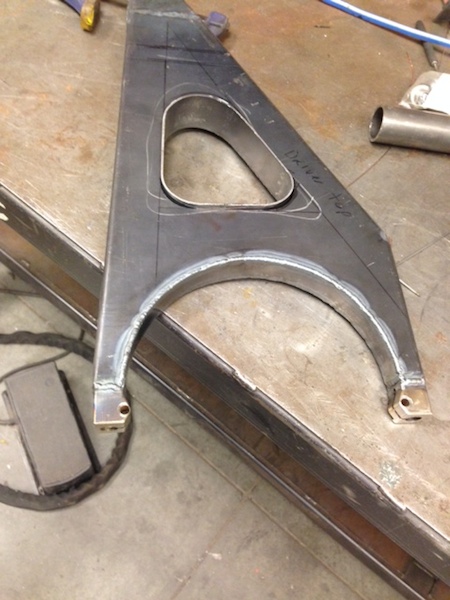
Got the plates cut out and ready to bend:
Bending these is a challenge. I don't have a break that will do the job, so it's clamp between a pair of billet pieces, lots of c-clamps and a hammer. I feel old world doing it this way! - and it's kind of cool. I can see where/how beating the metal in different spots makes it grow or shrink and it gives me a huge appreciation for someone that can do actual metal shaping and work. It's an art.
Another shot of fittment to the jig:
Once I got it where I liked it (adjusted the heims a tad), I tacked it in place and then added the shock mounting jig to get an idea of where stuff will be.
Another view:
Underbelly of the beast. I'm not sure where/how I screwed up on the width of the throat that the ball joint mount fits in, but I did. Missed it by exactly .25"... I'll deal with it - the entire end of the mount gets plated and gusseted. I'll just extend the end of the arm to the point of intersection with the mount.

I'm actually surprised how light it is right now - yeah, I know it's only one sheet of metal and some billet pieces attached, but to pick up a full stock arm and then this was an eye opener. I think they're gonna end up lighter than I expected. - still probably heavier than a stock arm, though - but SO much stronger.
Tomorrow I'll fold the bottom half and I'm going to make the arms taper wider from the inner mounts to just under the shock mounting area and then I'll taper it back down to the ball joint. I'm kinda stoked about the way it's coming out. I'm still not looking forward to welding it up, though - my TIG welding looks like ass.
November 21, 2013
Interesting day. This is the first time I've tried to work with sheet and it requires a technic that I don't possess (yet).
Fold, cut, grind, hammer, measure, draw, cut, fit, measure, swear, hammer, grind, draw, cut, grind, swear, rebend, fit, hammer, draw, grind, swear....
I'll be capping the sides (to cover up my hacked up edges!)

They feel light and are extremely stiff.
Tomorrow I'll work on the shock mounting area.
I'm tired... whew...
November 23, 2013
Got my pictures off my phone finally (darned "cloud" musta been storming...)
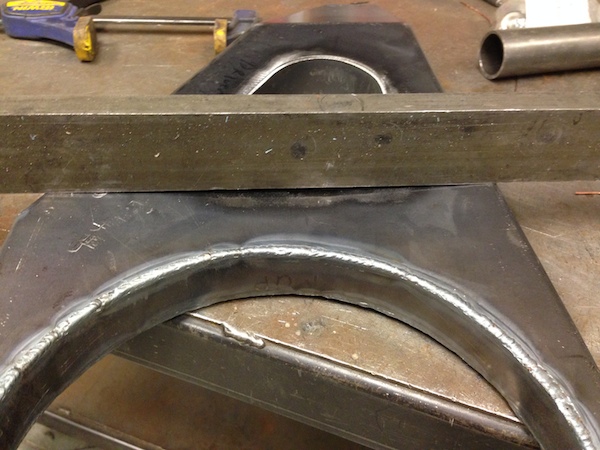
Spent some time fitting this little piece in. I wanted it to fit as closely as possible, so it was start at the big radius, bend, swear, fit, bend, fit, swear... Once I got that done, it was blend in the two smaller corners and then trim the piece so it fits in tightly.
Based the box insert off the bottom since it's the flat piece that the window is squared to. Problem that I didn't notice until after I got the edges blended is that the edge that's closest to the large radius fillet between the legs is warped a bit. It bows towards the top about .1". Nothing a hammer can't fix and then a bit more grinding.

I wondered why the top edge of it was sticking out as much on the other side as it was, as the cut was the correct length - You can see what I'm talking about here. I may tack it to the warped spot and then tap it back through from the top.
The second arm will go together in about half the time - I'll have a clue what I'm doing!
November 24, 2013
Got the arm finished today!
Here's the warped edge I mentioned in my last post. I was able to hammer it back flat. I'm pretty sure it was a warp resulting from doing too long of a bead on the arc.
Shock mounting tabs:
I had an "aha" moment while welding the tabs in place - all of a sudden TIG welding's technique made sense. I get it! I've been on that edge of understanding what I'm doing, but never quite felt comfortable. My buddy's directions a couple of days ago and some comments he made all suddenly came crystal clear and I get it! Wow, what a moment. Been waiting for this to happen.
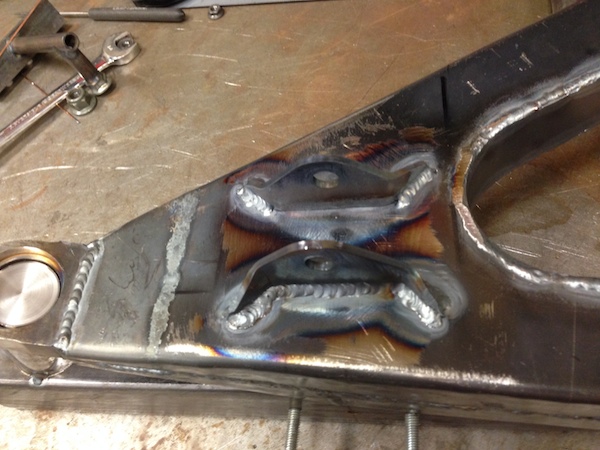
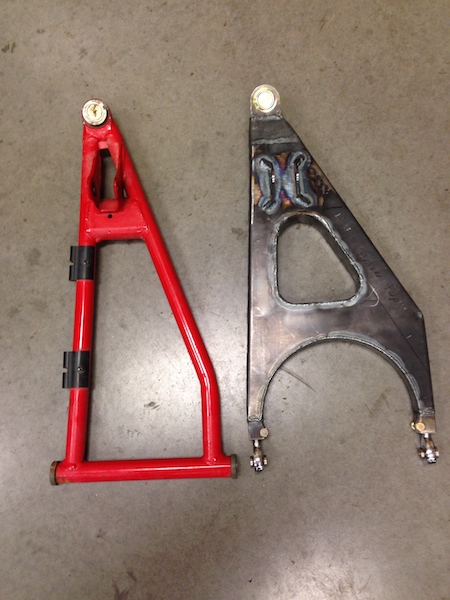
So after getting the shock mounts in place I had to see if it fit - yeah, it fits really well. The spring collar just barely kisses the arm at full droop - I'd prefer about an eight inch of clearance, but I didn't get it. Oh well. It's not an issue, but it will wear a spot in the paint.


While I had both arms off I held them up in each hand and I can't tell any difference in weight. I handed them to a buddy that was there and he couldn't say which one was heavier either. I really can't tell. Guess I need to find a scale. Wonder what the grocery store would say if I walked into the produce isle with a pair of a-arms and tossed them onto the scale?
End caps for support around the ball joint pieces.
"Oh look, an eagle!"
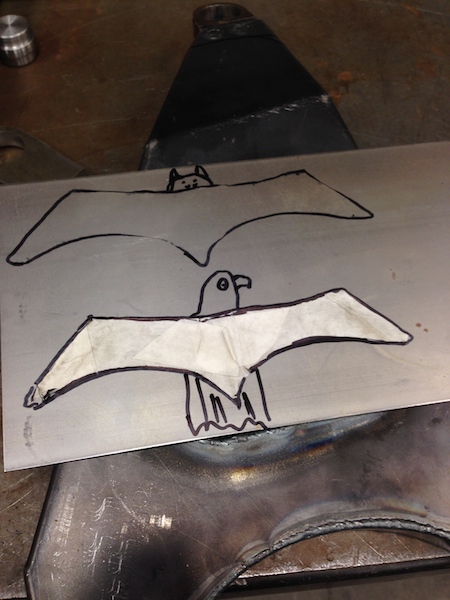
Here's the end after wrapping.
Painted it flat black ('cause that's what I had handy!) and it's sitting waiting on me to install it in a couple of days. I'm taking tomorrow off.
The driver's side arm should go together fairly quickly - I know what I'm doing now!
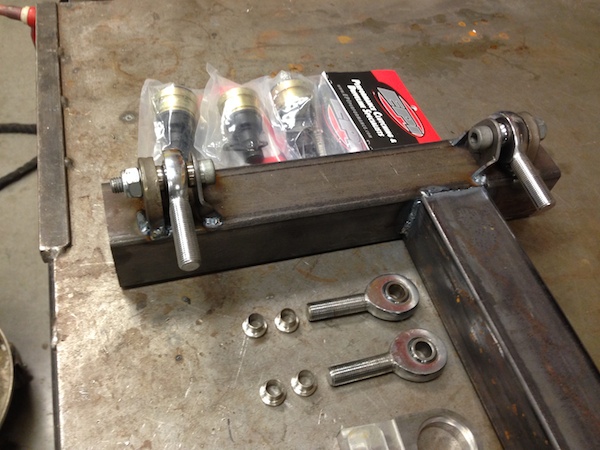
November 29, 2013
Brace across the shock mounting tab area. It fits into the bend of the bottom arm half.
Two halves meet somewhere on a table one wintery afternoon....
Close up of the end showing the heat signatures of the welded in braces/tabs.
I tacked the brace in on the bottom. It's all captured and really shouldn't go anywhere.
The end cap in place. This one fit better than the last, which doesn't make sense, as they're both the same.

Starting the install of the inner radius plate. I have a bunch of grinding to do on the other side.
December 3, 2013
Finished up the arms today.
This morning I still had to get the shock mounts in place and the brake hose tabs installed. Actually I needed to install the brake hose tabs on both arms (I forgot to put them on the first one - DOH!), which required removal of the driver's black painted arm. I wanted to change the color anyhow, so no biggie.
Off to the bead blaster and then it was attack with Rust-O-leum - And change color I did! They're bright yellow now!

So while the arms dry, I turned my attention to putting the arm mounts into double shear and also taking care of the thin, wallowed out stock tabs.
First thing was to make enforcing rings that would get pressed and tack welded into the OEM chassis mounts to combat the wearing out of the thin, piss poor metal that the RZR's chassis is made out of.
The 10 mm hole (.394") was worn out to .410" - .450" on the back mounting tab - it's thinner at .110" and the front tab, which is .140" thick was also a loose fit.
I drilled out the OEM tabs to .625" and then pressed the enforcing rings in place.
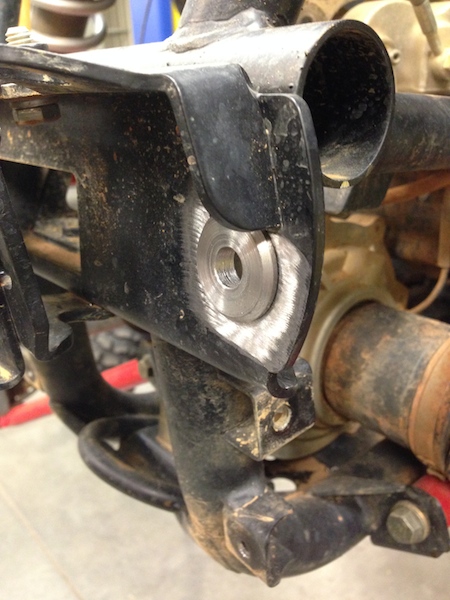
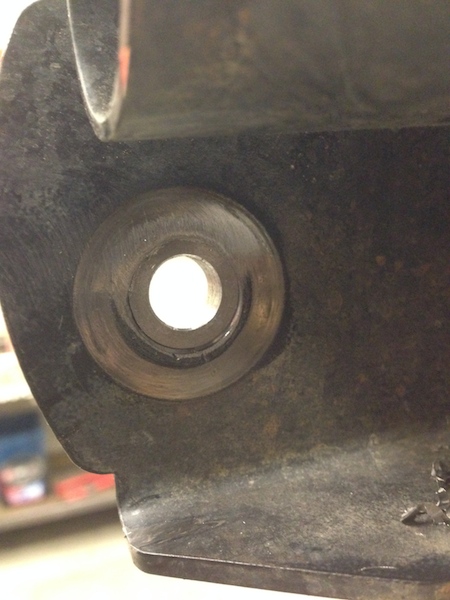
Notice the wear pattern? It's wearing at the top, not all the way around. Bent stuff that's allowed to shift around, even a tiny bit, sucks!
After getting them pressed in place, I was able to locate the double shear plates and then capture the plate in place with the heim joint for spacing and a nut/bolt for compression. Once I got them fitted, they got welded in place (actually I still need to weld in the back one).

Fully boxing these will help immensely and the load each tab takes is now halved, along with spread out over a wider, harder surface area. I doubt I'll ever have wallow issues with the top arm mounts ever again.
I'll get the mounts on both sides finished up tomorrow and then it's frame bracing time.
I should have my XP back together by the end of the week.
I still have some electrical crap I want to tackle:
I want to take the wires that I added for lights and blinkers and such and integrate them into the OEM harness
and
I really want to find the junction for the tail lights so I can remove them off the key and put them on the headlight switch.
I'm really curious how the HO kit will perform - oh, makes me realize I need to take the XP to the dealer and have them do the flash that goes with the HO kit.
Things I've noticed about the Polaris stuff:
1) Cheap metal. Sorry, but after being around Japanese stuff most of my life, the American made product can't be considered anything but cheap comparatively.
The materials used in the stuff from the Land of the Rising Sun is vastly superior. Sad to say that...
B) Lack of attention to detail. I've NEVER seen a piece of MIG wire hanging off a weld on a Japanese machine - NEVER. I was really unimpressed to find a 3/4" long (18mm) piece of MIG wire sticking out of a weld on the passenger's side rear upper a-arm mounting tab this evening. Wow - really taking pride in your job there Mr. XP builder, aren't we? Must be Union (yeah, I'm gonna take flack for that comment).
III) Piss poor fitment of pieces like tabs and brackets. Really? These things are manufactured and every piece should be jigged or self jigging and fit perfectly. NOT!!!
There's easily 1/8" (3.5mm) difference between the left and right area where I boxed in the front mount. My driver's side piece won't come close to fitting in the passenger's side - it should with just a bit of massaging, but this is gonna require surgery! I wasn't impressed...
December 4, 2013
Another thing that I've never encountered on a vehicle/bike/what have you is the self tapping screws used everywhere. The tabs all have bosses that give about 3/16" - 1/4" of bite surface area, but still, self tappers? They get loose eventually. EVERYTHING should be fastened with a nut and bolt... The quick and easy and cheap process was chosen instead. Damn.
-----------Both arms are done and installed. Bolts and nuts are on order - should see them tomorrow or Friday ([URL="http://www.mcmaster.com"]McMaster-Carr[/URL] rules!)

I like the yellow but man, the black definitely hit my lack of welding talent much better.
I also got a bunch of the wires and harnesses under the front end combined and routed better. So much easier to do without bodywork to deal with. I'm now putting everything back together and will work my way to the back end. I'm expecting a little air filtration system on Friday - UMP will help me keep this thing's engine dust free. I may end up putting the UMP on the other XP and looking at another system that's out there but I'm not sure I like the fact that you have to modify the bed to make it work.
By the way - what goofball designed the front clip so that you have to have it loose to mount the radiator? Really? If it was just 1/4" farther forward or bent a little higher, the rad would slide right into place. I didn't discover this until after I'd put the front clip on. Arrggghhh...
December 6, 2013
Finished her up this afternoon. All I have to do now is get it to the dealer on Tuesday and have the reflash done and then I'm headed to Durhamtown Plantation on Thursday to see how this new stuff performs, provided the weather and conditions down there are decent - I'm NOT a mudder, I'm a duster.
Got all the bodywork back on after integrating the wire harnesses I'd installed with the OEM harnesses - looks so much cleaner.
I also put a UMP filtration system on it. (and now I read about this new system that increases hp by a couple instead of choking out a couple hp... crap.) I get the feeling this UMP setup will end up on the other one.
Not sure I like the sound level of the muffler that came w/the HO kit. I just don't like loud.
I think it's gonna go something like this:
HO kit = + hp
= + hp
UMP = - hp
HO kit muffler = + hp (no likey the noise!)
Stock muffler = - hp
So, if I go HO kit + stock muffler + Advanced air kit, maybe I'll have something that makes good power, quietly.
I can dream, right?


God I wish I could weld that pretty! The UMP stuff is beautifully crafted.
I would like to see a bit more of a velocity stack in the UMP's plenum box - the edges of the tubes are flared a bit but definitely not velocity stacks. - heck, I think the OEM stacks have more taper to them.
Yellow looks good - was worried it was going to stand out too much, but with the bodywork on (and they just miss ever-so-slightly hitting the body) I'm pleased with the results.
April 2, 2014
The XPs ran flawlessly and with minimal troubles for a full week of use and abuse. I put somewhere around 350 miles on my XP and the other one went somewhere around 300. The HO kit I put in 'my' XP made a big difference. It has more power across the board and I'm really happy with the results. The only complaint I have is that the dual outlet exhaust is a bit louder than I'd like but I can deal with it. I ran with an MX style helmet half the time and would just wear my ear buds, plugged into my iPhone with the tunes running. The other times out I'd run a full face helmet w/shield and not have to use the ear plugs (but I generally did for the tunes). I can deal with the extra noise and the intercom allows for good conversation with a passenger when I had one.
Each XP had an issue, but nothing that kept us from having fun. I'll get into that in a bit, but for now, let the story begin.
Friday, February 21st one of my good friends, Greg, and I hopped in the van with the trailer in tow, filled full of toys (two XP-900s, the Deztaz, two motocross bikes and an off road bike) and headed west on another one of our Westward Ho trips. I believe this is number 12. Unfortunately there were only three of us making the trip this year. Usually it's seven of us and we've had a crowd as big as eleven. Oh well, it let us stay in Phoenix for a couple of extra days, since we didn't have to figure out sleeping arrangements for a bunch of guys.
Greg and I arrived on Saturday afternoon and our buddy Steve, from Florida, was already there, enjoying a cold brew with James - the guy who lives in the house I've been going to for the past 14 years. Greg and I joined in on the brew and kicked back for the evening, formulating a plan.
Since it was just the four of us, we figured we'd stay around Phoenix for a couple of days before heading out to Ocotillo. Years ago we did the back route run from Lake Pleasant to Crown King. It was a fairly brutal, but very fun ride. Rumor has it that the road has been worked over a bit, so we decided to find out.
We loaded up the RZRs and headed to the parking area just past Lake Pleasant and unloaded for a run up to Crown King.
I took the lead with James riding shotgun and Greg and Steve commanded the other XP. Things went well for the most part, except that I managed to miss the turn off to Crown. It's a big round rock that's painted white with an arrow and CK written on it. I blew right on past it - there are "street" signs with Crown King on them and I was looking for those. James said "Hey, that was it" and I stubbornly (and wrongly) said "It can't be - they have signs." Thirty five miles later, with about half a tank of fuel left in the XPs, I conceded that James may have been right! We decided to head back, since we knew we still had enough fuel to get home - and it was starting to get dark and a tad chilly. Still, we had a great ride and the scenery this time of year is spectacular. We got back to the house, found some food (killer Mexican place just around the corner), killed a few brews and decided to give it a shot again on Monday.
Greg decided that he was going to ride his bike this time too.
So Monday we packed back up, went back to the parking area and headed out. Greg on his bike, leading, me in 'my' XP and James and Steve in the other XP. This time I was watching for the big white rock. Yup, there it is - and Greg goes ripping right on by (of course!). Steve and James stopped at the rock, I ran Greg down (should have been over...) and got his attention and six miles later, we're back at the rock.
We headed on up and man, what a killer ride. The rumors of the trail being cleaned up were true, but it's still a pretty good off road run. All sorts of terrain, amazing scenery and a climb to over 6,000 feet. From down in the desert floor with cactus up to the pine trees - the trail covers it all.
We got up to Crown King, went to the local eatery, had one of the best hamburgers I've ever eaten and then went to the little general store so we could all purchase sweat shirts. It was COLD! By far one of the best things I've purchased in a while - they were needed all the way back to the truck.
About four miles into the twenty six mile ride back Greg managed to puncture the front tire on his CRF450. Bummer! But ya know, the guy rode the rest of the way like a champ - never seemed to get out of shape or let it get in the way. I was really impressed with how well he handled it. If this had been six years ago, it would have been a miserable trip for him. We put Greg out front and let him set the pace. Steve and James (who were taking turns driving/riding) took second place and I set back and had fun. I'd let them get completely out of ear shot and/or dust and then I'd get into race mode and see how quickly I could catch them. Man that was FUN! We made a few stops along the way, taking pix and such.
We wrapped up the evening by going back to the house, having a few more brews and getting ready for heading out to Ocotillo.
We got to Ocotillo on Tuesday afternoon and set up camp. A trip out was the first thing in order. Yeah, it was good to be back there. The place is a blast and what makes it even better is that there is no phone service unless you go up to the top of the hills. Nobody can bother you! WOO HOO!!!
We ran around until it was dark then headed back to camp.
The next day issue #1 showed up. Somewhere along the line, the day before, I managed to put a stick that was about the size of my little finger through the left rear tire of my XP. No big deal - it only took one plug, doubled over on itself, to fix the leak. I can deal with this sort of problem.
Now, if you'll recall, bdk said that my un-internally braced arm was going to have issues and I responded back that I figured the load would be spread well enough that there wouldn't be any issues. bdk was right. I managed to fold up the tip a bit. Oh well. It took most of the week to do it and it didn't keep me from driving the XP at all. I just stayed real conscious of not overdriving the driver's side - made sure I took it easy on the arm, best I could.
I did discover that I'd forgotten to tighten the winch down on 'my' XP one night too. Greg was following me and I was a bit more aggressive driving off a small ledge and down into a wash. Greg managed to high center the other XP and when I started trying to unreal the winch, to pull him loose, I was quite surprised to find everything just sort of flopping about up front. I tightened the line back up and made sure I fastened it down the next morning. The SuperStrap did a fine job of pulling him loose and off we went on our merry way.
The other XP ran w/o a hitch other than the LED light bar becoming schizophrenic; "I'm on, no, I'm off, no, on, no, off, uh on yeah, on... oh, no off..."
I checked the harness - switch, wires, connections. All good. I found nothing loose, no signs of anything shorting or coming loose. I think it's the electronics in the bar going south when they get hot. It's a Chinese bar, so .... (ya get what ya pay for)
Friday morning I got up early - just at sunrise. Greg and Steve were still sacked out, so I decided to go out on a little "race run". I prepped, strapped in and headed off with the pedal to the floor. I spent about an hour ripping around as hard and fast as I could go - total race mode. I was having a blast - man I love doing that.
When I get back, Steve's sitting there with his cup of coffee and a grin.
"I could tell exactly where you were." he piped up. Then he started laughing. "I've noticed over the week that most of the people we hear running around are driving pretty laid back. I hear 'brrrrrrr, brap, brrrrrr braaap, brrrr, brap' when they go by."
"But it's different when you're out there. All I hear is "BRAAAAAAAAAAAAAAAAAAAAAAAAAAA, brap, brap, BRAAAAAAAAAAAAAAAAAAAA, brap, BRAAAAAAAAAAAAAAAAAA! You never let off except for a second or two." LOL - he totally called me out.
We headed back to Phoenix on Friday with plans of riding on Saturday. Unfortunately that didn't happen. The rains came down big time, with a dash of marble sized hail thrown in for good measure. We chilled on Saturday and watched the recorded supercross races. Sunday morning I took Greg and Steve to the airport and they headed home. While it wasn't the normal crew, and we all commented at least once how much we missed having the other four guys, it was a great trip overall.
-----------------There was one incident that I have to tell on myself about too.
The last time I was on a motorcycle was Oct 13, of 2013. That day ended with a trip to the E.R., four compressed vertebrae and two broken ribs. Not a pretty way to end my riding season.
I took my bikes out with me, thinking I'd throw a leg over the CRF if we stopped in the dunes, and planning on leaving the Husaberg out in a storage place, along with the Deztaz and one XP. Turns out I spent all my seat time in the XP and I didn't ride either bike at all - well, except for 'the incident'...
The Berg is strictly battery start - no kick starter at all. Since I hadn't ridden it in quite a while, it decided it wasn't going to start the afternoon that I planned on unloading it and putting it in the storage place.
I unloaded the XP, unhook the trailer, unload the Dez and then proceed to unload the Berg. I turn it around in the back of the box van, roll it to the ramp, drop the front wheel just over the edge, down the ramp, throw a leg over it and then dead stick the bike down to the driveway. As the bike rolls to a stop, maybe thirty feet or so behind the van, I start to take my left foot off the peg, so I can put it down. The last thing I would have ever expected was that the foot peg and my hiking boot had decided to lock together like a couple of dogs in heat. I try to lift my foot and there's resistance. Uh oh! The bike's rolled to a stop and that little twinge of panic's set in. I yank up on my left foot and the peg and boot are hooked together even harder - the peg rotated upward a tad and pinned the boot against the clutch cover. All I can do is ride it down to the asphalt. Here I've been riding for 35+ years and I'm taken out by a bike that's not running and not rolling. All I could do was hit the ground, swear a bit and then start laughing. Yeah, it's the little things that get ya on occasion!
So that was the week, for the most part.
------------As I mentioned in the tale above, the front left upper a-arm on the XP folded up a tad. bdk said it would and I should have listened - but then again, I can be a bit stubborn at times about things...
Here's what a straight (right side with internal bracing) a-arm is supposed to look like after a week's worth of abuse:
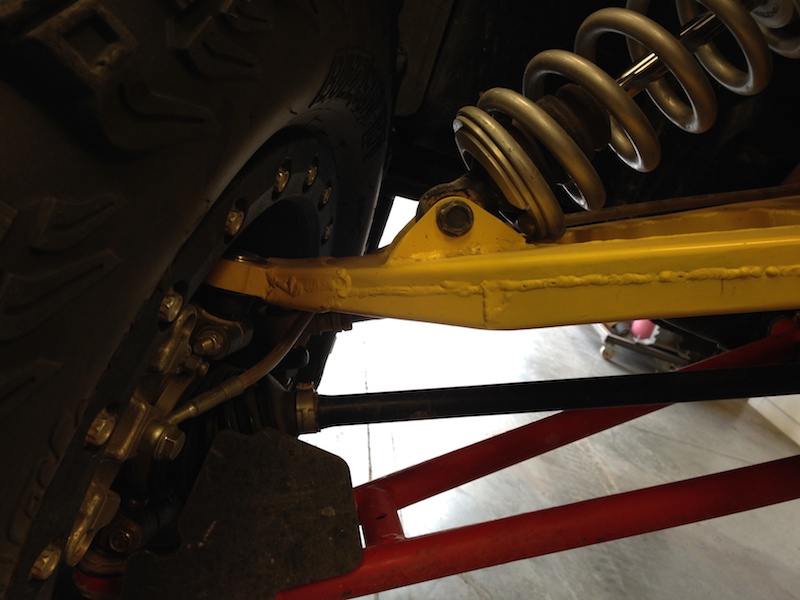
Here's what an unbraced a-arm looks like after a week's worth of abuse:
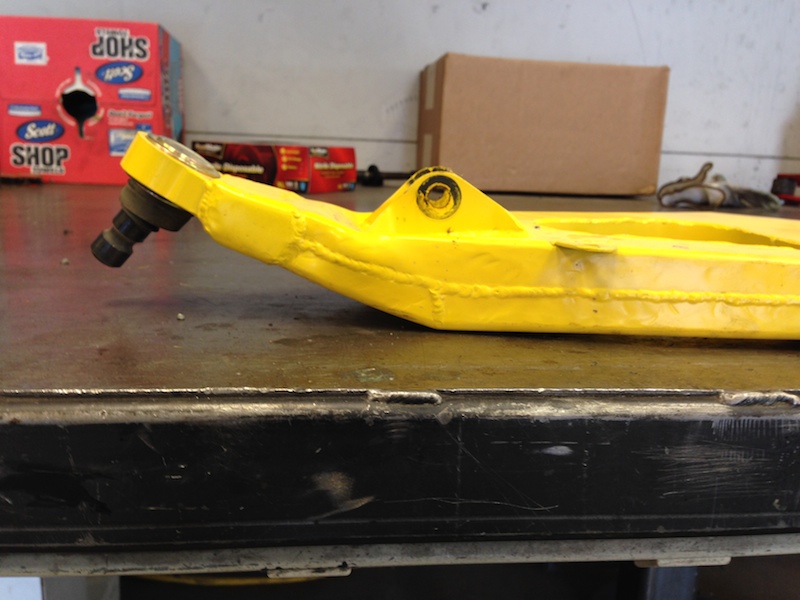
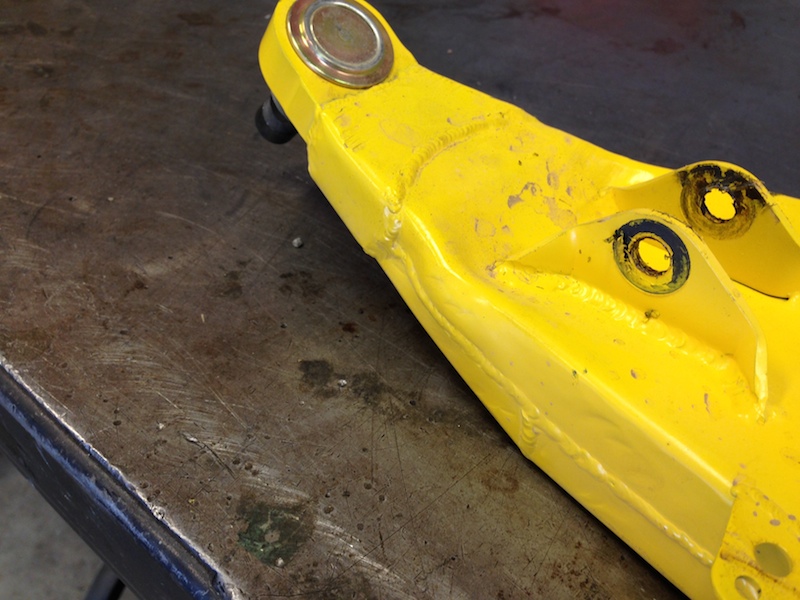
So it's time to go in and see what can be done to rectify the issue. I cut a hole in the space on the bottom of the arm, under the shock mounts, for access:
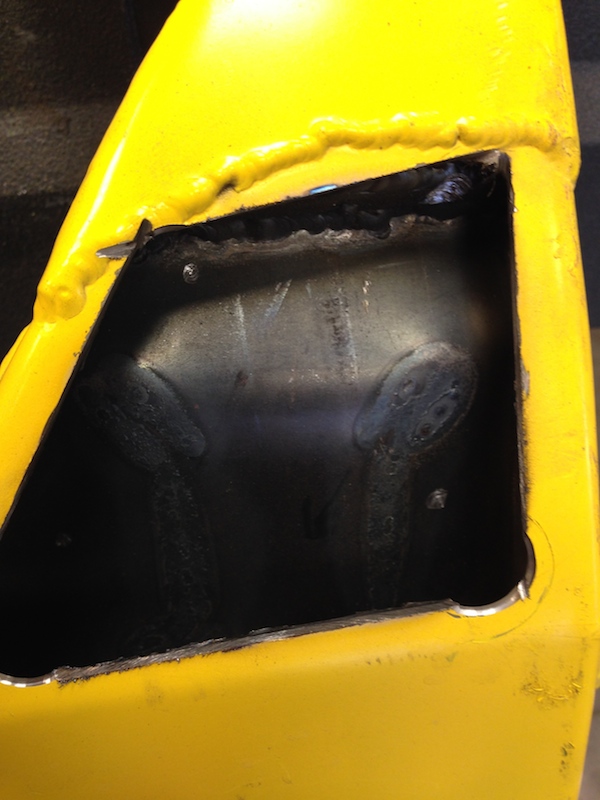
I put it in a press, and was able to push the bent section back into place. I was surprised at how easily it back into position. Whew!
To give me access far enough back into the arm, to place the internal braces, I peeled back a section of the arm a little bit more:
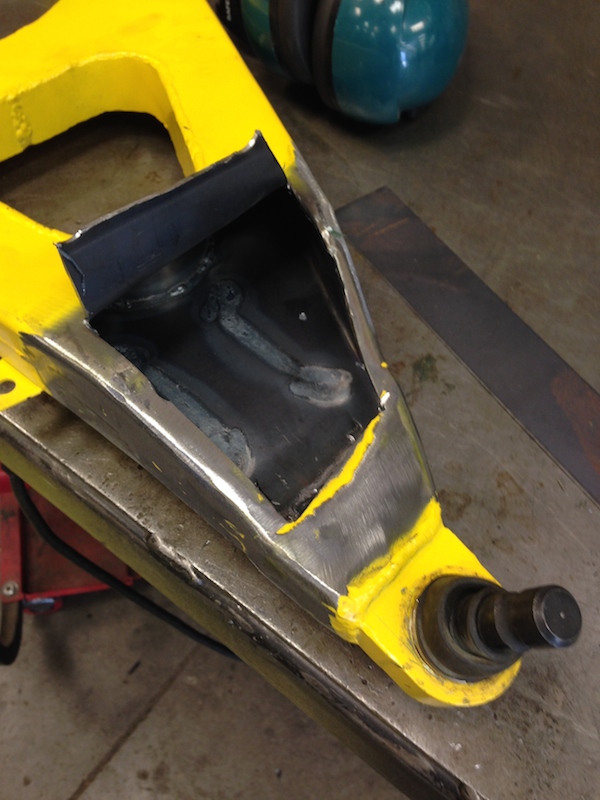
I fitted in a couple of ribs, welding them under the shock mounting tabs:
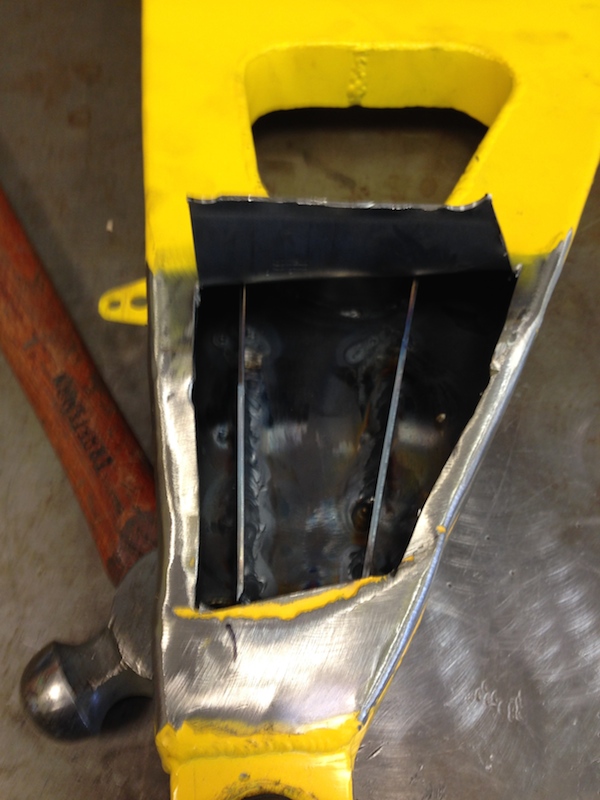
Then I welded the piece I cut out back in it's home:
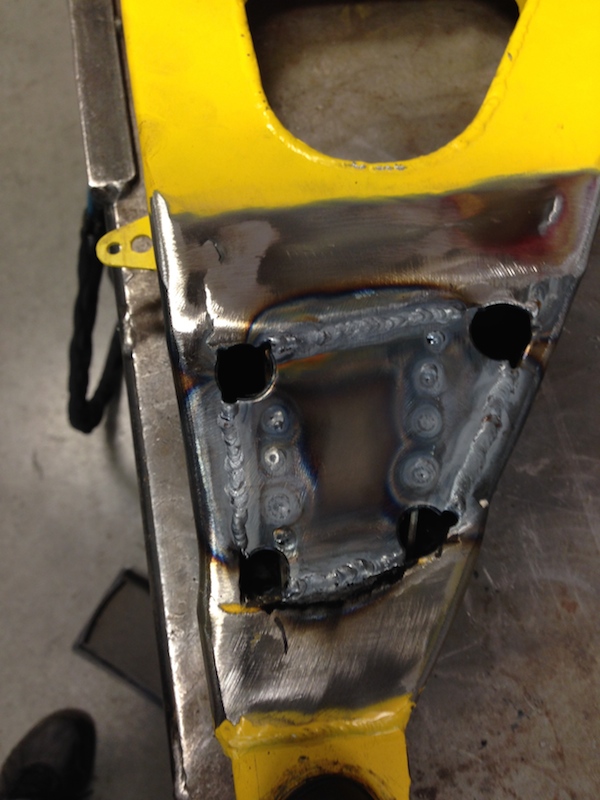
A cap was welded over everything to make it look pretty(er) and give the area a little more support:
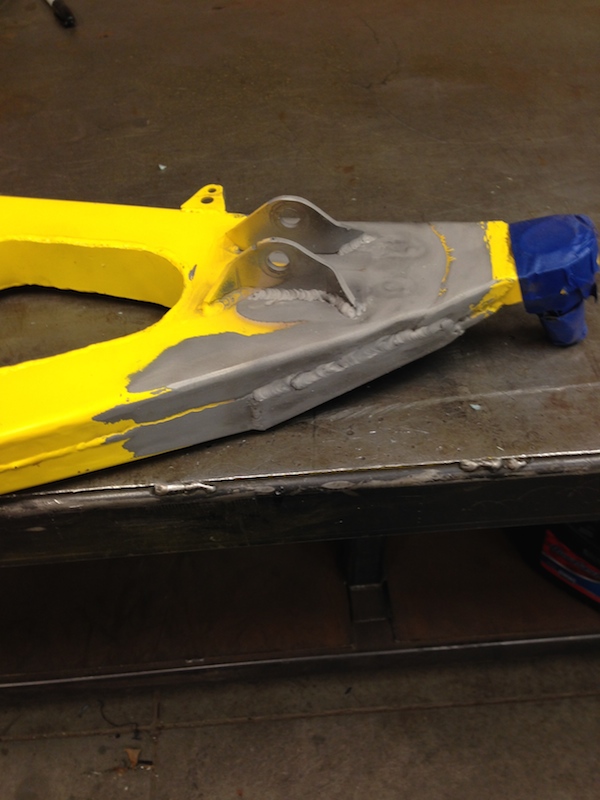
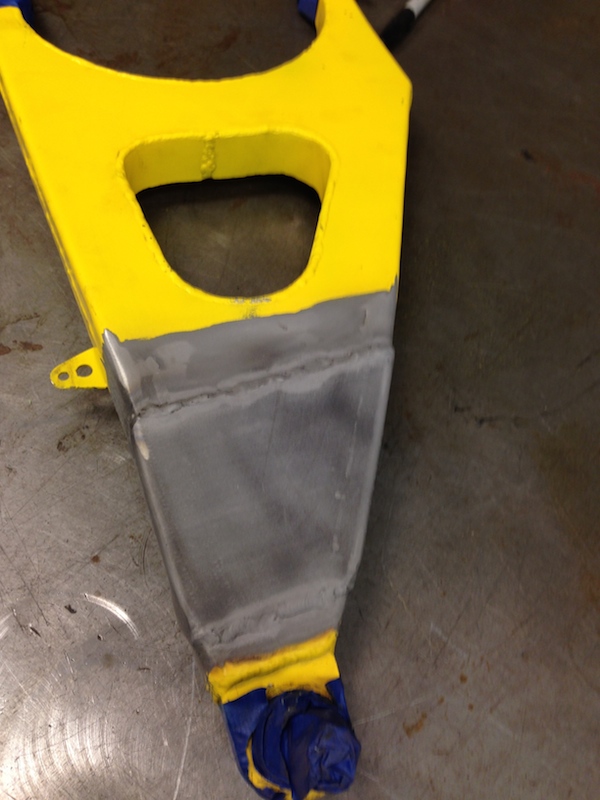
A little more paint and back the arm went. If you're not looking, it's actually pretty hard to tell a difference between the two arms. I don't think I'll have anymore issues either - but time will tell.
July 2, 2014
61 days until I live in AZ and counting!
Spent about 3 hrs running around northern Phx yesterday with papers in hand and by the end of the day, I have two XPs that are street legal with insurance.
Each XP cost me this much:
$90.00 a year for basic coverage thru Allstate
$17.75 for a STREET TAG!
25.00 for the off road sticker.
I can drive where ever I want in AZ and not be in trouble! (well, as long as I'm not causing trouble...)
God I LOVE AZ!!!!
July 4, 2014
It's official! I can drive out off of the property and out into the desert! WOO HOO!!!
My girlfriend and I just got back from a 65 mile RZR tour of the area north/north-east of Cave Creek (Seven Springs).
It's wild driving right down the middle of town, even having a sheriff pass us, and not having a problem.
Yeah, I'm gonna like it here!
September 20, 2014
Okay, this living in Scottsdale is just the shit.
We went out on a 100+ mile ride today. Headed away from the house down Dynamite (turns into Rio Verde), to Needle Rock, took the wash north from "The Rock" on out to the road that runs down to Bartlett lake, headed west on that until we got to the Great Western Trail road, then headed on up through Seven Springs and out towards Sheep's Crossing (didn't make it that far). Stopped on the side of a mountain and had lunch in the shade. Turned around and headed back. Just under 5 hrs of seat time. There was about 25 miles of asphalt driving, but that's not a big deal.
We did have a flat (not sure where the rear right decided to leak from...). I tried to high center the XP so I could get the wheel off - worked getting the flat off, but didn't have enough clearance to get the spare in place. Ended up stranding ourselves on this little ridge. Fortunately a good samaritan came along, gave us a pull off the ridge and he had a jack (gotta get jacks for both XPs).
After 20 min or so, we were back on the road and coming home.
Yeah, I'm happy here!
September 28, 2014
Man, the burgers and fries at the saloon in Crown King are awesome!
My GF and I spent the day making a 138 mile trek from the Dynamite/Pima area on out to Lake Pleasant (about 30 miles on the tarmac) and then on up to Crown King. We got in right at 4:40hrs of seat time making the trek and arrive home about 7:30.
What a BEAUTIFUL ride! It was a lot rougher than last time I did it, but nothing that was treacherous. There was actually a grader running down the lower 1/3 of the trail, cleaning things up.
Came across a 3ish foot long Green Sonoran rattler - beautiful creature. I got out and took a little video of it slithering across the road, but gave it enough room not to threaten it.
I have cab heat that's a PITA right now, but in a couple of months, it's gonna feel great.
October 15, 2014
Aaarrgh!!
My Sedona Buzzsaws have come to the end of their lives. They've been great tires, but alas, they've worn away. And I've discovered that the Hiper rims that they ride on are not happy out here in the desert either. I've wasted the inside of two of them getting rocks caught between the caliper and the rim. One of them has a hole punched into it, the other isn't far from it.
The Hipers will become sand rims - not a lot of rocks found in the dunes, and they're light weight.
After doing some research, I ordered a set of GBC Kanati Mongrel Radial ATV Tires (DOT legal) and upped to a 15" rim.
I also went from a 26x9-14 tire to a 28x10-15.
The larger rim will help with the rock catching issue, the larger tire will help with the speedometer accuracy (it's 20% off right now! - reads fast) and with the increase in both tire and rim, my sidewall gets slightly larger (better compliance). All good there.
On my Raptor project (yes, I still plan on tackling it once I get moved into my new house - mid Dec? - hope so...) I'd decided to go with Method 15x7 rims. These seem to be the hot ticket, light, durable, blah, blah. I have ONE sitting in a box - ordered it a while back while I was doing suspension design.
Hopped on line last night, placed an order for five more (four on the XP, one in the spare tire spot) and then started having issues - Method's online stuff is down. Placed a call this morning and poofkaboom. TWO MONTHS backorder time. NOOOO!!!!!
So I'm expecting a new set of sneakers to arrive on Friday with nothing to put them on. Damn.
Two rims down in 6 weeks... Two months to go... Hope this lasts! (I see at least one Hiper half being ordered... crap)
Put over 300 miles on the XP this past weekend up in the Stoneman Lake region of AZ (south of Flagstaff about 30 minutes) in the woods. Man these things are a blast.
October 24, 2015
Pardon this rambling post. I have a couple drinks in me and am completely enjoying my Friday Night!
Living here in AZ is PERFECT for me. I have dirt in my blood. I knocked out four teeth when I was 5 on a tricycle, ripping off curb into the street. I think I got a good clump into my blood and it's been a part of my life ever since.
I got to spend the day in a Bobcat excavator, digging trenches for the house.
Spent yesterday on a tractor smoothing the washboard off the road down the street.
All the time, with a smile on my face. I'm in dirt!
I'm as happy as can be, playing in the dirt. Never grew up, eh?
So, this disease seems to have affected my girlfriend too. Do you have any idea how nice it is to have your GF turn to me and say "Hey, wanna go on an RZR ride?"
She's said this a few times. (WOO HOO!!!)
Got the tires and rims installed yesterday evening. Gonna go try them out tomorrow.
Gives me a little more clearance than the 26" tires.
Put a set of 28x10x15 Mongrels on 15x7 Method Beadlocks. (got three of the five I ordered from Chaparral - fortunately I had the one for the Raptor).
I decided to go the 15" rim route for a few reasons - less rock/caliper issue, plan on using the same setup on a future build and I wanted to go to a 28" tire for both a tad more ground clearance and to get my speedo closer to legit (It's about 15% off according to GPS). Plus, going to a 15" rim and sticking with the 26" tires I had would lead to less sidewall. My sidewall actually increases by 1".
I did a lot of research on tires and decided on the Mongrels. DOT approved was a big bonus. They're 8 ply and have a good tread. (gonna try them out tomorrow).
I hope the H.O. kit and it's clutching are 28" tire happy.
I'm gonna make my Hiper rims into dune rims. Gotta get sand sneakers soon. (I think I can send my worn out tire carcasses in and have them done).
My g/f and I did a 200 mile round trip (we got lost, uh, I got lost - turned left when I should have turned right on the Great Western Trail) in "her" Xp last weekend. Crown King the back way at night is a blast!
Heading out tomorrow to a new place with the next door neighbor - he rides and was telling me about a great place to go that's just down the street.
October 28, 2015
Started working on high clearance rear links today.
This is the first machining and fab work (other than a table) that I've done in almost four months. Got my lathe leveled and up and running today! WOO HOO!! This moving stuff has gotten in the way at times. (but man I'm glad to be here in AZ and no longer an Ohio resident)
Knocked out 8 threaded bungs for the tube ends, cut and bent the tubing (1x.095 chromoly). I have a trick up my sleeve to keep the bent tubing from rotating once they're mounted. It's gonna take a little R&D to make it work, though.
Straight rods are simple and can twist/rotate w/o any problems in the suspension (in fact they need to twist to accommodate the arc they travel through suspension cycling). The bent links need to stay in place and not rotate out of the way. I've seen a couple setups that use plates to ride on the upper link and I'm not very up on that.
Thursday, I'll start the spacers and the anti-rotation devices.
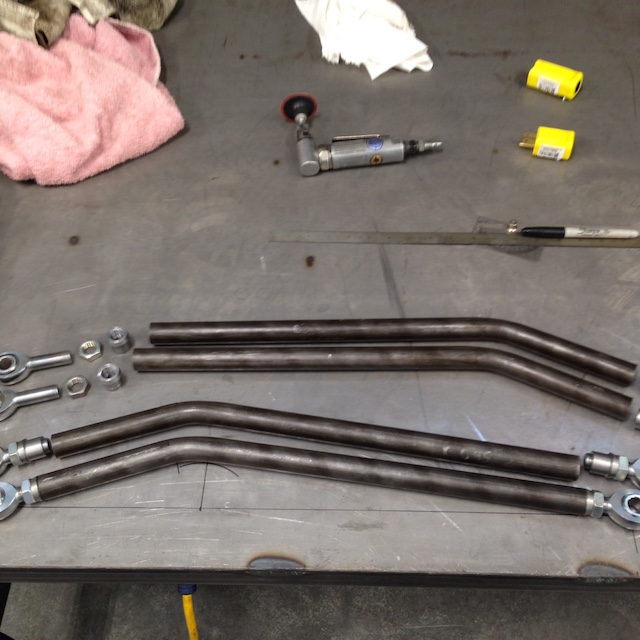
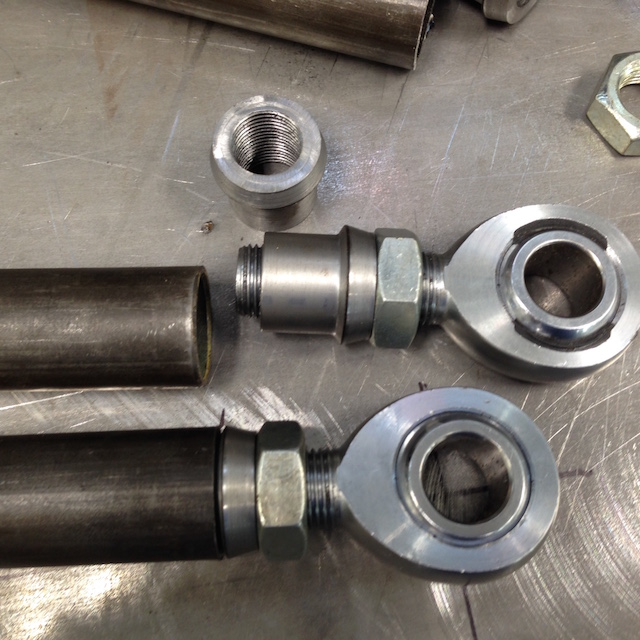
October 30, 2015
Got all the parts done today and I think this is going to work.
Here are a couple of shots with a link in place, but no spacers in the heims - wanted to see if things looked good.
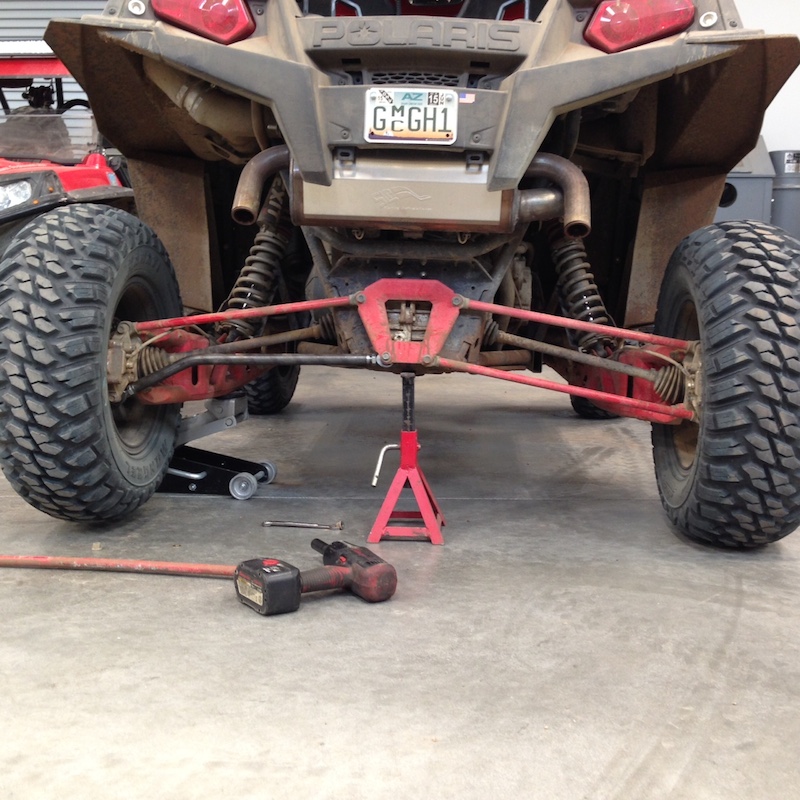
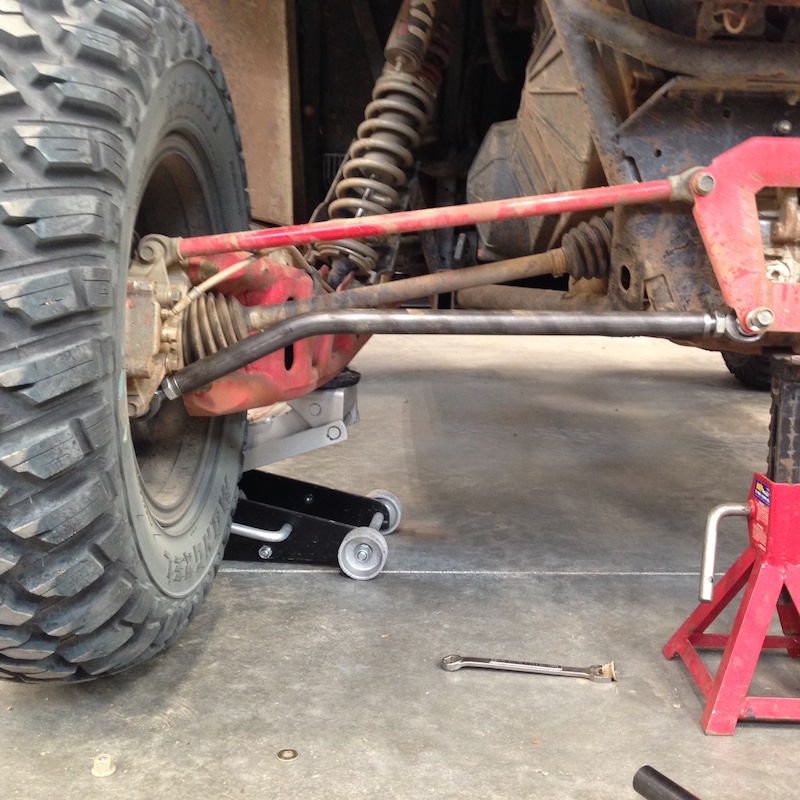
All seems good.
I noticed that the link that I removed had some road rash on it and that it's bent! The black line below it actually touches the ends of the rod, so it's bent about 1/2". Good timing making the new rods, eh?
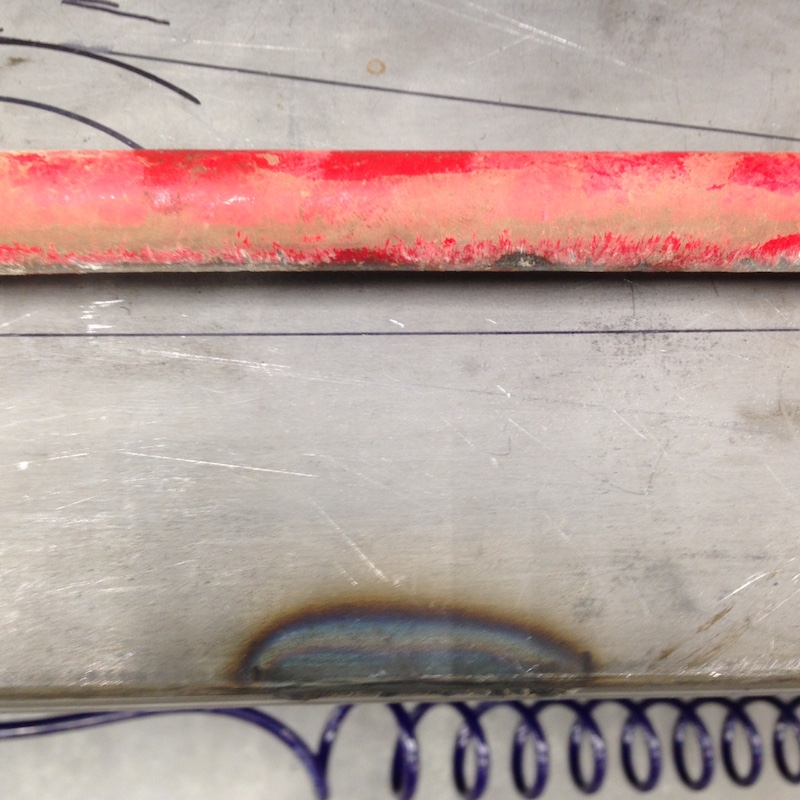
To keep the rod ends (heims) from rotating, I had to figure out how to capture them, yet still allow them some rotational movement.
Enter the O-Ring!
First I made spacers that have a round groove in them, that the o-ring lays in:
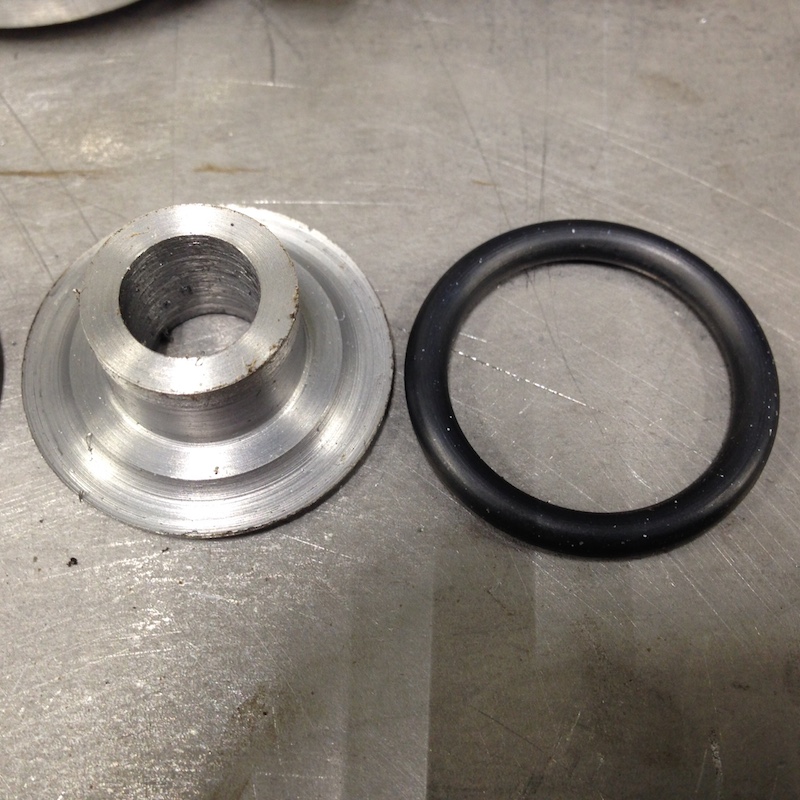
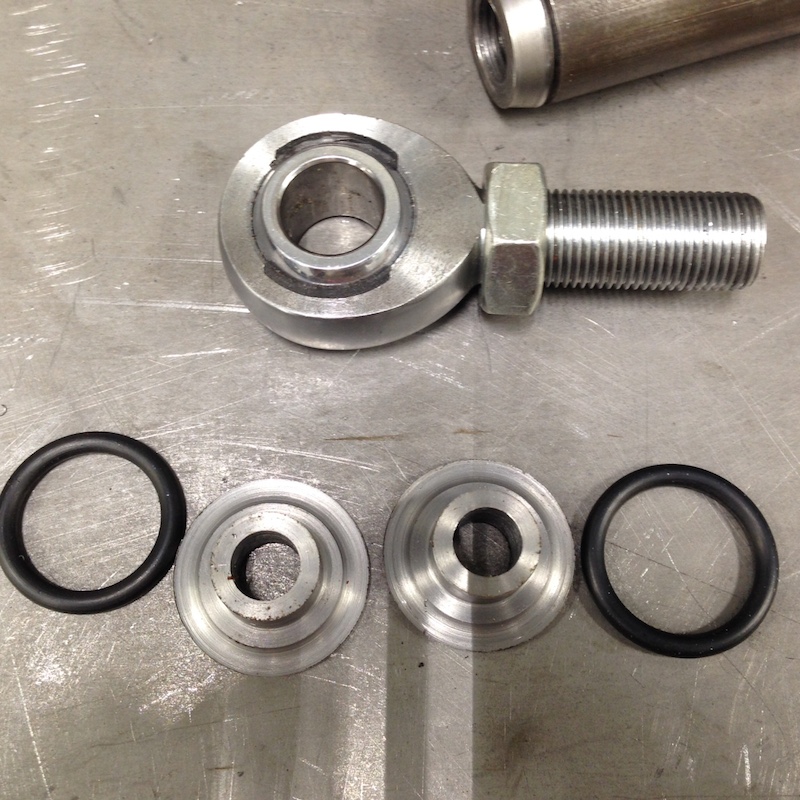
Here you can see the space between the heim body and the spacer (this is an inner set, with wider spacers.
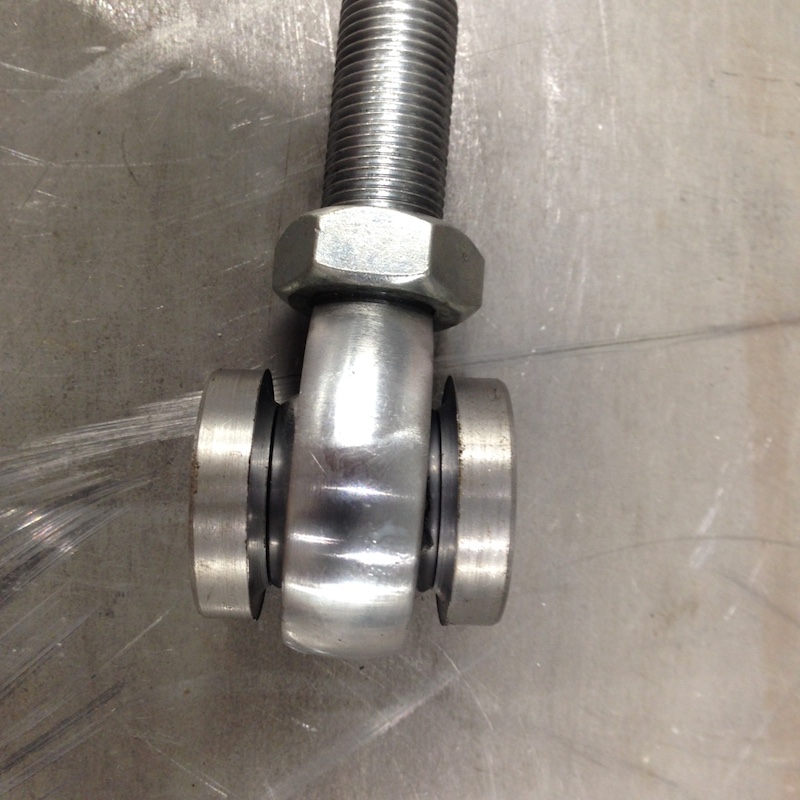
Mr. O-ring fits in the groove, taking up the space, keeping the heim from rotating in it's mount (outer set with narrow spacers):
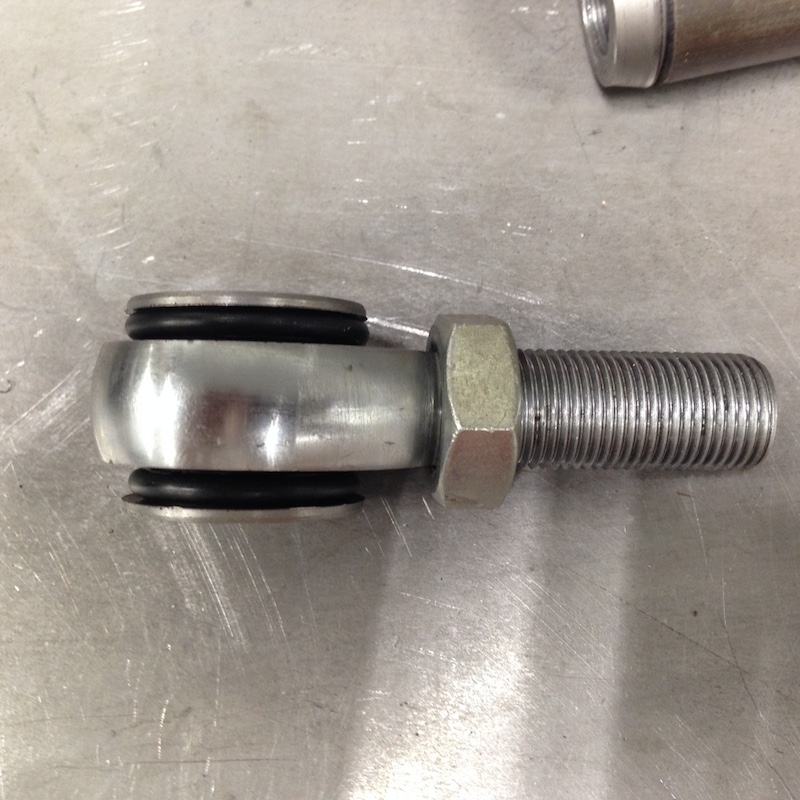
Everything fits really well, well... except that I may have to put a small kink in one end of the link - the outer end is hitting the caliper bolt. I'm hoping that if I put a small bend into the end of the inner end, it will drop the outer end's angle enough that there's no contact between the two parts. If that doesn't work (which of course it won't!), then I'll have to cut four more tubes and put a small S-bend in the outer end - keep the rod end a tad more level before the tube bends upwards for clearance.
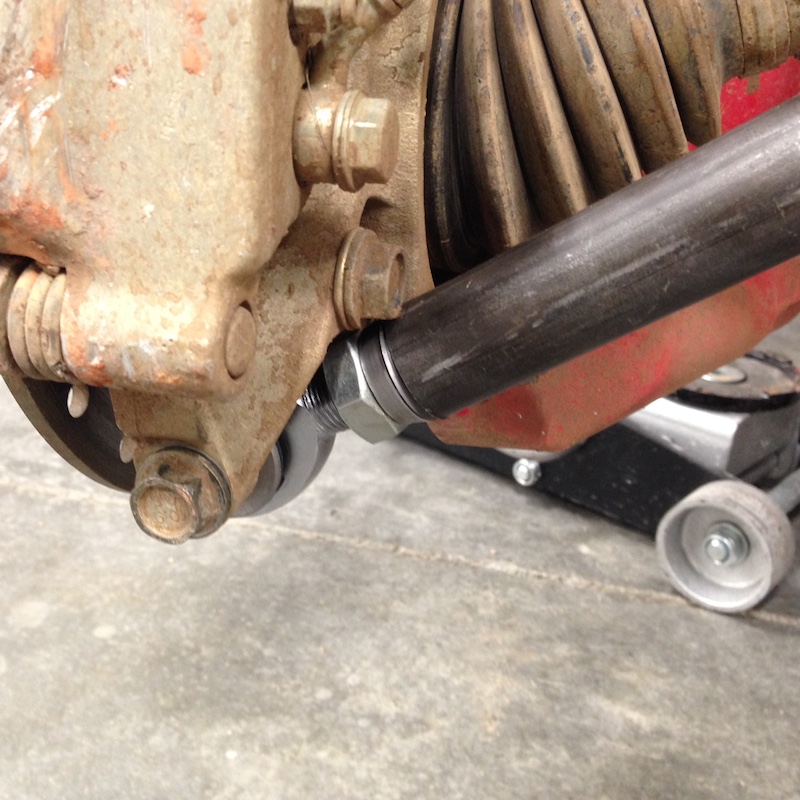
I'll find out tomorrow if things will work.
October 31, 2015
I've been toying with the idea of bracing the bend. One good hit from the side and, well, the tube's already bent, so we know where it's gonna bend more. I'm also considering doing a secondary tube that bridges across the bend - but then I'll loose some ground clearance, which sort of defeats the purpose of the design.
I've seen a couple of designs on the RZR forum that are braced/plated and need to go take a look at what they're doing.
Part of the reason I went with the 1x.095 chromoly was that it's dramatically stronger than the flimsy stock links and should be able to take a little more punishment. (and I had it in stock)
I may just roll with these for a little bit and see how they hold up or how easily I can destroy them. They're such simple pieces, that all I'll have to do is cut out the bungs and make new ones if these aren't up to task.
First, I gotta figure out how to bend just an inch or so of the outer end to get clearance at that bolt.
Please, oh please, great Tube Bending God, let me have enough sticking out that I can get hold of it and bend it.
DONE!
Just needs a coat of paint.
I ended up just bending the other end in two spots and it all worked out great. Guess I should have gone and looked at some pix of the high clearance radius rods before I started. I'd seen them, but not studied. Who knew? LOL
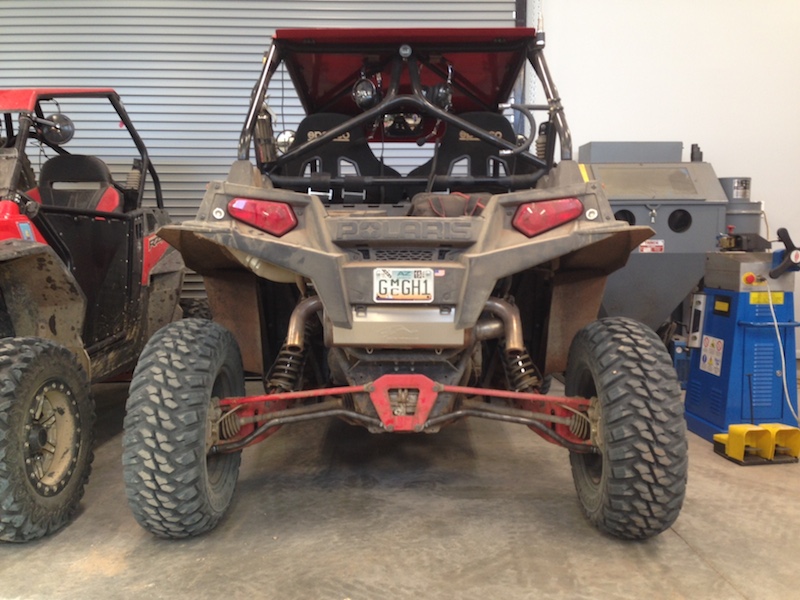
After getting online and doing an image search, pretty much everyone's just doing a bent bar w/o any sort of gusset or plate. Not really sure what they're doing to stop the rotation, but eh, what ever...
I'll go test these. If they bend, I can fix them!
Okay, so I cheated; tried to bend the bent end of one and all it did was pull the bung out and warp the end of the tube. Pitch that one.
Then I though, why not do both ends? Yeah, that's the ticket. Bend, bend, tada! Hmm... lost an inch worth of tubing. Not a big deal - they were designed with the heims turned out two turns, so there was a lot of thread in the bung. To make them fit, I just unthreaded .5" of heim. I'm using 5/8" heims, so they're more than strong enough with a bunch of thread showing. We all get caught up thinking if they're not seated, they'll be weak. Eh, not so much.
Realizing this, I went ahead and cut two tubes 1" longer so the heims fit in all the way like I originally intended.
November 27, 2014
Definitely tested out my links today - they work well.
Took a 70 mile drive out in the dirt. The weather was PERFECT!
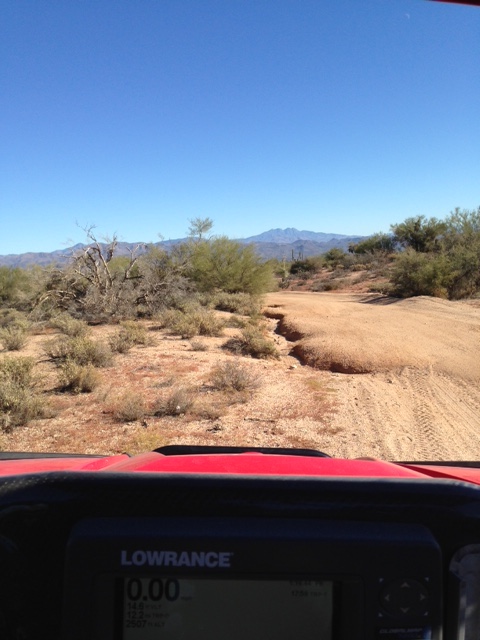
Heard a snap about two hours in and when I got to the asphalt, I heard something dragging. Pulled over and discovered that my sway bar is no more.


Looks like it snapped one of the mounts too.
Time to start looking at aftermarket bars.
December 8, 2014
Woke up to this on Saturday morning:
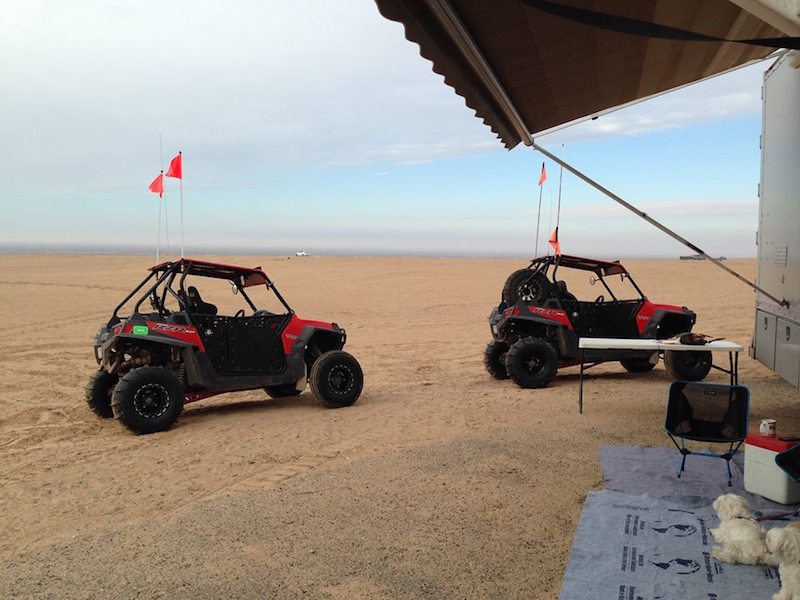
Funny how things work. Got paddles from ATV Racing on Friday afternoon and by 7:00 pm my better half and I were sitting behind the windshield of my van, watching I-10 move along underneath us, headed to the dunes.
I can't believe how much better the XPs work! Yeah, I knew paddles made a difference, but man, WHAT a difference!
There wasn't anyplace that we couldn't go and we pretty much went everywhere.
I had to laugh at us, though - and be really happy both XPs have winches... We needed them a few times. Robyn's brand new to duning (and picking it up amazingly quickly) and the drop offs and razor backs tended to spook her (Hell, they still spook me on occasion and I've been doing this stuff for years) and the sudden brakes at the top lender to uncoiling the lead outta one of the winch and getting hooked up to the other one. She lead me three to two for need of winching. Both times I got stuck in really soft stuff on the top of a ridge. Just bad parking on my part.
I did feel for her yesterday. We got out into the tight crap over by Ogilby (why anyone goes there is a mystery to me - Jay from Desert Dog loves it there and I don't get it - that shit sucks) and she got complacent about the ridges having been rollers. Of course the one 4' drop got her. She came off a bit quickly and did one nasty nose digger. Rattled her pretty badly. Those suck.
The XPs ran flawlessly and other than my broken sway bar not letting me slide like I'm used to, it was an absolutely awesome weekend. - the ride handles well, rolls a bit more, pushes a tad and doesn't want to let me set up the front end into corners like I'm used to. I need to go source a new one now.
WOO HOO!!!
December 9, 2014
Today I got another set of 28-10/14 Mongrels mounted up on a set of OMF NXG 15x7 beadlocks and put them on XP#2.
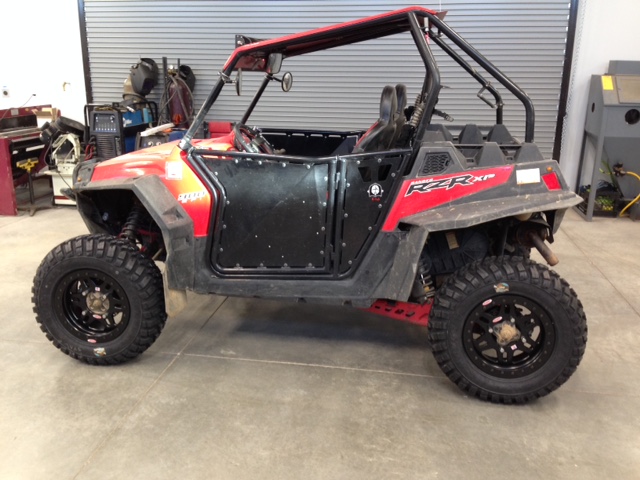
And then I started in on getting the Alba belt cooling system for the 1000 modified and installed in XP#1:
Here's the kit - gauge, blower, adapters, wire stuff:
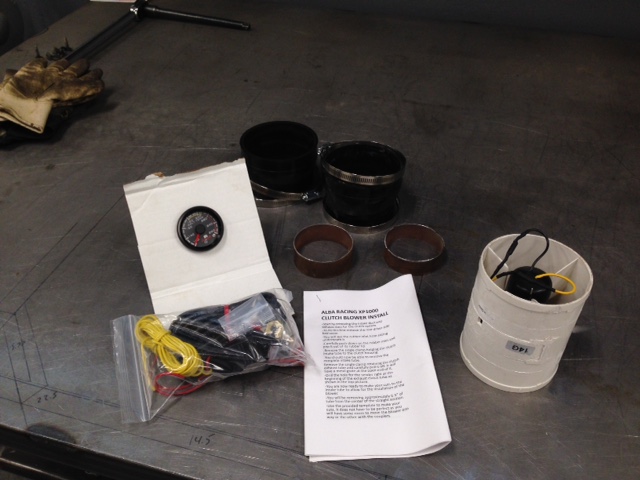
Blower fits here in the intake line for the belt air system:
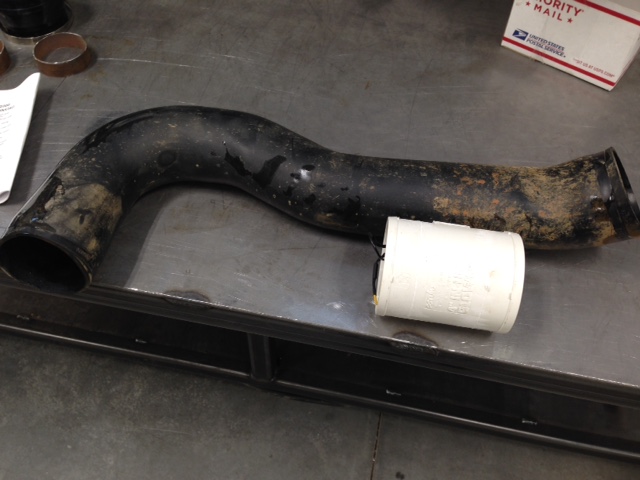
Blower with adapters in place, making measurements for fitment:
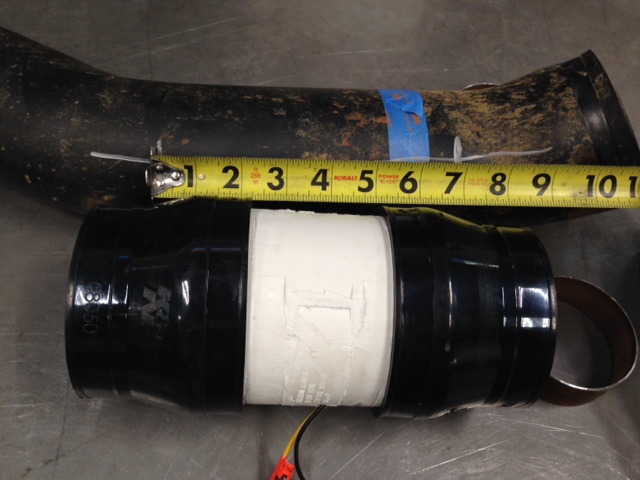
Crush ring installed:
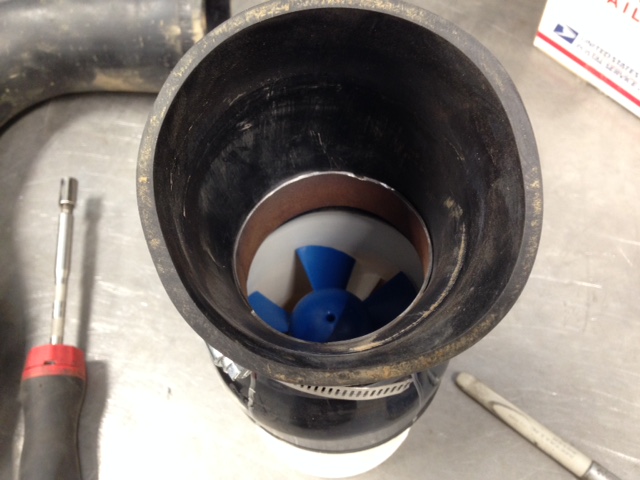
Blower installed:
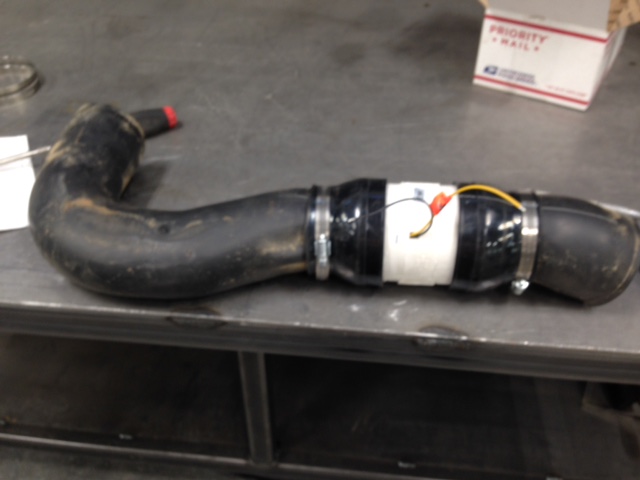
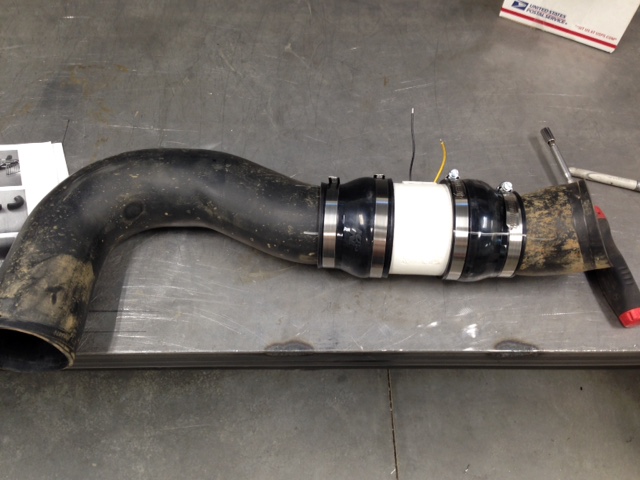
Gauge in the dash:
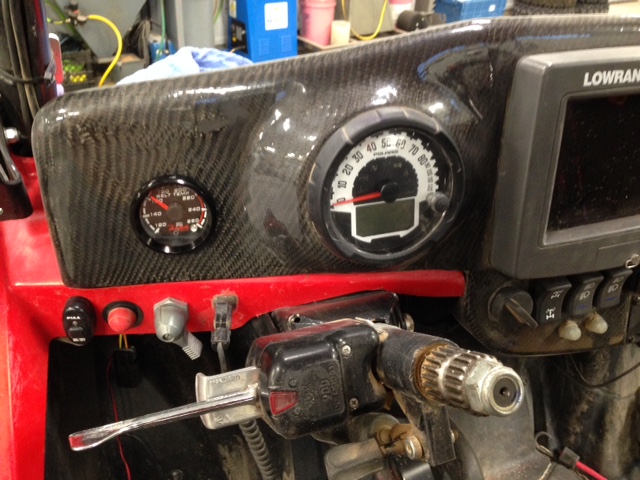
Swaybar found on Craigslist - nice piece!
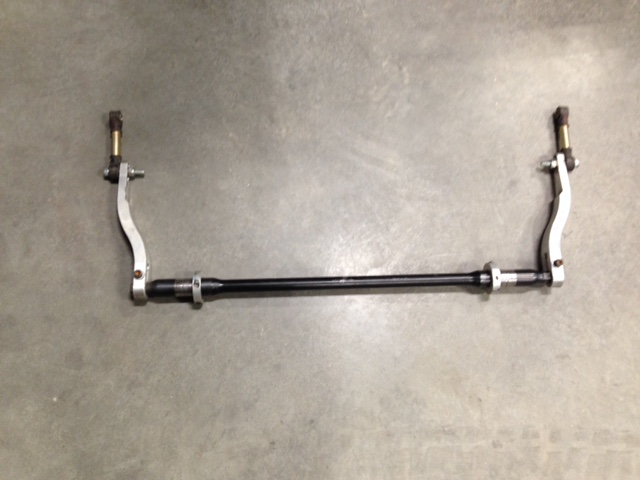
More to come in the next couple of days.
December 12, 2014
Getting everything buttoned back up.
The belt blower system is in and wired. I got my sway bar installed and just need to finish putting in the cabin stuff and add oil - did a service.
Sway bar was interesting to put in. The two stock cast aluminum mounts were broken. One ear on each mount. So instead of purchasing a pair of new, cast, junky pieces, it was time for a little mill time.
I knocked out a pair of billet 6061 aluminum mounts. They'll be a lot stronger and not prone to the cracking issues of cast aluminum.
I went ahead and made them a little larger on the sides and didn't worry about them begin a tad thinner (.020")
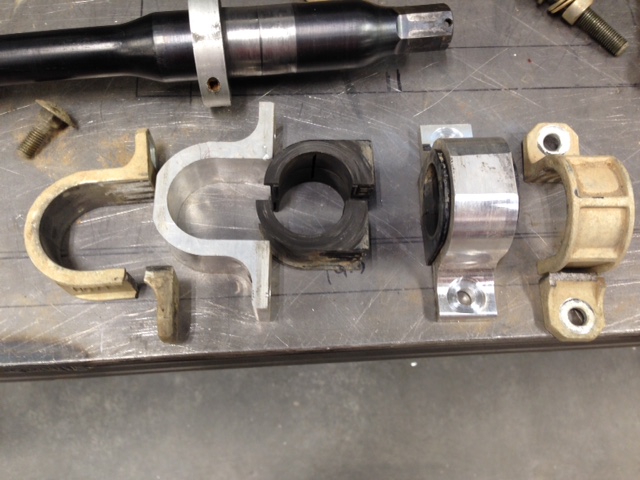
Everything fits perfectly. Being that the weak point on the cast piece is right at the ear/body transition, I went ahead and radiused out the transition with a bit larger than stock change and then cut pockets for the nuts to fit in.
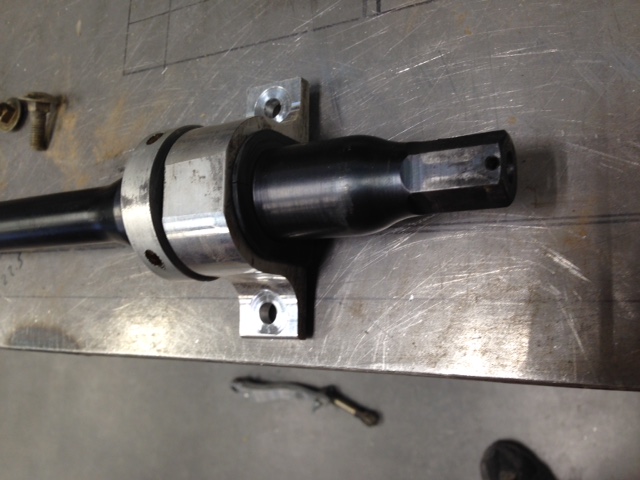
Since I've also read quite a few threads about the mounts for the sway bars being a bit on the weak side (sort of like the entire XP chassis - cheap tubing!), I went ahead and made a couple backing plates that the carriage bolts are pressed into, instead of just being held in place like the stock position.

Everything ended up fitting really well and I was able to put everything from the rear of the B-pillar back, back in place. Still need to put the fire wall and seats and harnesses back in, but that won't take long.
I think I may have found where a lot of the hot air in the cabin is coming from - it's coming from the belt system! The hot air is ducted straight over the top of the header and that flows down into the area behind the fire wall and under the seats.
I may have to look into doing some sort of block off panel in front of the engine/behind the fire wall all the way down to the belly pan. When the belt cooler blower comes on, I get the feeling the heat from under the seat's gonna be even worse than it was. Ducting this out and away from the cabin may be the hot (uh, cold) ticket.
I'll get the rest of the stuff back in place tomorrow and hopefully (weather allowing) get out and test the new sway bar and the belt cooling system.
December 14, 2014
Got my Rath bar installed a couple of nights ago and went testing yesterday.
The bar is set up with the links in the center of the three adjustment holes, so it's in the "medium" position.
It's TOO STIFF. While I like the aspect of a little less body roll, this thing keeps the XP completely flat and the back end is extremely loose. Too loose, as a matter of fact, and I like a slippy rear end. The oversteer on throttle was a bit much.
I'll move the links to the "softest" hole before I go out again to see what that does for the handling, but I'm having a hard time thinking that .5" of change is going to make that much difference on the leverage that the sway bar can apply through the suspension.
When I was running the stock bar, before it broke, the XP had some oversteer and I liked it, as I could control the back end with the throttle and braking. When the bar broke, the XP came out of the corners with a planted and squatted rear end and I lost quite a bit of steering - went to understeer on throttle. I couldn't get it to set up and drift the back end as much as I was used to.
Now, with this new bar, set in "position 2", the oversteer is drastic and the rear end wants to go around me all the time. I'd like to figure out how to make the bar work like a slightly stiffer stock bar, so I still have front end traction, but can still control the rear w/the throttle.
March 5, 2015
I managed to get 174.2 hrs and 3,527 miles out of my first drive belt. When it let go, I was starting to have clutch issues too (the two probably went hand in hand). The clutch would get stuck "in gear". So time to pull stuff apart.
Turns out my primary clutch was done. The rollers were tired, one of the weight arms was horribly worn and hanging up, not letting the clutch fully open.
Secondary was in good shape, but needed new rollers.
A quick call to Alba Racing and I had a new Team primary, a set of adjustable weight arms, rollers for the secondary and some other misc. stuff on the way.
Sorry, no pix - totally forgot.
So today I decide it's time to go test the clutching. Alba gave me a starting point and I wanted to see how it worked. Seems pretty good on a little jaunt around the block. Time to go really test - which means a run in the desert.
11 miles of street and I'm in the dirt, with a bit of a lead foot. It rained out here early this week, so there's traction.
Because of the traction, I'm able to run faster across the tops of the whoops - man that's fun. But it appears that my lower right ball joint doesn't care for this.
I throw it into a little switch back and suddenly it won't switch back. The XP pushed right out of the corner and into the bushes.
I backed it out - needed four wheel drive, as it was pretty deep sand (and I'm unaware of my issue at this moment). Straightened up on the trail, put it in forward, turned off four wheel drive, got on the gas and promptly went right back over the edge of the corner again. WTF? I hop out, take a look and discover that my right lower a-arm isn't playing nicely with the steering knuckle. Damn.

Not fun - I'm looking at at least a mile and a half walk to the road and then I'm gonna have to get someone to come get me and then go get parts and find the XP and fix it and, and, and. Ah, man. This isn't looking good.
Oh, wait, what's that? A tree? Hmmm.... need to figure this out. Put the XP in low 4 wheel drive, slowly worked my way to the tree (about 50' or so) and parked right under the largest branch. Winch out, tree attached, instant front end lift. Dilemma #1 solved.
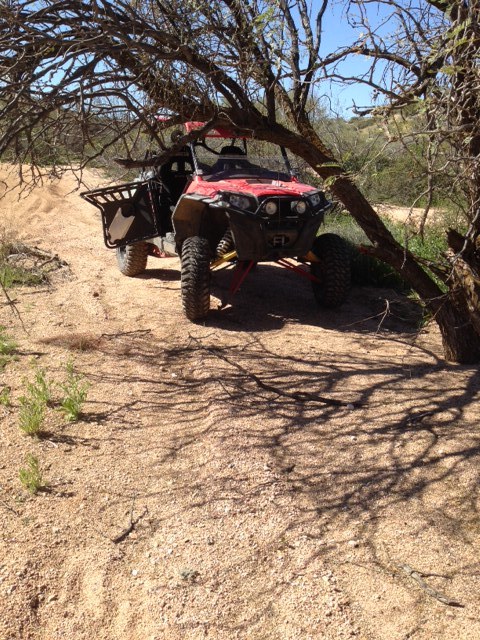
At first I thought it just pulled out, then I noticed the top half sitting in the knuckle.
Broken end still fits right back in it's hole. This is good.
Now, how do I keep this in place? I though about using the winch to pull it up into the suspension, but that would require setting the XP back down, not guaranteeing that the broken ball joint end would stay in it's home.
I need a strap... I need a strap... I should always carry a strap... (realization)
So I sat there for a minute trying to figure out what to do. I need to keep the lower arm strapped to the upper one. That should work, but how do I do this?
Then it strikes me - I have five point harnesses. One of the lap belts has a clip in on one end and is the clip in end on the buckle side.
I'm able to use the belt to strap the two arms together!

I took it easy and drove out. Never had a hint of an issue. It only ended up being about a mile of dirt, so that was a bonus.
I got back on Bartlett Lake Road and started driving - no issues what so ever! WOO HOO!
As I turned off of Cave Creek Road, I had a beautiful dark blue Ferrari, with brand new paper plates, turn in front of me. I got to follow it for the next 6 miles.
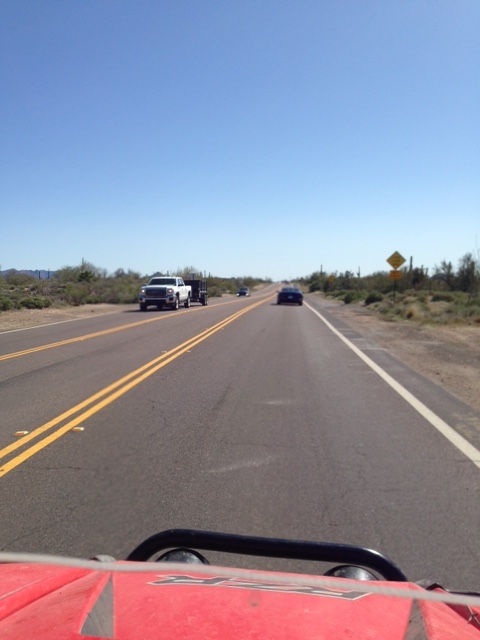
So, this worked out to be just about a perfect day!
I got to go out into 73 degree, sunny, not a cloud in the sky weather, play in the dirt, break down, trail fix it, follow eye candy and make it home in about an hour.
All this wearing shorts and short sleeves - while the white death grips the the state that I spent the last 25 years in. Yeah, I like it here!!!
March 6, 2015
New lower ball joints (had a spare set of EPI in stock) and my over sized front rotors got installed last night. I'd purchased the rotors for the Raptor project and since I've switched to the 1000 hubs, I ended up with set that wasn't gonna get used. I figured since I had the front end apart and needed new brake pads (which came with the rotors), I may as well install them.
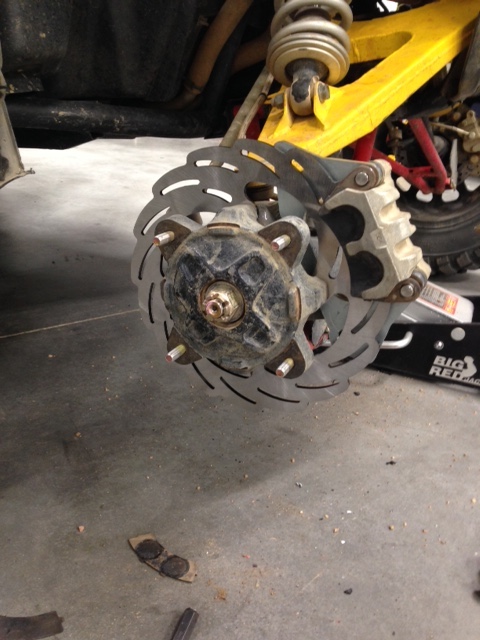
I do believe a test is in order a little later today.
Here's the stock culprit for my little fun dilemma of yesterday:
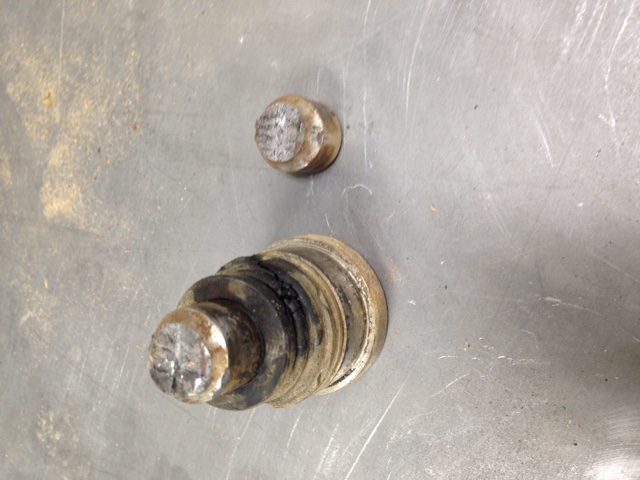
Return Home
5/20/2015