

Home of K-fab

|
|
|
|
2010
Hopefully the first year of
a running, working Deztaz
4/25/2010 - A little preface to this page:
It's been a while since I've updated my web pages.
The 10Dez has gone through quite a few changes, modifications and issues. I've been very lax about keeping my web pages updated, as most of the info I've posted has ended up in a thread on Minibuggy.net.
The last page of the The 10Dez's updates has become very long. Many pictures, loads of information, builds, changes, additions, subtractions, hours of sweat and swearing. Since that page is pretty much full, it's time to start a new page/chapter in the 10Dez's life. This is that new page.
This page starts at the beginning of the year 2010. The 10Dez was finally "finished" and ready to get dirty. Instead of being half way intelligent and taking the car out west and testing it I decided that it was time to go race it. Hey, why not? The very first desert race that I ever went to in person was also the very first desert race that I entered. It seems to be my style. Finish (or so I think) a car and go race!
MDR was doing an end of the year race and I figured that was a perfect reason to a) get out of Hell (also known as Ohio in the winter time) and 2) to test/race the newly finished 10Dez in the 3000 class (cars powered by Ecotec engines). So off I headed out to Arizona on December 26th, and then on out to Plaster City where the race was being held on the 31st. My good friend James (who used to work for ATV Racing and built the chassis of the car) was joining me for the race and was planning on being the navigator for me for the race. We were meeting Brian Knight and Ronnie from Revolution Racing Shocks out at Plaster City. Brian's been a desert rat for years and knows what's going on in the Desert Racing world and Ronnie's been racing for years and developing shocks just as long. They'd both offered to help us out for the race.
Fortunately for me, I never take a trip, I always leave my driveway on another adventure. When one takes a trip, that means that there's planning and expectations of some sort or another. When I leave on an adventure I keep an open mind as to what may or may not happen. I take what ever happens as just that. As a very good friend of mine says "I'd much rather be pleasantly surprised by having things go well than to be disappointed by not having things go as planned." I think it's a pretty good way to look at things.
So here it goes. The majority of the babble below has been cut & pasted from the thread on Minibuggy.net - as I have been doing on and off with the build of this car. I've also added some extra info so that what's here makes sense. Anyone that's familiar with forums knows that the banter back and forth in a thread can set the direction/tone of the subject. Most of the names through out this page are the screen names of people off of Minibuggy.net
1/1/2010
Okay, it's late, I'm worn out and sitting in my truck, getting ready for horizontal time...
Short & sweet:
The drive out was killer. Fastest avg speed and shortest driving time I've ever had. No traffic, very, very little construction and just a bit of ice around Tulsa and OKC. I was able to set the cruise just a mph or two above each speed limit and stay there all day long.
Brian Knight (bdkw1 on Minibuggy.net) is one killer dude! THANK YOU FOR THE HELP!!! and thanks for hanging out w/us. Sorry we didn't make it on over to Ocotillo - I'm junk today and bummed.
Race was a bust.
Got the shocks dialed in fairly well - need new front spring rates. Ronnie over at Revolution Racing Shocks is great. Really nice to work with and puts out a lot of great, first hand service.
As we ran the car on Wed, testing the shocks, the engine started falling off. Funky, rich smelling (maybe?), wouldn't run over 4.5K.
Thought maybe it was computer related. Switched them out (I was smart enough to actually bring the second unit!), no change at all.
Tried removing a few sensors, hoping it would go into limp mode and/or reset itself if it was computer - nah, not a thing.
Decided it's probably fuel related. It's either the pump going bad or the regulator screwing up.
Screwed around this morning w/the car, still nothing.
I decided not to even go to the starting line. The car was not going to finish the race, nor was it able to go over 45 or so. We were just going to be in the way.
There were 3 3000 class cars there. Two started, one didn't (me) and none finished.
The race was a blast to watch. James, Brian and I rode our bikes all over the desert looking at different spots. We saw a few killer things: One endo, a roll, cars that shouldn't have been going fast hauling ass, cars that should have hauled ass, going slow. Fun time.
I think the endo was probably one of the more spectacular things. There was a guy out there with a nice pre-runner that had been jumping a section of the track. We'd seen him hitting it on and off over the day. He had it down pretty well:
I'd forgotten about him running around, as he'd been gone for a little while.
Then he came back and pulled off this little number:
Pretty spectacular, eh?
We thought it was a 5 car, as there was a pack of them battling around the time of the endo.
It was probably one of those "Hey, let's get the camera" moments.
James saw the crash and thought it was a racer, but now we know.
That stuff will get you after while. I'm guessing the face of the jump was rutted out after a bunch of race cars had gone by. He came back (with camera?) after not being there for an hour or so and things had changed, much to his surprise.
I'm bummed about my car not working, but hey, (sh)it happens, so what can ya do?
I'll get the problem figured out and come back out here and race again.
It's always an adventure for me and that's what it's really all about.
Oh - I did accomplish my one and only goal for the race: The car drove back into the truck under it's own power.
1/4/10
Took the car to ATV Racing this morning and started following Neal's troubleshooting:
Fuel filter was clean. Just a very few small particles. They washed right out.
Put a pressure gauge on the line into the fuel rail. The pressure sat nicely at 48 psi. Rev the engine and it would hit 58. All good there. I ran the car up and down the street and the pressure reacted accordingly. Neil hopped in and had the same results. The engine would rev to just under 5K and was progressively working it's way down to 4500 or so.
I switched the input and the output on the fuel rail. Pressure went right to 100 and the car wouldn't start. So that showed that it was plumbed correctly from the start. I switched lines back and it fired right up.
One guy that's a car mechanic showed up at the shop asked a few questions, mumbled a bit, said it was either intake or exhaust.
Neal agreed. We discussed putting the Tazcar K&N intake setup on as a check and removing the baffles from the Super-Trapp to get the system as close to a regular Tazcar as possible. Neil figured that since the program he had Redline do was with a different intake and exhaust, that may be part of the issue.
Intake was ruled out by the mechanic - said that the computer should compensate and it shouldn't be an issue.
The exhaust, on the other hand, wasn't part of the computer.
I pulled the discs off the exhaust and out came a marshmallow shaped piece of stuff. It looks like white cotton. It ended up being packing from the muffler, of all things.

And there you have it. This crap in the exhaust system DNS'd me for the race. - Just too simple and easy to fix.
I got in the car and was just amazed. I've NEVER felt the car pull like this.
I took the car to the desert for a little testing.
The thing works great. The clutching is still off and I'm going to work on that tomorrow.
I was able to get 76 mph out of the car on a long run. I'm guessing about 3 to 3.5 miles of run. It gets to 45 - 50 quite well, but then it's just let it run. I'd like to find a very long straight, flat road to see just how fast it will go as it sits. When we hit 92 w/the VTEC, it was a VERY long road.
I came back to the truck and checked the clutches w/a infrared heat gun. Front clutch 212, rear 118. My primary is slipping.
We're sort of scratching our heads now.
This tranny is an 8:1. I would swear that the tranny that I used w/the VTEC was 8:1 also, but now it has me wondering if it was a 9:1. Both engines we/are capable of 6200 rpm. The VTEC was supposed to hit closer to 7500. We got 92 miles per hour out of the VTEC at 6K - 6.2K. This engine (eco) is spinning 5.8 - 6K and climbing, but I ran out of road.
I'm going to have to pull the tranny out and check the gearing in both boxes.
Tomorrow I'm going to mess w/the clutches. I want to find where my current clutch is set (hoping on the 'lightest' setting with the helix) and then set my second clutch, which has a heavier spring, up on the more radical helix. Switch clutches, hoping the rear clutch doesn't upshift as quickly, and see what the change ends up being.
1/11/2010
I'm back in Hell (Ohio)
Okay, here's the testing info that I came up with:
I am running a Comet 108 four weight primary clutch. I can't recall what it has for a spring - black/maybe white?.
It has ATV's custom weight arms in it.
At the moment, I have two Team drivens. One has a black/orange spring (180-280 lb) and the other has a black/lime spring (180-300 lb).
I have two helixes:
One is a 54-44-F / 54-42-F
The other is a 65-52-27 / 65-50-27
I'm using an Ultimax 3 138-5232 belt - the longest I could find.
The initial setup was w/the 54-44-F and the black/orange spring. This is what we tried out in Plaster City, but the engine was already suffering from terminal exhaust plugging.
We got that cleared out and I went out testing:
Test run #1: Relatively slow acceleration, 76 mph top end on a VERY long run. 212F on the primary clutch, 118F on the driven. Engine RPM was (questionable) 5800-6K. Not truly sure, as I was watching the road and trying to glance at the GPS every now and then more than the gauges. Good hard packed surface.
Primary clutch was 218F, secondary was 115F.
We figured the high temp on the primary was due to belt slippage, so Neal and I decided that we should try a stiffer rear spring, to combat up shift, keeping the tension on the belt in the primary higher. This ended up being a mistake because of my center to center distance being incorrect.
The following day, James and I went out testing, getting test runs #2 & 3 in:
Second run was w/the 54-42-F and the black/lime spring.
The car could only pull 60 mph. Engine would hit red line off the line and then drop back to about 5500 rpm during the run, which is desired, but all we could get out of the car was 60. It was fairly deep sand, though. We were running in the Sycamore Wash.
Temps were 220F and 150F
The engine was also starting to pack up again about the time we got back to the pits. It was getting dark, so we figured we'd change clutches first and go do another run. The sun was going down, and we didn't have time to unpack the muffler. In retrospect, I should have removed the Super-Trapp baffles right from the start of testing.
Third run was using the 65-52-27 helix w/the black/orange spring.
The car got to 57 mph quite quickly, but the engine RPM would only hit 5K because of the muffler packing issue. This setup FELT the best, but top end is a mystery. I want to explore this setup once I get the center to center distance set correctly and rid the system of this packing problem.
The temps were 215F on the primary and 115F on the secondary.
Once we started looking at things, it appears that the front clutch is doing it's hardest to fully upshift, but it can't fully close, as the belt's too short, so it just builds up heat. I still have about .25" of tell-tale black mark on the face of the clutch at the edges.
A note on temps - I checked the entire face of both clutches and the temps listed are the peak temps. They actually varied from about 130F on up to the above 210F on the primary and the secondary read anywhere between 95F and what ever was listed as the hottest.
My understanding (Neal and I discussed this) is that the larger the helix angle number, the less pressure you get on the belt. So the 54-44-F will up shift slower than the 52-42-F. - side note here: I stated this backwards. The smaller number will upshift more slowly than the higher helix number.
We were trying to get it to up shift more slowly, but with the belt being too short, it ends up being a moot point at the moment. I have to cut the tranny mounts out and redo them before I can get anything else done.
Part of the reason that we didn't get a chance to do more testing was that my power steering pump, while a wonderfully working unit, blew out the rear seal and pissed everywhere. I ended up waiting on a seal until almost 3:00.
By the time James and I got out to Sycamore creek, it was 4:30 and the sun was down by 5:30. We lost a huge amount of valuable test time because of it too. It was the last testing I'll get done for a little while.
I was ready to head back to Ohio after our day of testing - I'd hit my 10 day limit a couple days prior to me leaving. (my usual "I'm ready to head home" time).
Why the Hell I wanted to come back here, where it's frozen, snowy and NOT 73F is beyond me - guess I was just done w/my little jaunt out west.
I really have come to hate this part of the country when it's not warm and dry. God I hate winter. 4.5 more years of this area and then I plan on NEVER setting foot east of the Mississippi River.
I'm cold, have to cut the tranny out and redo it and pissed off about it all.
Not a good combination.
1/12/2010
Got the car unloaded today and started my list of things to do to it.
Overall, for a first run out, I have no complaints. I'm just bitchy at the moment because it's COLD. Hell, I'm wearing shoes! I usually wear flip flops year 'round except at the shop and nice dinner places.
I knew there would be teething issues.
One's quite stupid to think that a fresh build's going to be perfect right off the bat. That's what testing's all about.
Here's a list of things that are going to happen before the 10Dez hits the dirt again:
1) BIG brakes up front. The little rotors and twin piston calipers, to put it lightly, SUCK. I have room for larger stuff, so I will use it.
2) Limit straps on the front suspension. Ronnie said that the Revolution shocks are NOT to be used for top out control.
3) It needs 250 lb, 14" main springs on the front end. At present, the 12" 175/225 setup is too soft. James and bdkw had to crank in a bunch of preload to combat the issue.
4) Move the GPS up. It would appear that it eats knees, according to James and Brian.
5) See if I can move the co-dog's seat down in it's mounts a bit. bdkw was bouncing his head off the roof during the first couple of runs.
6) Weld the passenger's step back onto the side of the car - and remember to weld both the top AND bottom this time... It didn't work as a lift point.
7) Fix the leaking seal on the power steering pump. I'll make a block off plate that's o-ringed.
8) Extend the exhaust's outlet about 8" and get it pointing more out of the back of the chassis. I took a temp of the tubes around it and came up with 160F.
9) Get the exhaust system ceramic coated. There's too much heat back there!
10) Figure out this packing getting blown out and captured by the aptly named Super Trapp issue.
11) Make a real number plate for the back. The present reflective postal box numbers are not very trick - especially on the plastic board that's zip tied on. It was late, we needed something quick and Homo Deepoot had what we needed.
12) Get the front lights mounted and figure out why my light bar's not working. WTF now? It worked just fine in the shop.
13) Wait for warmer weather. Did I mention that I HATE the cold???
Clutches are 14.625" apart. That's .125" farther apart than was suggested. I still need to contact Dayco and see what they say about it.
I don't have a drag issue when the car's in neutral. It goes right in w/o any problems. This (generally) means the belt's not too short for the given center to center distance.
Clutching is going to be a challenge. Gotta figure out just what's going on back there. I probably need to figure out how to brace the input shaft of the tranny a bit better too. Brian said it was flexing quite a bit.
I'm either going to conquer this car and make it work or it's going to kill me.
I plan on winning.
Some extra thoughts:
Handling is great. It's getting better with each little change.Over wash board and/or whoops in corners the car wants to crab just a tad, but nothing that was uncontrollable or out of hand. But there's room for improvement and I think I can get it set up so that it sticks to the ground a bit better in these conditions.
Power steering is wonderful! One handed driving is a breeze - but I keep both on the wheel. There's good feedback and I have a good feel for what's going on, but that wicked, hand breaking whip is GONE! Yippee!
I probably need to play w/tire pressure a bit too.
Rear feels a bit soft. When James and I were doing the testing, the back end feels squatted and low. Not sure what this is all about yet. It makes me wonder what it will do w/the stiffer front end. Actually that may change the ride attitude and make this feeling change. Not sure.
I have quite a bit of body roll. I may look into an anti-roll bar in the back. Not sure on this one yet. bdkw and I discussed it a little bit. I need to go pick his brain a bit more on this subject.
I was impressed with the shock tuning - THANK YOU RONNIE!! He was able to run along side the road, watching the car (slow down...) and adjust accordingly. The first time he changed the settings in back, the car got very loose and skittish. I was surprised that it made that much of a difference. There's a lot of potential hiding in the suspension. I just need to massage it out.
Ronnie is great. He came out to us at the race track and dived right in. The customer service he offers is by far some of the best I've ever experienced. Great guy to boot.
I'll say it once again: Dirt people are the best around! Never have I met a better group, in general, as the Dirt Nation and I'm damned proud to be a part of it.
1/18/2010
Front springs are installed. The nose of the car sits up higher and I only have about 1/4" of preload in it. I might make spacers that slip between the collar between the springs and the top shock collar. These allow you to set the cross over height, controlling where the main spring takes over.
Brian was talking about getting the front end to stay plush over the little stuff by sticking w/the 175# tender, but then making 250# the 14" main kick in a bit earlier than the previous 225# 12" main. The cross over spacers would do this quite easily. It gives you better chassis control.
Started working on remounting the GPS - looks like I'll have to fabricate tabs. I thought I had AA tabs floating around, but it would appear that it's time to start making an order list.
It's a good thing that I'm changing out the front calipers, rotors and caliper mounts. Both lower a-arms had spots in them where the brake line fittings had hit them. Not enough to bend anything, just enough to mark the paint. Still, that's not good.
I have to find larger rotors w/the same bolt mounting pattern, Presently I have Gear One front hubs. I didn't really try to get any measurements tonight - too late to call anyone out west.
Tatum makes some nice 11" rotors that, if will fit, I'll switch out to and then go w/the 4 piston calipers. I actually would like to find a 12" rotor, as I have room. A 12.75" vented that would bolt up to the Gear One hubs would be perfect - which means it doesn't exist.
I have four piston calipers that I can knock down to fit a 1/4" rotor, but if I can find a 3/4" wide vented one, that's even better. Less work too.
I talked to the people that make the power steering pump today. The guy said that the seal that blew shouldn't have (duh). Said that the seal is actually a dust seal over another seal and that side of the pump is suction, not pressure.
He was totally baffled as to how the seal was pushed out and even more surprised when I told him it was leaking. - so what the heck's being sealed???
I'm sending him the pump back tomorrow - he wanted to see it.
The Super-Trapp had trapped away. No marshmallow hiding in the end this time, but the spaces between the plates were probably 80% blocked up and there was a marshmallow in process in the bottom of the baffles. Need to call Magna Flow and see if it's a common thing for them to blow this much packing out.
I figured that I'd go ahead and tack the extension in before I pulled the exhaust and send it to Millbilly. All I needed was a little piece of 2.25" exhaust tubing. I have 2.5, 2.0, 1.75, 1.5 but not a single piece of 2.25". (and does this surprise any of us with this build anymore? I think not!)
I now have a piece w/a 45 degree bend on the way. The internet sure makes getting parts easier now.
1/31/2010
Got most of my stuff done last week. By Wednesday, I was done being able to work on the car until parts and supplies arrived. Some stuff is still on the way, some needs to be installed.
Here's a run down of what's happened thus far:
1) BIG brakes up front. The little rotors and twin piston calipers, to put it lightly, SUCK. I have room for larger stuff, so I will use it.
RickS is suppling me w/rotors. I'm blown away by the price and how quickly he's been able to move along on this. I'll wait for them to show up and then rework my four piston calipers (they need to be cut down so they fit a 1/4" rotor) and make caliper mounts.
2) Limit straps on the front suspension. Ronnie said that the Revolution shocks are NOT to be used for top out control.
Installed! I used the same setup that's on the back of the car, so it's one piece fits all four corners.
3) It needs 250 lb, 14" main springs on the front end. At present, the 12" 175/225 setup is too soft. James and bdkw had to crank in a bunch of preload to combat the issue.
Done! Front end sits up better now. No idea of how much it's going to help. There's no place to go test and the weather here sucks.
4) Move the GPS up. It would appear that it eats knees, according to James and bdkw.
Done! GPS is up about 3" and forward about the same. I can actually reach it from my seat now.
5) See if I can move the co-dog's seat down in it's mounts a bit. bdkw was bouncing his head off the roof during the first couple of runs.
Still need to get this done. My seat mounts may require a little reworking to make this happen.
6) Weld the passenger's step back onto the side of the car - and remember to weld both the top AND bottom this time... It didn't work as a lift point.
Done and welded all the way around.
7)Fix the leaking seal on the power steering pump. I'll make a block off plate that's o-ringed.
Sent the pump back to KSE. They looked it over very carefully, replaced the seals, ran it and said the pump's just fine. It would appear that the non-vented res is the culprit. I have the vent line stuff sitting on my desk - just need to weld it in and run a line.
8)Extend the exhaust's outlet about 8" and get it pointing more out of the back of the chassis. I took a temp of the tubes around it and came up with 160F.
Done! It now exits down and away from any part of the car.
9) Get the exhaust system ceramic coated. There's too much heat back there!
The whole exhaust system's on its way to Millbilly in Washington. He's going to do a full heat barrier ceramic coating and ad a little color to the two aluminum heat shields for me. Hopefully I'll see the system early next week. Thank you Mill!
10) Figure out this packing getting blown out and captured by the aptly named Super Trapp issue.
Still thinking about this one. I may put washers between each of the discs to space them out a little more.
11) Make a real number plate for the back. The present reflective postal box numbers are not very trick - especially on the plastic board that's zip tied on. It was late, we needed something quick and Homo Deepoot had what we needed.
Done! That was easy. It's a nice aluminum piece covered in white die-cut covering (the stuff used to make stickers)
12) Get the front lights mounted and figure out why my light bar's not working. WTF now? It worked just fine in the shop.
Light bar - just didn't get the plug fully seated from what I can figure out. The lower, front left light is in. McKenzies sold me a used one - it's being replaced with a new one this week.
13) Wait for warmer weather. Did I mention that I HATE the cold???
If I had my way, it would be 80+ now, but alas, it's winter in Ohio, so I'm stuck in this crap for a while.
I've not gotten around to screwing with the clutches yet. I'll wait for the exhaust system to come back so I can work on a quiet car.
There are still a couple small things I still need to add - fuel pressure gauge, a quick fitting setup in my return line so I can fuel the car from my line in my truck (long story, let's just say that w/o a quick fill jug, it's a total pain in the butt to fill this machine up with fuel).
The list is shorter each day.
2/8/2010
I just opened a box from RickS and it contains two sets of absolutely beautiful 11.5" diameter rotors.
THANK YOU RICK!!
The service, quality and communication from Rick is phenomenal. If anyone ever needs one of he services that he offers, you'll not go wrong.
I am totally impressed with these things.
2/10/2010
I was able to get back to work on the car today. I got the rotors from RickS. on Monday, but because of weather here (8" of snow), I didn't make it to the shop yesterday. Today was better and I was able to make it there and get some work done.
Limit straps and lights in place:
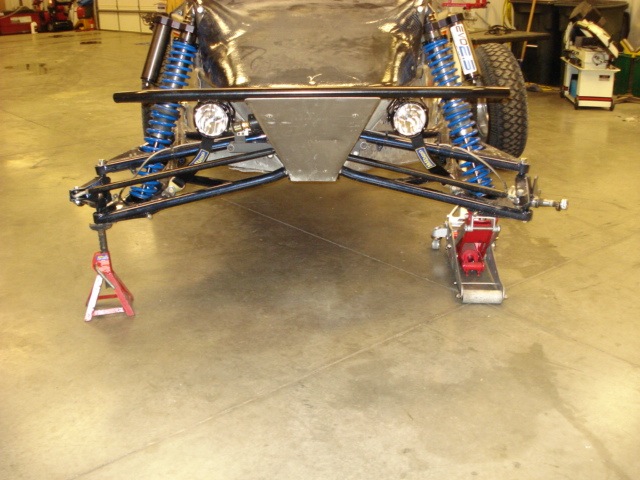


I'd already pulled the hubs off the spindles on Monday and broken two allen wrenches trying to get the counter sunk socket screws out of the hubs. To get the counter sunk socket head cap screws out of the hubs I stuck them in the oven at 350 for about 30 minutes. The bolts (which had been loc-tited in) came out without much fuss.

Here you can see the difference in the original 10" diameter rotor and the new 11.5" rotor:

Right side with the original two piston caliper stuck on the rotor:

Left side with the four piston caliper stuck on it:

Here's the fun stuff. Two piston calipers were set up for a .25" thick disc:

The four piston calipers that I have are set up for .75" wide rotors:

So it's time to machine .500" off the towers on one half of the caliper:

Of course the side I have to machine has the o-ring sealing recess on it. I can't just whip off .500" and be done:

First caliper done being machined. You can see the difference between the machined and non-machined half:

Here's the difference between the two calipers after taking out the excess space:

More issues: I already had some clearance problems with the 2 piston calipers. They just sneaked in between the upper and lower arms, but these don't fit. I'm still working on locating them so that I can avoid as much clearance issue as possible:


I'll have to cut part of the original caliper mount off, make a new end plate that locates the new calipers in the correct spot and then weld the plates onto the existing mount. I'm never surprised when there's a clearance issue on this thing anymore - heck I darn near expect it!
Just for grins, here's a pic of full compression on the right side of the car, full droop on the other:

Hopefully I'll get the mounts done tomorrow and welded in place.
I'm waiting on my exhaust system to come back from Millbilly, still need to weld in my power steering rez vent line and then start looking at the clutches.
Once again, I'm getting close to the end.
2/11/2010
Got the ears on the two piston caliper mount cut off and started working on the adapter.

I started out w/a sheet of thin aluminum and made a mount that fits to the four piston caliper. From there I got the caliper installed where it's "supposed to be" (what ever that is.....) and then started making the sheet fit over the caliper mount.
I then took the one measurement that I knew was correct - the distance between the two mounting holes on the caliper - and started drawing. After a couple hours work, I had drawn up a new mount. A lot of that was taking the actual cut up sheet, taping it to my computer screen and moving things around and zooming in/out until the two holes on the drawing fit perfectly in the plate.
Once I had that done, I was able to draw lines right against the plate, on the screen and make the drawing fit the rough location plate.
Take the drawing, move the points to the Proto-Trak and start programming.
I was quite impressed when, with just a little bit of file work, the newly cut out adapter slid right over the end of the mount on the spindle AND the brake pads aligned up exactly like I wanted them to with the edge of the rotor.
The next aspect that I have to deal with is that the original caliper mount is .250" thick plate. The new calipers need to be offset .100" from the face of the original plate. There's a difference between the center of the two calipers.
To deal with this I wanted to make the new adapter plates out of .375" thick plate and face off a bit - or overlap the edges so that I get a better weld. Of course there's no .375" plate to be found. Lots of .250" and one good piece of .500". So .500" it is!
I'll take the .500" plate down to around .400" or so, so that I have a good edge to weld on, and don't have any clearance issues.
Hopefully I'll get a chance to get the adapters welded in place tomorrow. If not, it won't be until Tuesday.
Things are progressing, though. Whew.


2/11/2010
Here are pix of the stuff I mentioned in the post with all the pix above.
This is the aluminum plate that I used to figure it all out:

The caliper being located by the plate:


The piece on the computer screen so I could trace it:

The finished drawing:

The sheet piece in place:

The finished steel plate:

I got the right side piece (the side the pix are all of) welded in place this afternoon.
The spacing between the back of the adapter and the rotor ended up being exactly .125". It made aligning the plate really easy - I just stuck a parallel between the two and clamped it down. I was then able to weld around it in sections to keep it from pulling and the whole thing ended up being perfectly aligned.
And for some reason, the picture I took of the finished spindle is missing. I want my camera back!
I'll get the left side done on Tuesday.
2/24/2010
An update! Front brakes are installed!
I got the exhaust back from Millbilly this week. Very nice job indeed! If anyone needs anything powder coated or ceramic coated, give him a shout. (If I'm hanging you out to dry here Mill, let me know and I'll retract this statement!
I started addressing my clutch issues. I started checking out how far the belt's moving on the clutches. Oddly enough, it would appear that the secondary clutch isn't getting fully opened up. Not sure why, just saw this this afternoon.
One of the things I did wrong is that my clutch center to center distance is supposed to be 14.5". Mine ended up being 14.625". 1/8" too long. Can it make THAT much difference??? Time will tell.
Anyhow, the first thing I wanted to get rid of was the RPM input shaft flex issue. bdkw1 said that it was moving quite a bit when I'd put the car under load.The original setup I had ran the support arm to a 1" diameter tube that came was attached to the Ecotec. The tube paralleled the input shaft. There was no real bridging or triangulation. Everything was able to flex.
Not anymore.
The pull of the engine is now put directly into the rear of the frame. The support arm now goes backwards to the frame.
This causes a problem, though. It makes belt changing impossible unless the support is easily removed. So, I cheated and borrowed the solution that Jay uses on the Coyote - the support is pinned in place. A quick pull of the pin, the arm rotates out of the way and belt access is instant and easy. It probably adds 5 to 10 seconds in the belt change time.
I still need to get the quick pin, so there's a bolt in place of it at present - for setting it up and getting everything in place. I'll order the quick pin here soon - or make one.
Here's the plate that will get welded to the frame. The little piece above it makes the pocket that the clutch support plate fits into. I want this setup in double shear.
Here are the two pieces placed as they'll be welded. The support arm fits into the slot.

The clutch support arm and the new attachment plate being test fit:

The support installed:

How the support arm fits into the pocket on the new brace:

Pull the pin, the support plate drops out of the way and you can change the belt pronto!

Here's the exhaust all ceramic coated. Great job by Millbilly!

The exhaust system installed:


Now that it's ceramic coated and the exhaust outlet's moved, hopefully the frame temps will drop.
I need to get the Super-Trapp spark arrestor installed tomorrow. I think to combat (or at least attempt to) the issue I had with the muffler packing packing up in the plates, I'm going to throw a couple of washers between each of the plates, spacing them out so the packing (hopefully) heads on out of the end of the pipe. I figure it's a good first start.
2/25/2010
I started messing around w/the clutching today. First thing I needed to find out was if the belt was moving completely in both clutches. I was worried that the extra c-to-c distance might cause the belt to bottom out in the secondary clutch before the primary was fully upshifted.
Not the case. I have full belt travel in both clutches. That's a good sign. I soon discover this is NOT the case... Damn.
Next I really need to start doing test runs - yea, right. Like that's going to happen in the snow covered Hell I live in. I hope that I can head west in the next 6 weeks/2 months and do some more testing.
One of the issues I ran into while trying to test last time was the muffler packing problem. The last two test runs James and I did were with a constantly worsening power plant. The engine was getting choked down and not able to pull full revs. Without the engine being able to run in it's sweet spot, there's really no reason to try to tune the clutches. It's a loosing battle.
This time I'll not run the baffles in the exhaust when I get out and start testing. That will eliminate any issues that the engine may have.
I still need to re-bleed the front brakes and play with the bias on the pedal. It was set up with major front bias with the smaller calipers. Now it's mushy feeling, but not a lot of pressure's getting up front. A little attention to detail work should fix that.
There are a couple little things that still need attention - took the clutch/belt guard to the powder coater, will get it back tomorrow. Need to address the jack mount (maybe... - junk jack, may not be worth working with.) Need to mess w/the radio and get it set up correctly.
Once again, the car's almost "done" - at least as far as I can get with it for the time being.
Will it ever end?
4/7/2010
I finally made it out to Phoenix. This trip was just for testing (and to get out of Hell, er, Ohio - gawd I've come to hate this place). No race, no pressure, just testing. I got in a lot of it too.
One thing that I discovered was that the initial testing, while providing some good info, was pretty much useless. The engine not running up to snuff was a major factor in this. The drive system in the 10Dez is a CVT setup (constantly variable transmission). It's what's used in snowmobiles. It's designed to let the engine sit in it's power band and then adjust the drive train to the correct "gearing" to match the engine's ideal power range. The CVT system uses two clutches: A primary clutch - the one on the engine, and a secondary clutch - the one on the transmission. The primary clutch, more or less, adjusts the engine's peak rpm ability via a set of weight arms and a spring and the secondary clutch adjusts just how the "shifting" happens via a spring and helix.
The primary clutch is pretty much set. I might remove a little weight out of the arms later on down the line for some fine tuning, but in general it's pretty much where it needs to be. The secondary clutch, on the other hand, needed some attention. In all the years that I've been playing with the original Deztaz and now the 10Dez, I've never actually sat down and done any true clutch testing. I've read a lot of info about clutch work, I've discussed tuning and such with Neal and Jay, but until I spent three days out in the desert actually getting my hands dirty, checking out how the different springs and helixes worked, I was still a bit in the dark about it all. I now know a huge amount more of just how it works and what happens when you start messing with the different setups. It was an excellent experience for me.
Somewhere north of Phoenix...
(I need to fix the camera's twist, eh?)
I don't know why the audio is screwed up - not in time w/the video.
Clutch testing.
Three different helix sets were tested today. I didn't get to the fourth because the stupid power steering pump blew the seal again!
Pump was sent back, rebuilt and tested by the guys that make it. Said that the only way it can blow a seal is to pressurize the res. The seal is actually on the suction side of the pump. So I vent the res to solve the problem. Guess that's not it.
Will make a new block off plate to seal the pump (again) and go back and test some more.
No more exhaust plug issues. At least something's going right.
Here's what I know so far for you guys playing w/the Ecotec engine.
My setup that doesn't change during testing: 33" Yokohamas (they claim to be 33" - I really don't know, doesn't matter - they don't change diameter) 8:1 gear ratio in the RPM Comet 108 four post clutch. Black spring, ATV Racing's weight arms (extremely heavy) Team Driven. Black/Orange secondary spring (180-280 lbs rate)
The car would hit the rev limiter (6,450 rpm) with all three of the setups I tested. It runs 82.28 mph max.
Once the clutches upshifted, the engine would go ahead and pull on up to rev limit. I was looking more at how the clutches shifted and how quickly I could get the car to accelerate.
First test run:
Helix tested: 62-52-27 (quicker upshift)
Engine runs in the 5.5 - 5.6K rev range. Will hit 6K off the line then drop back down to running range. Doesn't have the greatest backshift - sort of sluggish.
Front clutch hot spot 200F Rear clutch 150F to 170F (using an infra red thermometer)
Sluggish off the line, - heck, sort of sluggish everywhere.
Next test:
Helix tested: 62-50-27 (slower upshift)
Engine revs moved up to 5.8 - 6K rpm and would hit about 6.1K off the line.
Clutch temps went up. Front hot spot was 235F, rear 170F.
More lively off the line and across the board.
P/S steering pump now has popped the seal. I put it back in and went ahead and tried again.
Next test (last of the day):
Helix tested: 54-44F
Engine ran right at 6-6.1K rpm and would peak at 6.2 off the line.
Didn't seem to want to pull the top end as easily as the other helix, but it did top out.
Primary temp was 210F, secondary was 150F.
Will fix the seal in the pump tomorrow, test the fourth helix and then try a stiffer secondary spring with all four helixes - will make back shifting happen faster, but will slow upshifting. Not sure yet what that's going to do. Hence the idea of testing!
Don't know if I'll play with the primary's spring or not.
Front brakes are nice. Suspension feels good - but it seems to ride rear end low - sort of stink bug. It's smooth as can be, but just feels a bit funky.
I don't like the limited steering I have. Due to the four piston calipers trying to join the a-arms, I had to put in steering stops. Turning rate now is about like a Suburban.
The car feels pretty solid. Just have to work on the clutching and that stupid leaking pump.
Waiting on an Arizona OHV sticker and plates (street legal here in AZ! - not sure about Ohio, though....)
First off, I have to confess that I was wrong about my clutches fully upshifting. (noted above earlier) Did not see the little mark left on the unmovable sheave until this afternoon. I'm not using about 3/8" of the primary's outer edge. Neal says that's probably 10 to 15 mph. That puts the car at 95 mph once I move the tranny forward.
Moving the tranny forward isn't going to be as bad as I thought. Got some ideas at ATVR and I'm taking it there tomorrow. I may look into diving in and rotating it if they have room for me to work.
Still, even w/o being able to use all the clutch, my clutch tuning should apply directly to what I'll have once the center to center's correct.
As stated above, I have four helixes and two springs.
The four helixes are:
62-52-27 Quicker to upshift
62-50-27 Slower to upshift
54-44-F Quicker to upshift
54-42-F Slower to upshift
Both of the slower upshift helixes worked better than the quicker upshifting helixes. Engine revs went up more quickly, they peaked a bit higher and dropped back to a higher running range than the quicker upshift helixes.
I felt that the 54-42-F gave me the best out of the hole feeling and it got to about 60-64mph before it was fully upshifted (think of it being in top gear). Once the system was fully upshifted it was just HP and the engine working it's way to the rev limit of 6450 rpm.
With the center to center distance correct, my fully upshifted gearing will be higher (like I put a bigger counter shaft sprocket on it). I'm guessing full upshift will probably be closer to 75-80 mph and then the over rev on up to the limiter should get me closer to 90-95 mph.
This sort of verifies the 93 mph run I had w/the VTEC. It would spin just at 6.3-6.5K and the clutches fully shifted out correctly.
Secondary Springs:
Spring 1: 180-280 rate. This means 180 lbs of pressure at 2.2" long, 280 lbs of pressure at 1.1" long.
Spring 2: 180-300 rate.
The more upper pressure the spring has, the harder it is to pull the secondary clutch open and the harder it will close back up when you let off the throttle (back shifting).
BUT, it also slows down the upshifting a bit too. This actually works to my advantage with the amount of torque the Eco puts out.
Turns out that the heavier rate spring gave me a lot better out of the hole pull, as it holds the primary clutch faces open longer, hence putting it in a "lower gear". I could see that with the engine rev when I'd stab the throttle.
Get the car rolling at about 2500 rpm, let it get up to about 10 mph and then stab the throttle. I want the power plant to peak right at 6.1K rpm and then as the clutching starts upshifting, the engine should back down into the 5.8-6.0k rpm (meat of the power band).
Backshifting allows you to get the same sort of response as you would on a motocross bike by slipping and dumping the clutch - instant HP. You let off the throttle and then stab it and the revs will go up to that 6.1K mark, dropping it into a "lower gear". Then the upshifting takes back over and puts the engine in the peak torque area.
I can lighten the front end of the car quite a bit, even at fairly high rates of speed by a quick drop and then stab on the fun pedal with the heavier spring.
I tested all four helixes with the light spring. Once I saw that the slower upshifting helixes worked better than the quicker upshift, I decided to just try the two slower sets on the heavy spring.
The system worked really well.
The 66-50-27 seemed to sort of stall out about half way through the shift - it seemed like the car was hitting a little bit of a wall around 50-55 mph. Once it got through that, it went ahead and rev'd on out.
The 54-42-F worked the best. Great back shifting, put the engine peak at about 6.2 rpm and then dropped back to the 5.8-6K range. It pulled out of the hole nicely too. It's what I plan on running.
I tried to twist the camera to straighten up the video. It would appear that I twisted the wrong way. Ah, what ever!
This video's 4.3 miles in 4.5 minutes. The last left hand turn where I head for the truck - yea, I would like to have had more steering at that point.
Four more videos:
Same stuff, just different spots along the trail.
This morning I got the camera straightened up better, so the videos should be a little less neck bending now.
Heading over to ATV Racing this morning to do a full car go over - make sure things that are supposed to be tight still are, check the CVs, fluids, etc..
I'm hoping the woman from the AZ Title office calls - getting plates and AZ OHV stickers for the Dez and my Husaberg. Then I won't have to worry about Mr. Forest Ranger, 'cause I'm following the rules!
I need to get out at night too. Been too long since I've played in the dark.
I only have three days left before I head back to Hell, er, Ohio (sorry, I'm very bitter about Ohio and all that's there at the moment.... God I want out!) so I'm trying to make the best of it.
4/8/2010
So today I moved a transmission. I rotated it forward off the lower rear mount. It lowered my CV joints about .125".
I had a clutch center to center distance of 14.625". It was really hard to get the belt on/off - really hard, fight all the way. The belt also sat about 1/16" in the secondary clutch. Neutral was easy to find, so I'm betting that I was right there at that limit.
The jig that ATV has, has a center to center distance of 14.25". .375" shorter than what I was running. They run the same belt and clutches I run too.
I jigged up my tranny and engine w/ATV's piece and started redoing the mounts. It really ended up being pretty easy. Redrilled the front lower mounts and then capped them with another tab, cut the upper tube on the back mount down the middle then made another tube that sat up against it. Cap the bottom, weld the top and tada, all was good. I had to shorten the front upper mount's legs too. It took me about four hours.
Belts go on/off easily. Like way too easily (in my eyes). I've never had a belt on any of my stuff go on/off this easily. It does it on the other Ecotec powered Taz sitting at the shop - this is apparently correct?
Test rev in the parking lot and the belt now goes all the way out on the primary - it's fully upshifting. Woo hoo!
This should give me more top end. I wasn't using 3/8" of the outer edge of the clutch - like I said earlier, this should be like going one tooth larger on the counter shaft sprocket.
So out to the desert I go. First thing I notice is that the engine doesn't rev out to 6.1K and then drop back to the 5.8 or so it was yesterday. It only goes to about 5.8K rpm.
The car feels like it's lower geared - and it should, as the belt's riding farther out on the secondary clutch. But now the whole drive train feels "loose" or "sloppy" - there's a lag and the snap isn't there like it was.
It gets to top end quite quickly - but the problem is now the top end is 76.79 mph. I've lost almost 5 mph. I should have gained close to 10!
Back shifting is now sort of sluggish too.
So, what does this tell me? - that my incorrect setup was better than a correct setup with too long of a belt! Or too narrow of a belt...
I'm guessing that the center to center distance is shorter, the belt is getting all the way out on the primary clutch but not getting pulled all the way in on the secondary. I've, in effect, put a larger sprocket on the rear while upping the front sprocket - yielding a lower gear ratio.
Jay is running the same setup and is using a 14.5" center to center - which is also what Standfast had said.
I believe that Neal has a slightly different belt that he's using on the supercharged Ecotec. I'll talk to him about it tomorrow.
Interesting stuff.
I'll get today's videos posted here soon. I'm getting more aggressive (as demonstrated in the blown corner. ) and the harder and faster I push the car the more impressed I am with it.
IT'S ABOUT FREAKING TIME!!!!
4/9/2010
The camera angle's better today.
Where did that corner come from?
Power line road of some sort:
A lap and some around the place:
I'm getting braver and braver - much faster today even though the car doesn't go as fast.
Man, the camera's taking a beating. I can't believe how much it's jumping every time the car takes a hit.
I want to do a little night driving before I have to leave. Hope the camera survives.
Today I switched belts:
Was using a 138-5232-U3. Outer diameter is 53 5/16" long. (I'd think they'd do internal diam, as wouldn't the ridges make a larger OD? - oh well, it is what it is...) Width is 1 7/16".
New belt is a 140-5157-U4. (they don't offer the U3 series anymore - direct replacement is U4).
OD is 52 11/16" and width is 1 29/64th.
Shorter, wider.
I'm now actually using all my clutch faces. With the long belt on the short C to C, the front clutch was able to close fully - to the point that the moveable face was making contact w/the stationary face - left a little galled ring where it was hitting. No big deal, as it's not where the belt rides.
The new belt feels like the old belt did as far as performance - it has better "snap" than the longer belt did. The longer belt just had this "loose" feeling - sort of like if your torque converter was slipping a tad. There was a spool up/down feeling and it all felt mushy.
With the long belt on the original long C to C, the system had snap, felt good. Now the new shorter, wider belt's brought that feeling back.
The only issue is that now the engine won't hit full rev. It peaks out at about 6.1K rpm. 83.08 mph. I think I've probably hit that wall of drag. (and to the new guy that wants a car that goes 130 mph on a budget: HA HA HA HA HA!!!! Yea, right. Each time you double your speed, you square the drag.)
So I'm back to running 83 mph, the engine's not strung out and bouncing off the rev limiter and overall, it seems pretty darn good.
I tested three setups:
Same clutch as I last ended with with the first tranny position: 180-300 lb spring on the 54-42-F helix. Max speed 83.08 mph. Full face usage, pretty high temps, though. 240 on the primary, 180 on the secondary. Belt temp was 200.
Max rpm was 6.1K, ran in the 5.6K range. Back shifting was a bit sluggish.
Second setup - dropped the other clutch in with the 180-280 spring and the 66-50-27 helix. (since I saw similar changes and the two slower upshifting helixes were the better of the four) 6.1K max, 5.8 rev range, better back shifting. Top end was 82.7 mph. I forgot to take temps.
Third setup (and still on the car)
I put the 54-42-F back in the 180-280 spring setup.
81.25 mph, 240 F, 150F rear. Pretty good back shifting, but not as good as with my too short of belt (too long of C to C) setup before I moved the tranny.
So, I have the right belt for the C to C distance.
I need to slow upshifting a little more. Not sure whether to loose a little weight in the front clutch's arms or to go with a different helix.
I'm thinking that I'll probably start out w/a helix - 54-40 / 54-38 combo. Not really sure yet.
4/10/2010
I fell asleep after a couple hours of reading Aaen a couple nights ago. Aaen is the CVT clutch tuning "Bible" for those of us that use this system. It's really nice to be able to apply what I've been reading over the years now and understand it all.
I think I'll start out simply by seeing if I can slow the upshift with the helix. After that I'll start messing with the weights.
Slowing the upshift effectively holds it in a lower gear across the board and hopefully make the car a little quicker out of the hole and hopefully let the engine rev out a little bit more on top - I'd like another 100 rpm on the nail the throttle off the line or when trying to get the front end light for bumps.
Then again, I can spin the rear wheels just about at will, so do I need much more acceleration? Yea, it'd be nice.
Like it was said on Minibuggy.net: "Chase your tail."
Took the car out with James last night. Had a great time and got about 25 minutes of video.
The only real changes I did to the suspension since Plaster City in January was to up the front spring rates and get the front end to sit a little higher. James couldn't believe that just getting the car to run faster and stay up on top of stuff would make that much of a difference. "You have to have done more than just change springs, right?" - he must have asked me that a couple of times.
The front lights work extremely well. The little 4" HID Fuego Sol-Teks from Baja-Designs. They light up what's out in front really nicely and with a bright white, wide spread pattern. I'm really pleased with them.
The light bar has four of the Light Force HID units on it. I need to get a different diffuser lens so I have a broader spread of light instead of the two spots in the middle and the wider angle spreads out on the sides. They also seem really yellow in comparison to the Fuegos.
I have to get a better actuator for my lights. This one's too fast in reaction and doesn't have enough holding power. At about 50 the lights start rotating back from the wind drag on them. If there's some way to gear the unit I have lower, that would work too. I wore my finger out trying to keep the lights pointed the right way!
I also need to move the actuator switch to a different spot. It's not in a good place to operate while driving. Right now it's down below and behind the brake bias lever on my left side. I really need to move it to the steering wheel - that's going to be an interesting wiring setup...
Watch the overhead lights as I drive. Speed up, watch them rotate back, I'd bump them back down so they'd shine on the ground out in front of us again and then wait for them to start rotating back again. It was really bad when I'd over shoot lowering them and then try to bump them back up just a hair. They'd just take off and shine up at the starts. It was kind of funny, actually. - and I'm really glad the little 4"ers work as well as they do...
The Dez topped out at 79.9 mph with the lights. I figured that would cause more drag and drop more top end off - I expected 5-7 mph top end loss, to be honest.
Here are three clips from last night:
4/25/2010
Back in Ohio (for a little over a week now). I've gone over the 10Dez and the only thing that I've discovered that needed attention thus far was my left upper front spindle's ball join/high mis-alignment spacer had come loose. The bolt had wallowed out the two spacers and the top of the spindle. I machined a new pair of spacers and bored out the top of the spindle. The bottom spacer was pressed into the top of the spindle and then welded up. Hopefully I'll get a chance to take the car out to a local motocross track and run around the property a bit to do a little more shake down testing here soon.
The race plans for the 10Dez are to hit Snowflake in September. I figure it's fitting. I love the track, it's the first place I ever saw/attended a desert race and there's a bit of nostalgia to it all.
As stated earlier, "IT LIVES!" (again). Hopefully from now on it will be little modifications, up keep and general repair that goes along with owning a desert race car.
Time will tell!
Been working on little attention to detail things on the car over the past few weeks.
I made mounts for two spare belts . They now reside against the body panels next to where your elbow would hit the frame. There's a nice "box" area between the upper frame rail and the window opening that the belts fit in perfectly. I made a couple of Z bend rails that are held in with the Dzus tabs that hold the upper body panels to the car. Squeeze the belt, put it in the mount. Removal is just as quick.
I have room behind my seat on the fire wall for a couple more of these mounts - I've just been lazy and not tried to mount them yet, as I have to remove the seats and both pieces of the fire wall to get them attached. I need to make a similar mount for the tow rope too; it's riding under the driver's seat at present.
I also got the first aid kit mounted and made a mount for the Snap-On 1/2" impact wrench that is used for tire changes.
I've also redone the light bar's actuator mount. I moved the point that the actuator attaches to the bar up away from the pivot point about 6". It now moves more slowly, doesn't pivot as far (which is fine - I was able to pivot it from pointing at the moon to pointing at my toes) and the leverage that the bar put on the actuator should be cut down to about a third or so of what it was.
With any luck, I won't be shining lights at the sky once I get above about 40 mph or so anymore. The four lights on the car are about as aerodynamic as a three car garage and put a lot of force back into the actuator in it's old position.
I also moved the switch that I actuate the light bar with from down low in the side of the car to up above the brake bias lever. I discovered that the original spot was just too far back and low to comfortably operate last time I was out playing in the dirt.
There were two other things that I didn't like and that needed attention paid to also:
The first one was the back of the car gets awfully hot when running. There's not much air flow to the muffler/headers at all and the tubing around them was getting upwards of 150F. I made a heat shield that sits right over the top of the muffler. It wraps around the back of the header and keeps the heat away from the spare tire and the rear tail/brake lights. I need to either send it off to Millbilly and have him ceramic/heat barrier coat it or see if my local powder guy can do it.


I'm trying to figure out a way to duct cool air from the side of the car down onto the exhaust system to help get some of the heat out of the back of the car. I think I can fairly easily duct air from the navigator's side down, but that forces the hot air right over the top of the driven clutch. That thing already runs pretty hot (and I wonder if it's not exhaust related), so that direction is not really a good plan.
Unfortunately, ducting it from the driver's side down and then out over the tail pipe isn't as easy as doing it the other way. There are a couple catch cans in the way of where I want to take the cooler fresh air. I need to study this a bit more.
One other thing that I never liked about some of my aluminum work was the dust light bar. I'd made it fit (sort of - fairly cheesy) over the upper radiator mount. Never was happy with it.
Since I've been feeling the need to be creative and fab something up, I decided to redo the aluminum work for the lights.
First off I made a flat panel that stretched across the back of the car above the radiator. I had to make a clearance area for the radiator cap too. I'm not showing anyone the horrid welding on the back side of the panel. But the front side blended nicely and looks, dare I say, fairly professional!

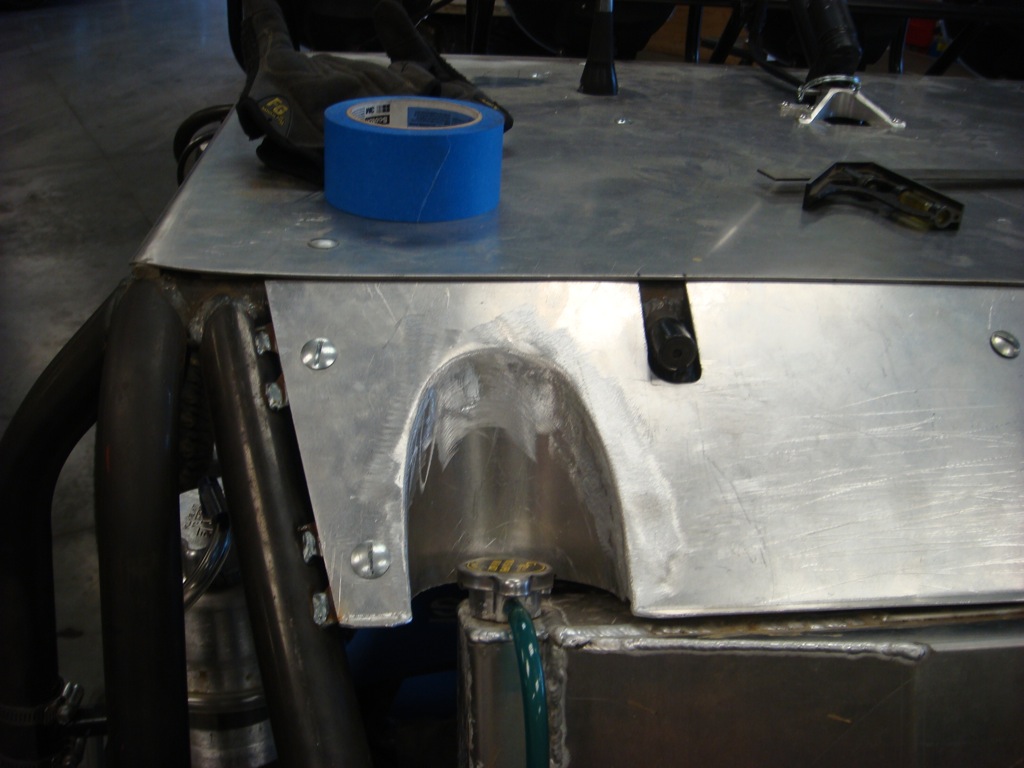
Next it was see where the lights would fit. In the pic below you can see the original light mount that went around the upper rad mount:

Next I made a box that the lights fit into and that got mounted to the new panel. Not sure why this thing welded up so much better than the clearance area around the radiator cap, but it sure made me happy that it did. I cleaned and prepped the same way on all the welding - sometimes I just SUCK at TIG welding, I guess...


Test fitting of the lights in the box and then the new box:


Got the box welded in place - some went really nicely, some of it went ugly. I did a lot of grinding and blending on this. I was dealing with some warping and the gap between the box and the panel was being a beast. I tried tacking about every 2" or so, but it still wanted to warp a gap between the pieces. Oh well - I'm still happy w/the results. Just made more grinding work than it should have.

Finally got it all finished up and wired:

I'm waiting on my jack to show up. I'm not quite sure where it's getting mounted yet. I'm hoping it as small as I think and that I'll be able to mount it on one of the down bars on the back of the car. If it doesn't fit there, hopefully it'll fit under the spare tire at the back, just above the new heat shield.
I'll try to remember to get pix of the other little mounts and such that I've done. The belt holder idea is one that other CVT users will like if they have enough room in their rides.
I do believe that body panel powder coating may happen here soon.
I'm only 10 months on updating my pages. Unfortunately Life has managed to get in the way of doing so but that said, I have been working on the 10Dez, have actually raced it and have a lot of seat time in it. Looks like I need to step back and start from my last installment of info way back on 5/25/10
5/25/10
Belt storage: It's so simple it's stupid, but it works very well. I rounded all the edges and they sit above where your elbow would tend to hit. They stick into the cabin area about 1/4" - very minimal invasion.

Impact wrench and first aid kit.: I'm not sure if the one bungee will hold the impact in or not. Testing will tell.
The 3/4" socket fits into a short piece of tubing on the lower frame rail and there's a small rubber pad underneath the battery to help keep abrasion and such down.
There's a bungee across the first aid kit. It goes from the lower left corner across to the upper right corner. It all fits in the frame, tucked in against a couple of tabs and is held against the body work.

This is the box beside the driver's seat. A quarter turn fastener releases the lid. Simple, fairly crude, but effective: I can almost stuff a six pack of water or Propel in this box. No carbonated stuff - that makes one serious mess!

6/12/10
Still waiting on my FOA jack. Ordered it May 11th and a month later I should be close to receiving it (at least I hope!).
I stripped all the body work, firewall and pretty much anything that is an aluminum panel off the car this week and DA sanded them all down to nice shiny (albeit pitted in areas and just plain wadded in a couple where the frame dragged when it was a three wheeled wonder) aluminum and off to powder they went.
A few red parts - belt storage pieces, spare box
A few semi-gloss black parts - fire wall, dust light box, tail light panel
Two white pieces - the shields for the back side of the front shock towers
and a lot of bright yellow body panels. The car should stand out like a sore thumb.
While I had the firewall out I was able to make another belt storage spot and a place for the tow rope to live.
I also went through the chassis and finally hard mounted a few things that needed attention. My feed line for the power steering went from being on the left side of the car (w/the VTEC) to the right side and it was just zip tied in. Now it sits in nice little clam shell mounts.
Cut out a few unused tabs
Correctly mounted/plumbed my fuel tank vent line - James and another buddy of mine did a good field job when we had to get it in, but now it's a little more neatly setup and plumbed.
I'm on the fence about keeping the steering damper. It was a pain to get, I like the mount and install, but w/the power rack that I'm running, I don't believe it's needed. It would save about 10 lbs up front by removing it. It will also allow me to make the under the nose panel one piece instead of three that, as much as I hate to say it, don't really fit that well.
There are two wire harnesses that I need to remount and one of them needs to be rejacketed.
Ah the little things!
This winter, I'll probably strip it down to the frame, make sure everything's good and then get the chassis powdered clear.
After FOUR long years (the car was started in July of 06!), I'm finally getting those last little pain in the ass attention to detail things buttoned down.
I think I might actually have a race car that works! WOO HOO!
6/29/10
Got the jack last week and the body panels back today.
The jack's a cool little unit. Very light, compact and picks up the corner of the car w/almost no effort at all.

It tucks just under the spare and between the Parker Pumper and the frame rail. Pull a pin and it comes right out.

The jack uses a pin that fits into a thick walled piece of tubing that's welded to each suspension component.

Put the impact wrench in the top, pull the trigger and up comes the wheel - not the whole car, just the minimal lift required to put some distance between the wheel and the ground.

YELLOW DOG RACING lives!


Stickers are being put on tomorrow. I needs them desperately.
The car's finished (again and hopefully "finally"). I spent a bunch of time going over little attention to detail things. - power steering lines are all routed and fastened down, roll over tubing's been redone and re-routed, obviously the paint, belt and tow rope storage. Lots of little things...
9/19/10 Let's go short course racing!
I was talked into hitting a local race. A group called MAORA brought a race to Hamilton, OH. The track ended up being about forty five minutes from my house. They ran a sprint race on Saturday and a three hour endurance race on Sunday. I took my Briggs car to the race on Saturday and then dragged the 10Dez out for the endurance race on Sunday. I figured that a three hour thrashing would be a great test. Boy was it!
I took my buddy Chris (who works in my shop and has helped me with carbon fiber work - the hood and dash) with me. He'd been to the race I attempted out in Vegas a couple of years ago, but he'd never seen short course racing. I threw him in the passenger seat and off we went.
I had no clue what to expect - I'm 2140 lbs and set up for the desert - and had Chris riding shotgun and waving at the crowd every (80) lap... Some of these guys have real short course race cars. Light, quick, agile.
None of them have their suspensions dialed in very well.... I got to see a lot of very stiff, bucking cars this afternoon. There were a lot of comments by other drivers after the race about how well the Dez's suspension seems to be set up. It soaked up anything and everything thrown my way. The car flies well off the jumps too.
We had the win in the bag - but not at the checkered flag. I had two laps on everyone and we'd dropped back to cruise control. Popped a belt about 30 minutes from the end. I was out of and back into the car in under 2 minutes. The belt had a lot of miles on it, so I'm not upset about that at all. About 10 minutes later the front right corner suddenly started rattling and then we lost steering after landing off a jump.
Turns out that the upper ball joint on the spindle pulled out of the body, let the spindle rock back and snap the outer heim on the tie rod at full droop. I have already redone the left side spindle due to the same issue.
Oh well. We ended up placing third. Can't complain about that.
Here's about 10 minutes of video of the second leg of Sunday's 3 hour enduro.
I forgot to turn the camera on before we left the line, finally remembered about 10 minutes into the race. Unfortunately there's a dirt clod stuck on the camera's lens (that sort of looks like a poodle) so the video from the first half of the race is a bust.
They stopped the race half way through for track watering and I remembered to attend to the camera - clean the screen. I forgot to start it as the flag dropped, but remembered on the second lap to turn it on.
You'll see how quickly the camera gets muddy again - fortunately it's not totally obscuring.
You can see our speed if you watch the GPS screen. The fastest we hit going into the back corner was 73.8 mph. The tight 180 degree left hand corner after the straight dropped us down to about 10-15 mph and it seemed like we were just crawling through it after the high speed entry.
I took the 10Dez back to the shop and fixed the broken stuff. It was a pretty easy, straight forward fix too - heck, I'd already done it to the other side, so I knew what I was doing this time.
This was the last thing that the 10Dez got to do until I left Hell (Ohio) and headed out to Phoenix for the month of February. And what a blast Feb proved to be!
3/6/2011 - Home, unfortunately. I like Phoenix in Feb!
February's always been the month of pack it up and go play in the dunes. My riding buddies and I head out west and spend a week playing at the dunes in So-Cal. This year we decided to change it up a little bit and hit the Dumont Dunes, in the Death Valley area, first and then head to Glamis for the rest of the week, commencing the week with President's Day Weekend. It's fun watching the crowds cruise in and the place go from being dead and quiet to madness all around.
Dumont play Gecko to Gordon's 15 valves leaking seals letter rip!Return Home
3/6/11